
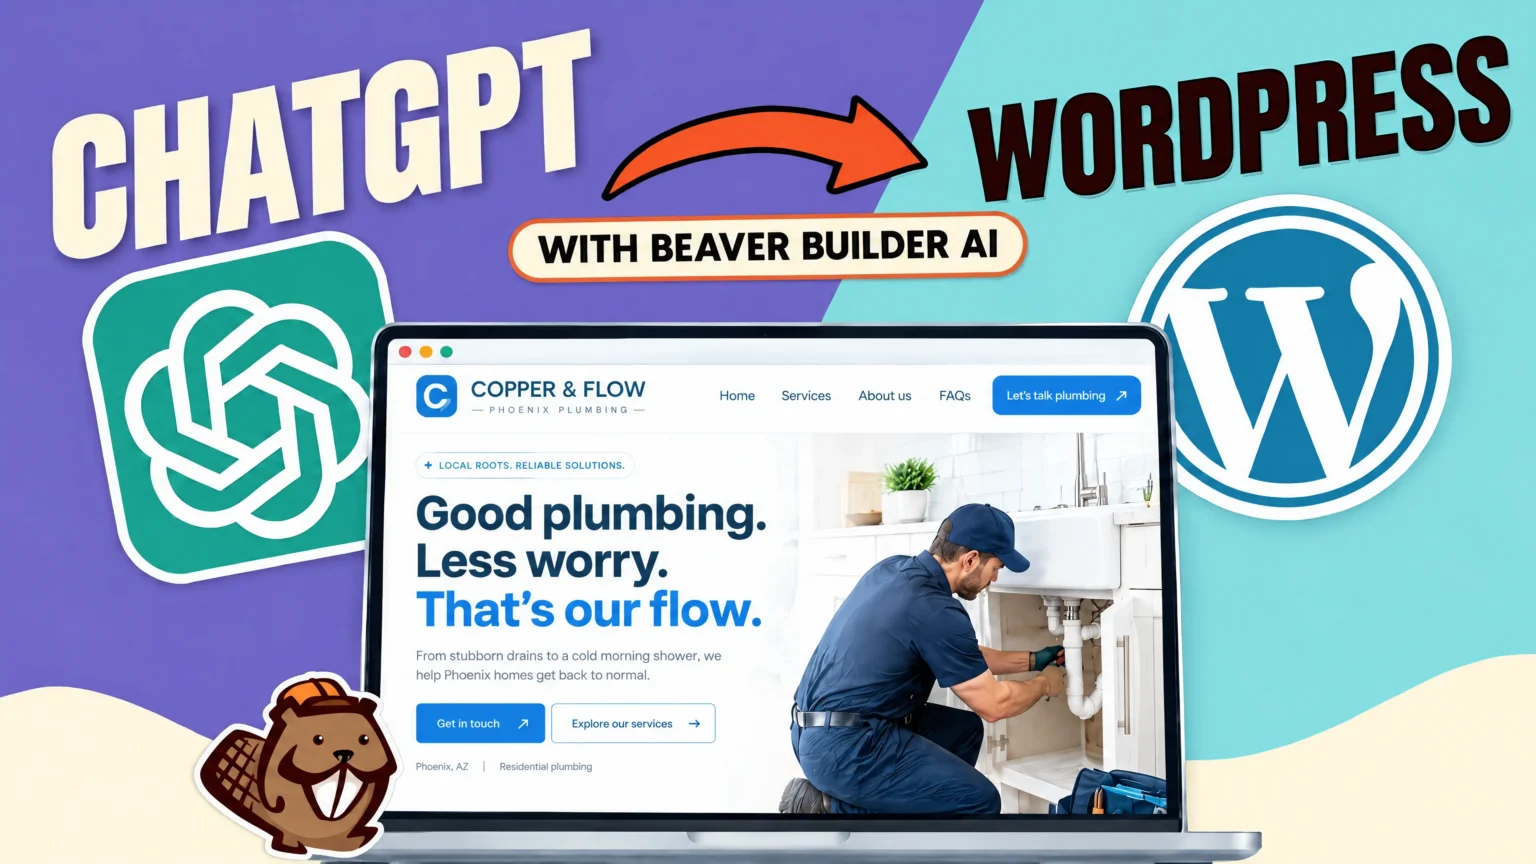

Hey everyone! If you’ve built a website design in ChatGPT, you’ve probably wondered how to get your ChatGPT site to WordPress. Do you really have to rebuild the whole thing by hand?
Good news: you don’t. You can convert a ChatGPT site to WordPress with the Beaver Builder AI MCP connection. It links ChatGPT to your site, and then ChatGPT builds the page for you right inside WordPress.
And the best part? The page you end up with is fully editable in Beaver Builder, just like any other page you’ve built.
TL;DR: Connect ChatGPT to your WordPress site with the Beaver Builder AI MCP connection. Give ChatGPT one prompt, and it rebuilds your design as a draft WordPress page, with the images in your Media Library. Then edit it in Beaver Builder and publish. Want to test Beaver Builder AI first? Try it free, no download required.
I walk through the whole thing in the video below. This post follows the same steps, so you can read along or skip to the part you need.
In this post
- What you need before you start
- Part 1: Connect ChatGPT to WordPress
- Part 2: Convert your ChatGPT site to WordPress
- Part 3: Edit the page in Beaver Builder
- Who this workflow is for
- FAQ
- Try it on your site
The design I’m converting is a homepage for a made-up Phoenix plumbing company called Copper & Flow. I designed it in ChatGPT, and any site you design there works the same way.

What you need before you start
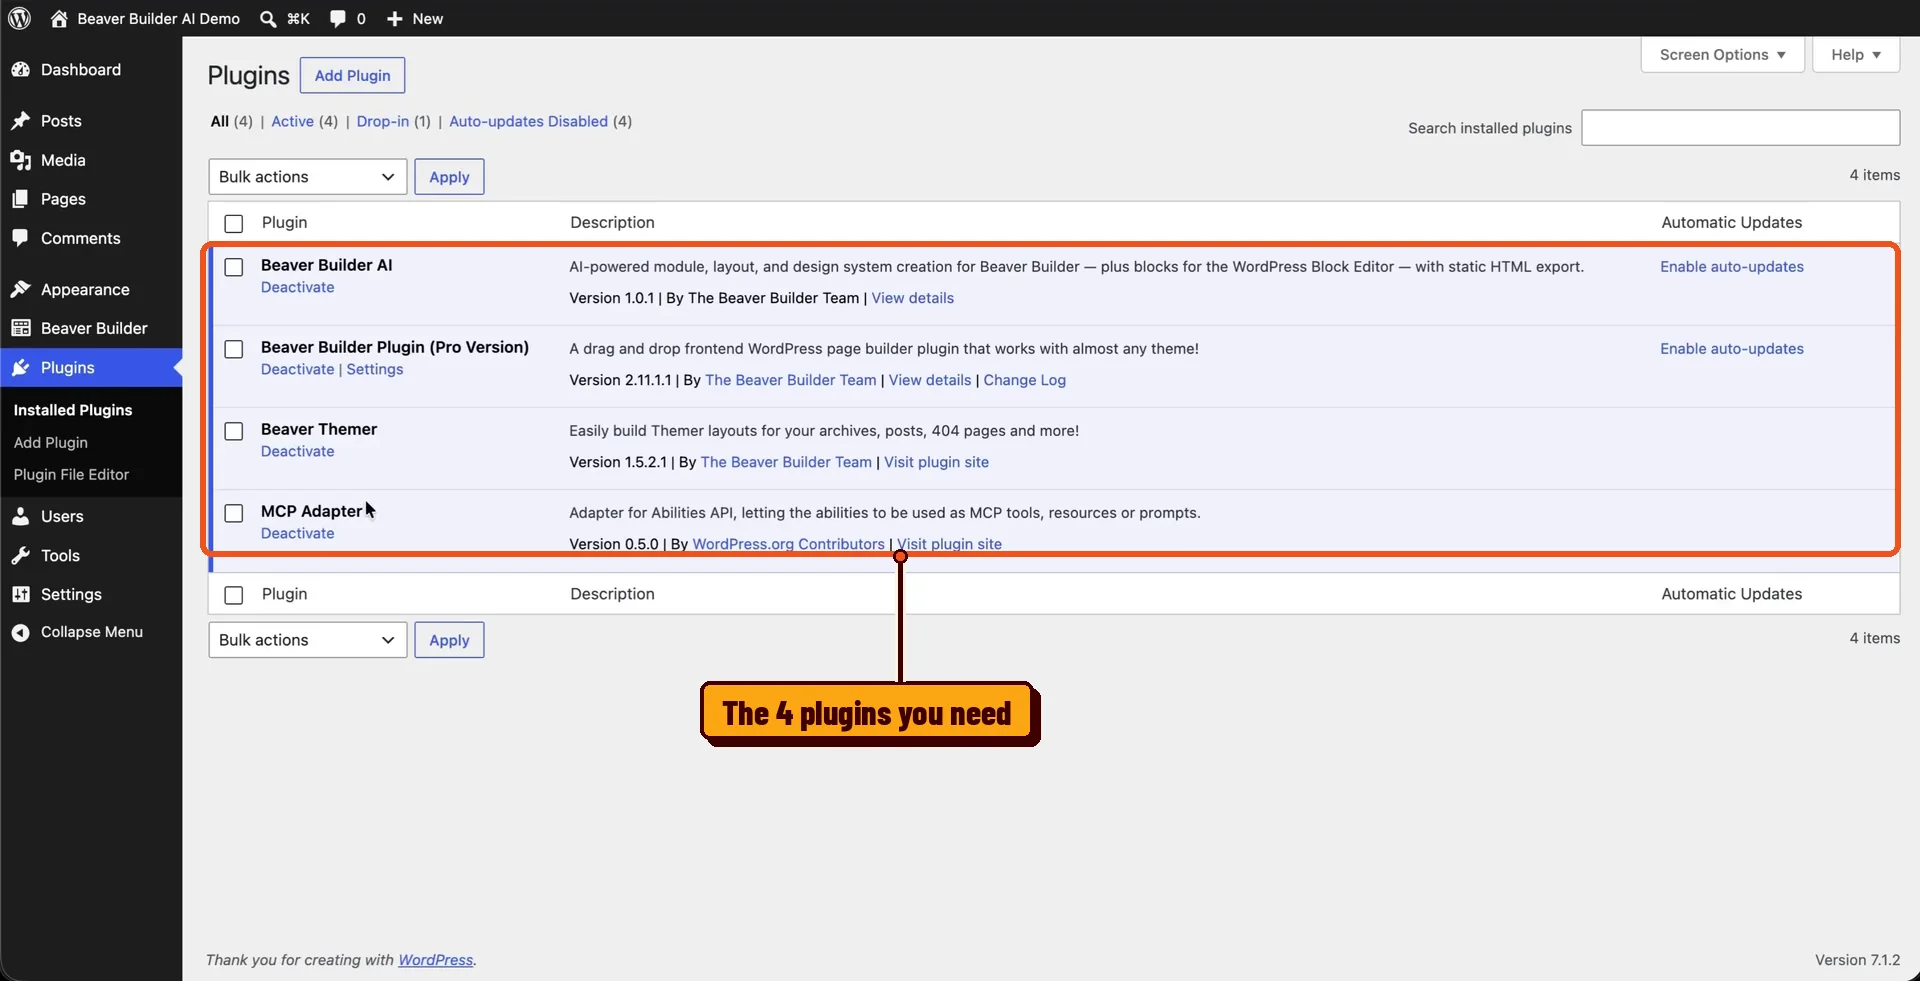
Here’s what I had installed for this tutorial. Get these set up first and the rest goes a lot smoother.
- A WordPress site that’s live on the internet over HTTPS. A site that only runs on your computer won’t work.
- The Beaver Builder plugin
- The Beaver Themer plugin
- The Beaver Builder AI plugin. I’m on version 1.0.1.
- The MCP Adapter plugin from the WordPress.org contributors.
- A theme. I used the Beaver Builder theme and child theme.
- A ChatGPT account that can add custom MCP apps. More on that in Step 4.
Don’t have Beaver Builder license yet? The plugins and theme come with a Beaver Builder plan, learn more from our pricing page. Already a customer? Your downloads are on your My Account page.
Part 1: Connect ChatGPT to WordPress
First, you connect ChatGPT to your WordPress site. It’s a one-time setup, and once it’s done the connection stays in ChatGPT for your next project.
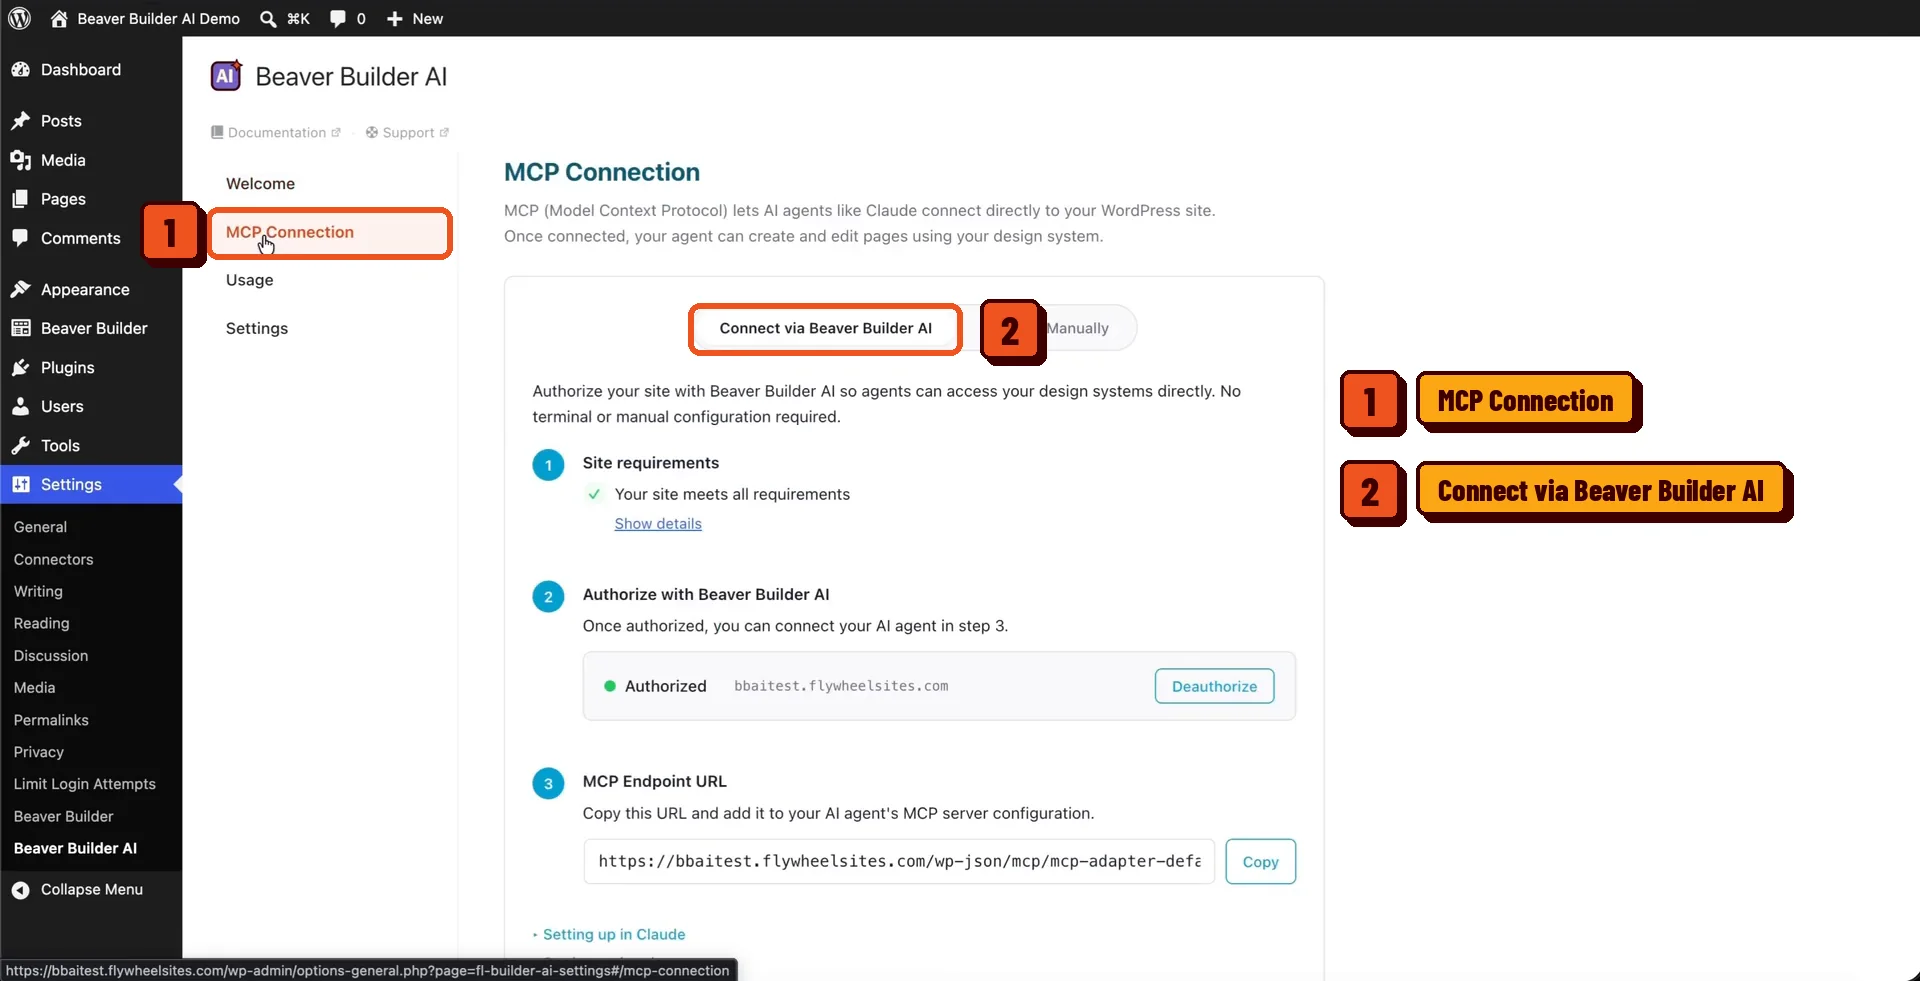
Step 1: Open the MCP Connection settings
In your WordPress dashboard, hover over Settings and click Beaver Builder AI.
The first screen has a couple of short videos. If you’ve never set up an MCP connection before, the MCP Connections video is worth a watch. It’s only about two minutes long.
Click the MCP Connection tab on the top left. You’ll see two options: Connect via Beaver Builder AI and Connect Manually. I used Connect via Beaver Builder AI.
Step 2: Check the site requirements
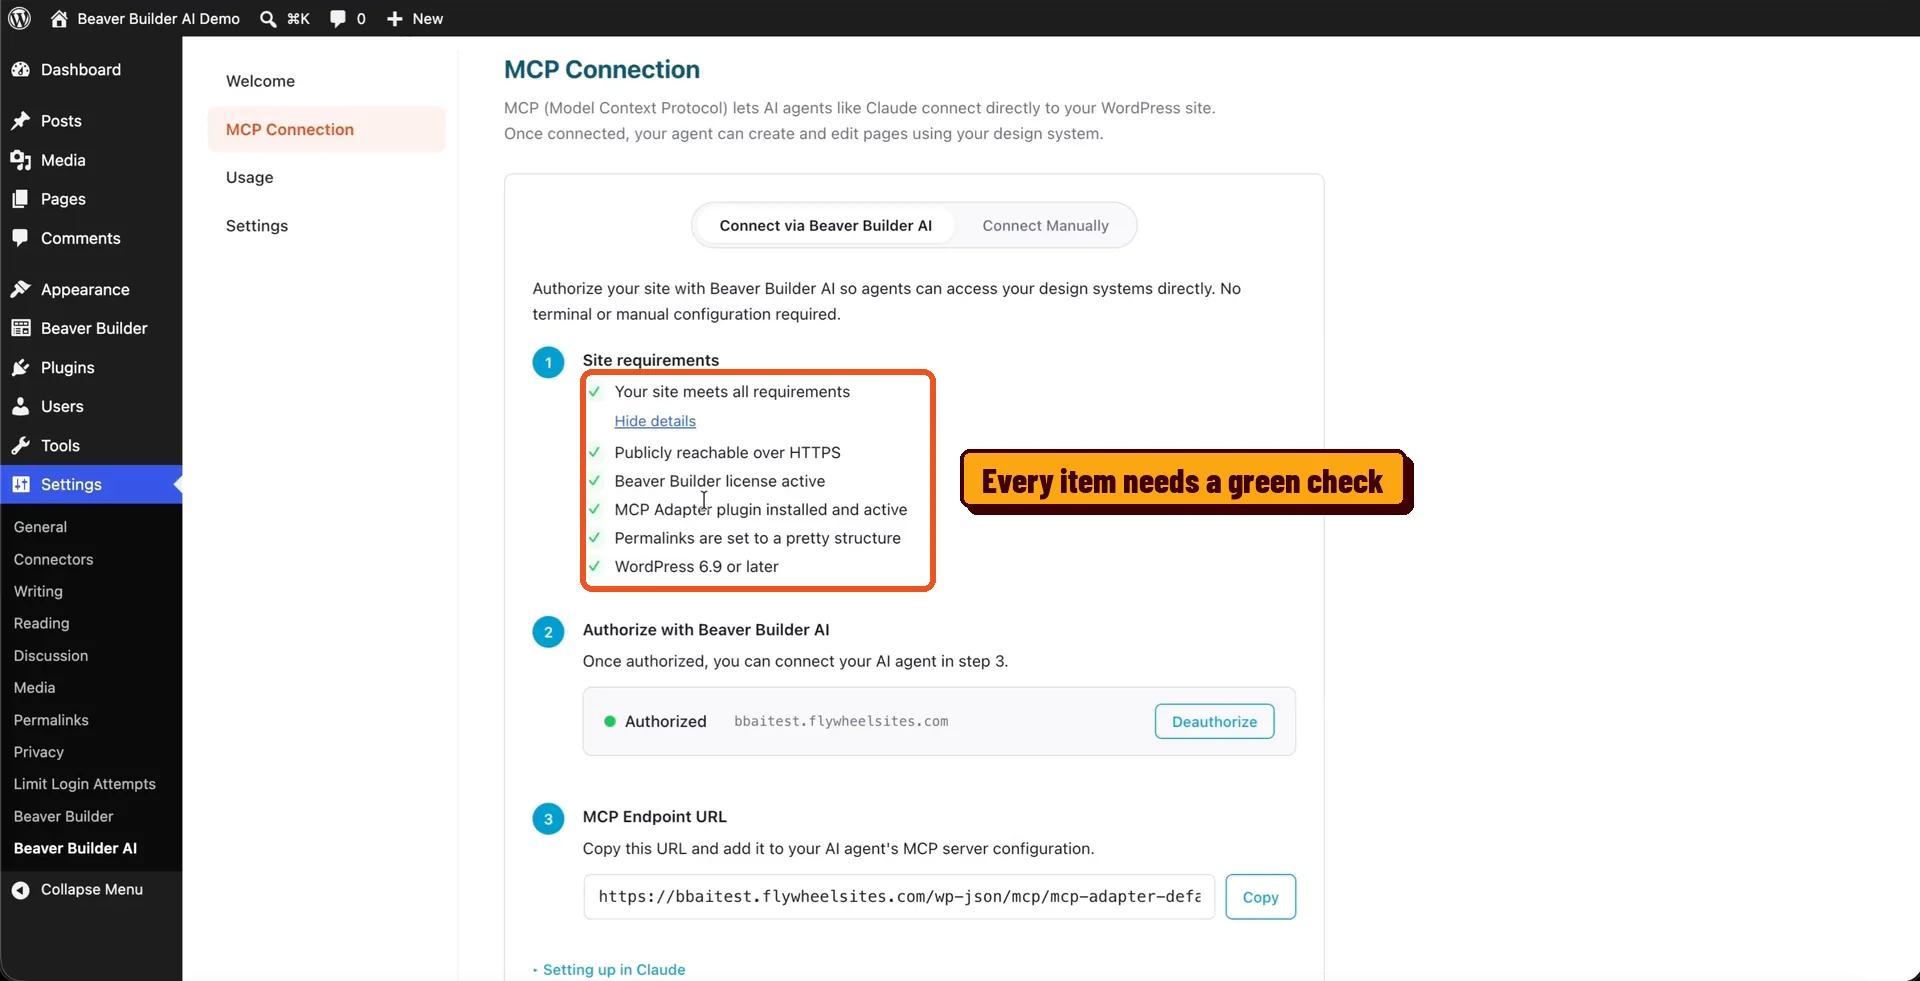
The page gives you a short checklist. Every item needs a green check before you move on.
- Your site is publicly reachable over HTTPS.
- Your Beaver Builder license is active.
- The MCP Adapter plugin is installed and active.
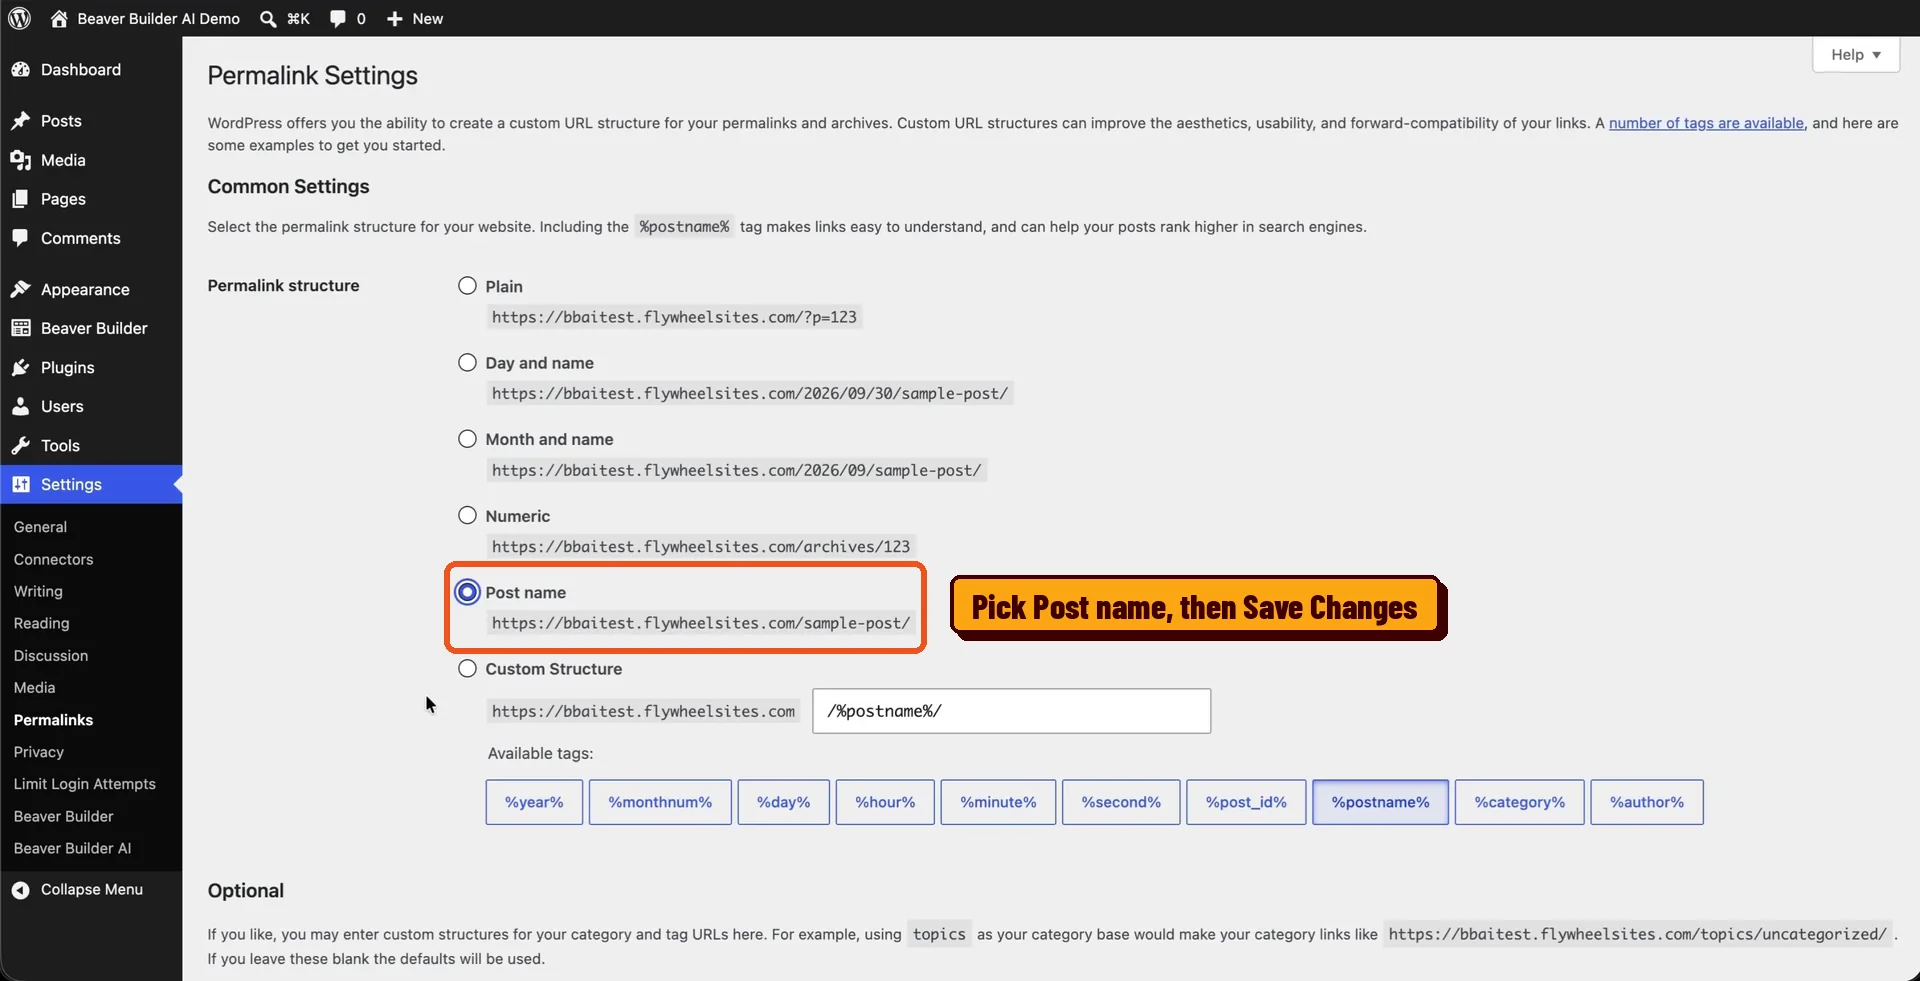
- Permalinks are set to a pretty structure.
- You’re on WordPress 6.9 or later.
Not sure what a pretty permalink structure means? Go to Settings > Permalinks. Brand new WordPress installs are sometimes set to Plain or Numeric. Pick Post name, then click Save Changes. (WordPress has a full guide to permalinks if you want the details.)
Step 3: Authorize and copy the MCP endpoint URL
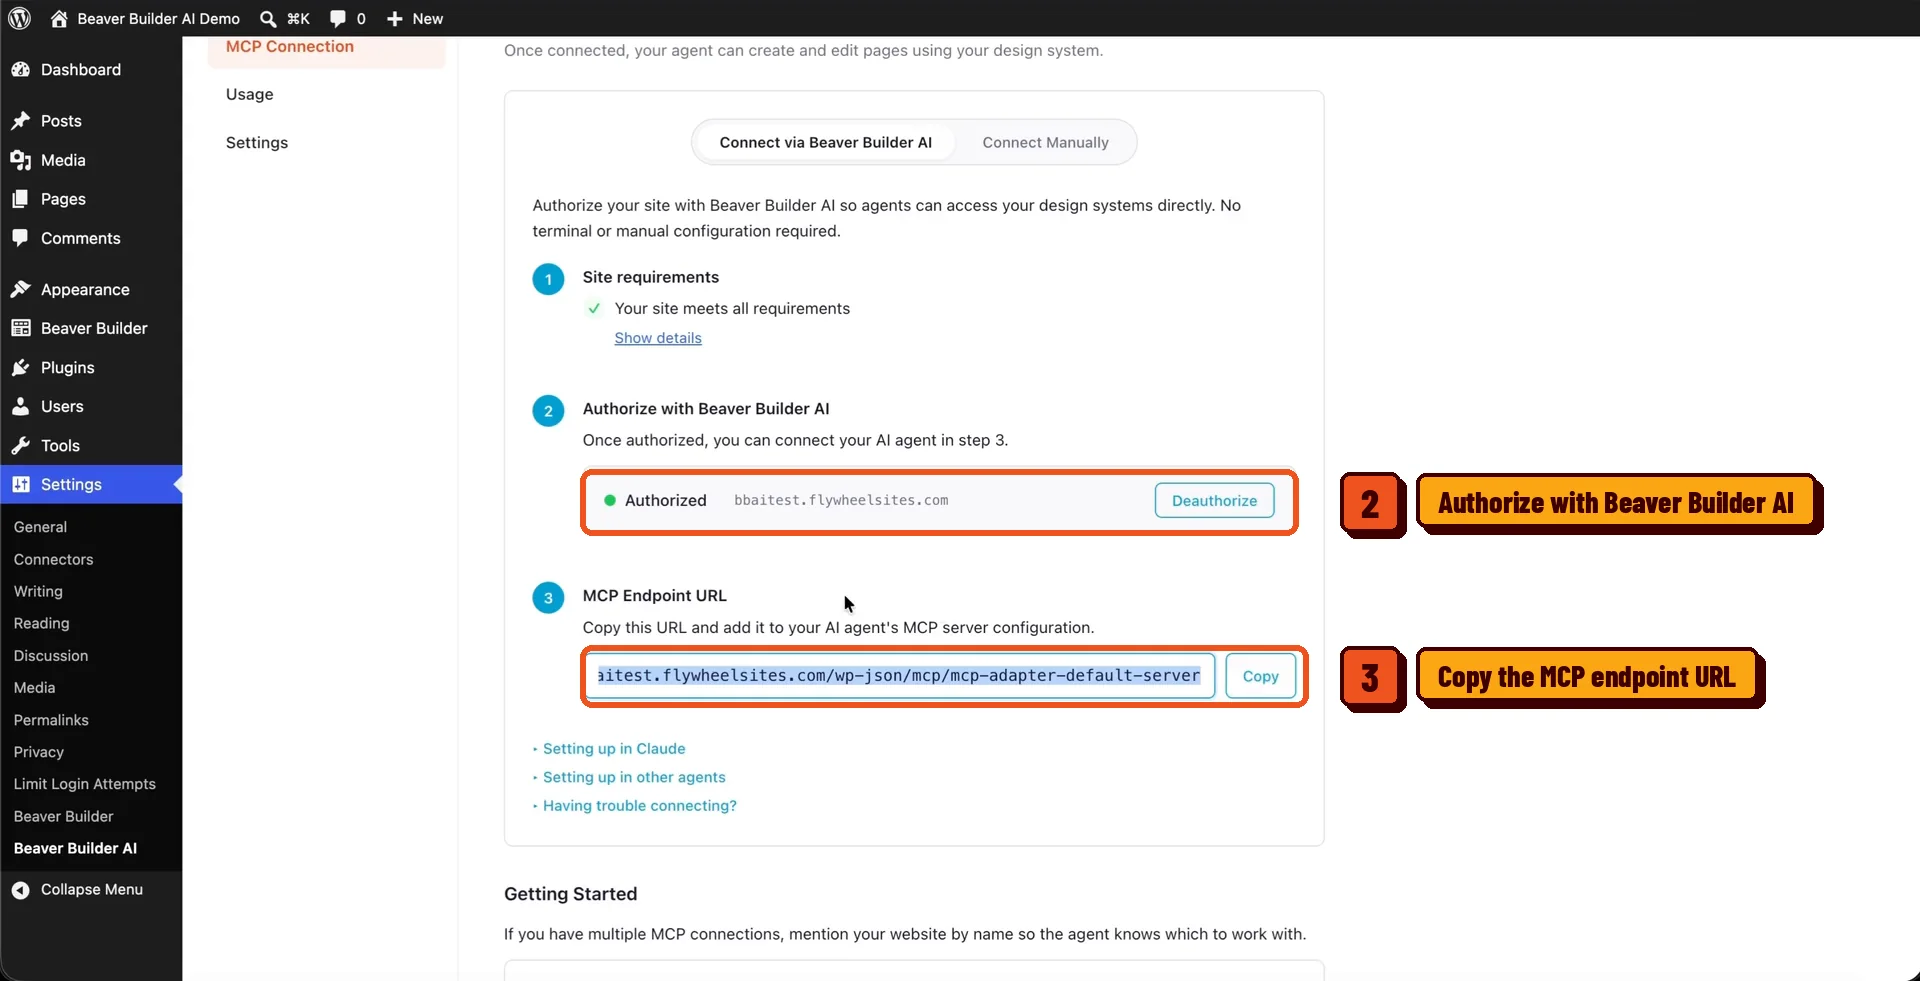
Head back to Settings > Beaver Builder AI and open the MCP Connection tab again.
Step two on that page is Authorize with Beaver Builder AI. Mine was already authorized. If yours isn’t, click Authorize.
Step three on that page is the MCP Endpoint URL. Click Copy. You’ll paste it into ChatGPT next.
Step 4: Create an MCP app in ChatGPT
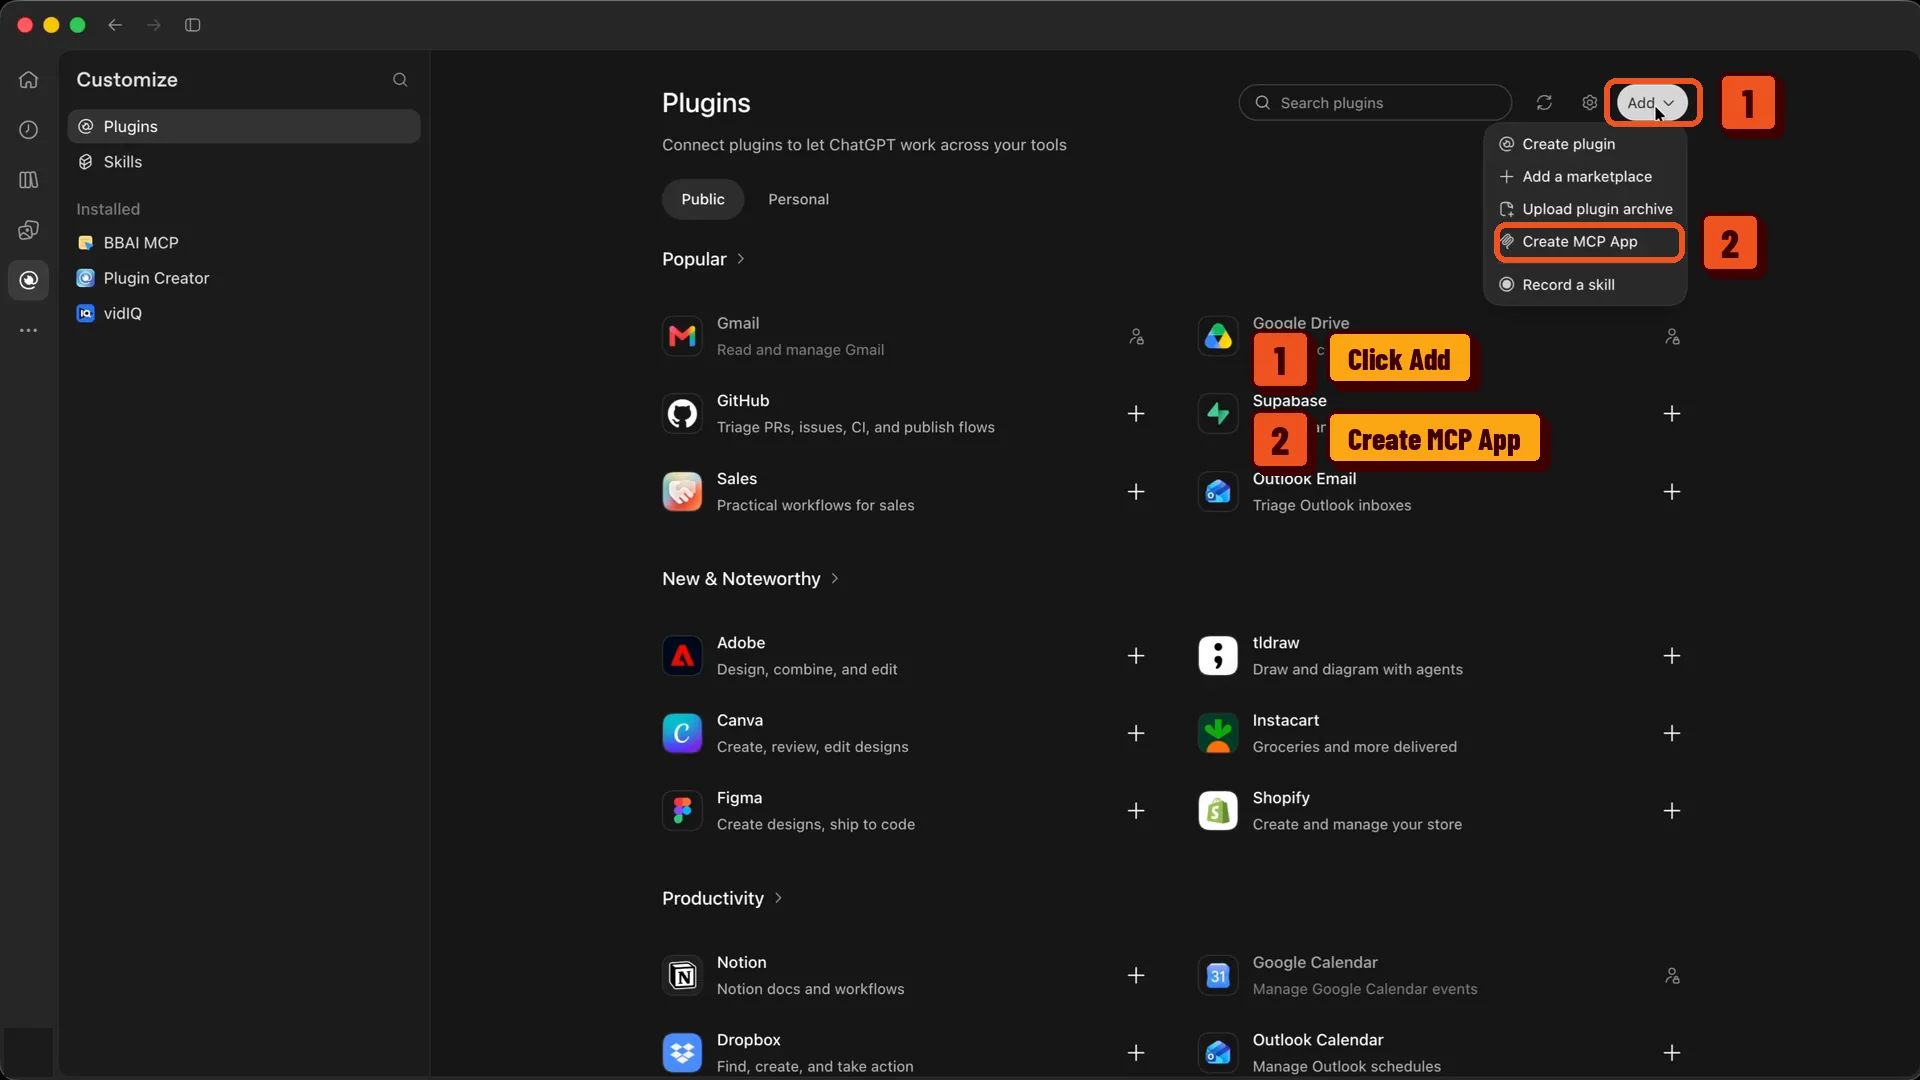
Now open ChatGPT. Click the Plugins icon, then click Add and choose Create MCP App.
A New Plugin window opens. Fill it in like this:
- Name: anything you like. I call mine BBAI MCP.
- Server URL: paste the MCP endpoint URL you copied from WordPress.
- Tick I understand and want to continue.
- Click Create, then click Authorize.
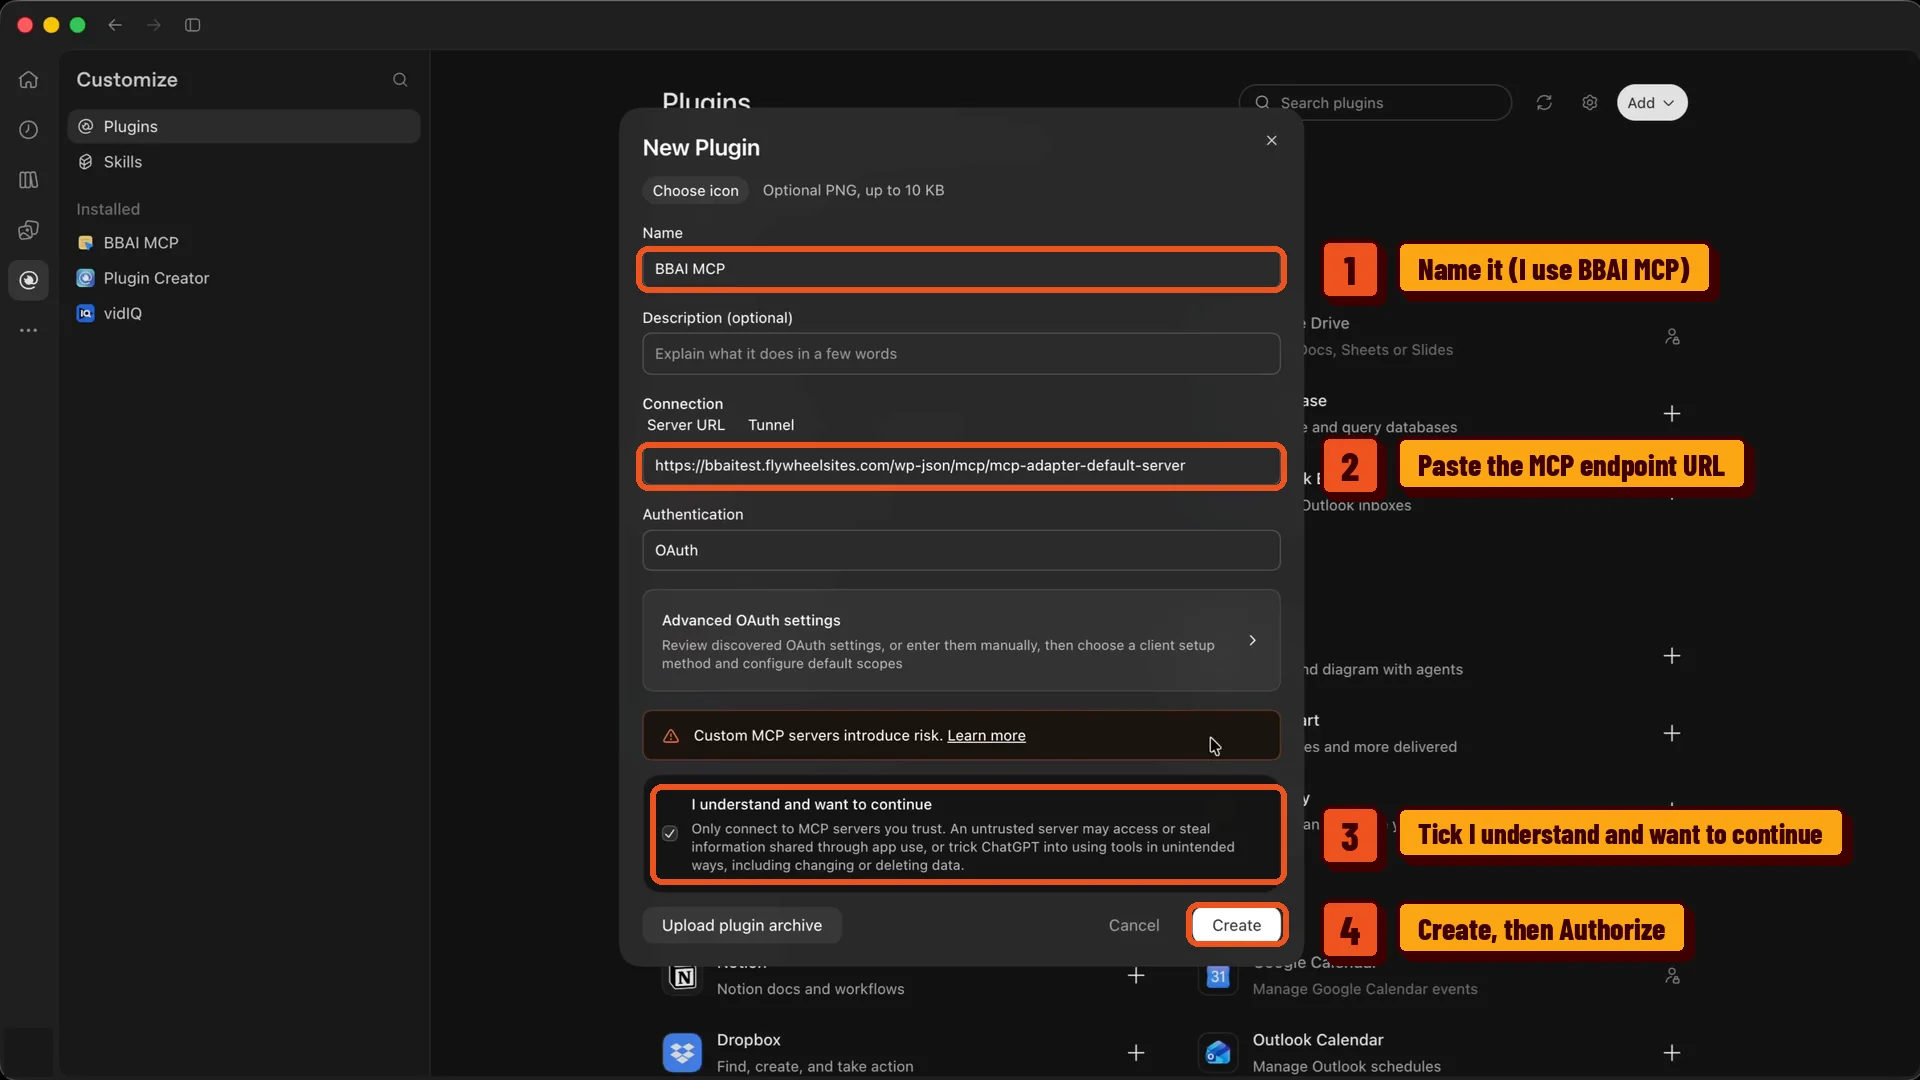
You’ll notice ChatGPT shows a warning that custom MCP servers come with risk. That’s fair. Only connect servers you trust, and here you’re connecting your own WordPress site.
Don’t see Create MCP App? Custom MCP apps are still a newer ChatGPT feature, and what you can use depends on your plan and settings. OpenAI’s help article on developer mode and MCP apps has the current details.
Step 5: Make sure it’s connected
You’ll know it worked when your app shows up in the left sidebar under Installed. Mine says BBAI MCP. You can turn it off or remove it from there later if you need to.
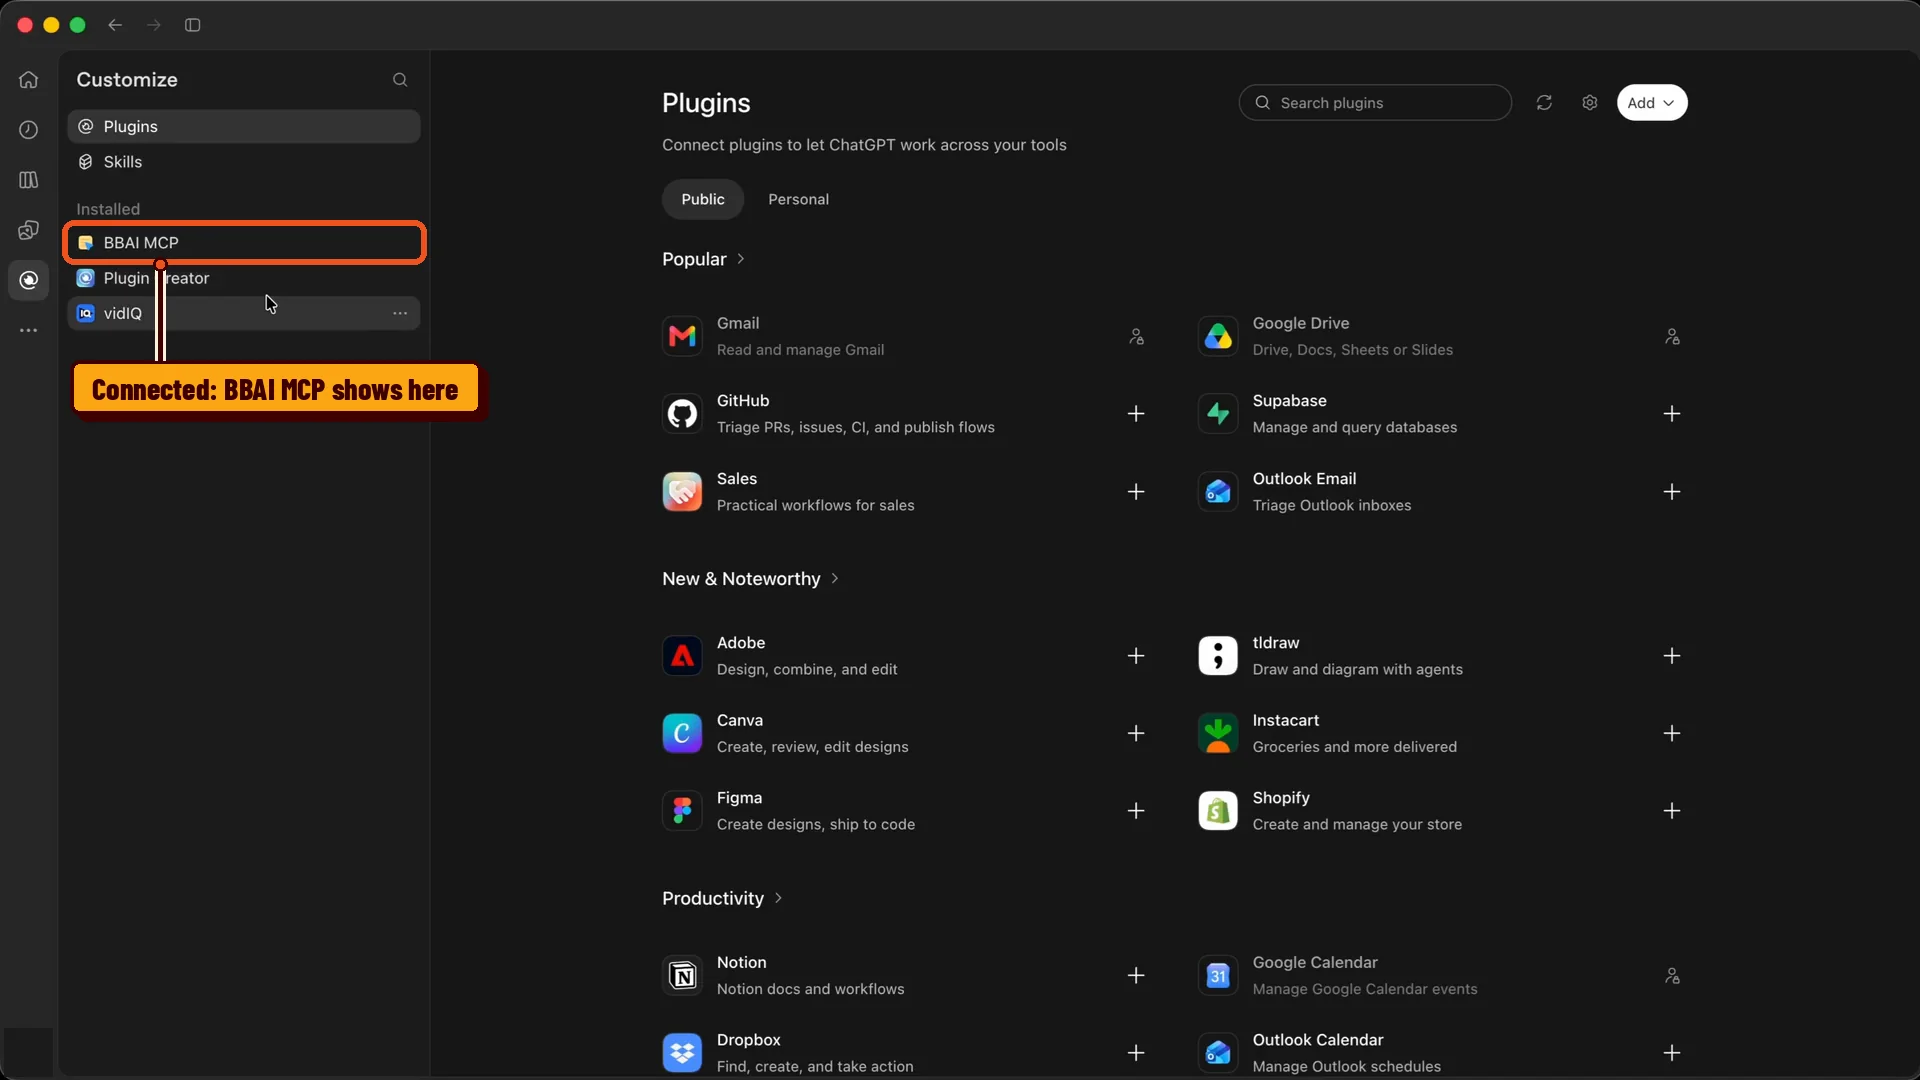
One more thing I always do: ask ChatGPT if it can see your site. In my case it said yes, it could see the connection and was ready to go.
Part 2: Convert your ChatGPT site to WordPress
This is the fun part. You tell ChatGPT what to build, and it builds it on your WordPress site.
Step 1: Give ChatGPT the build prompt
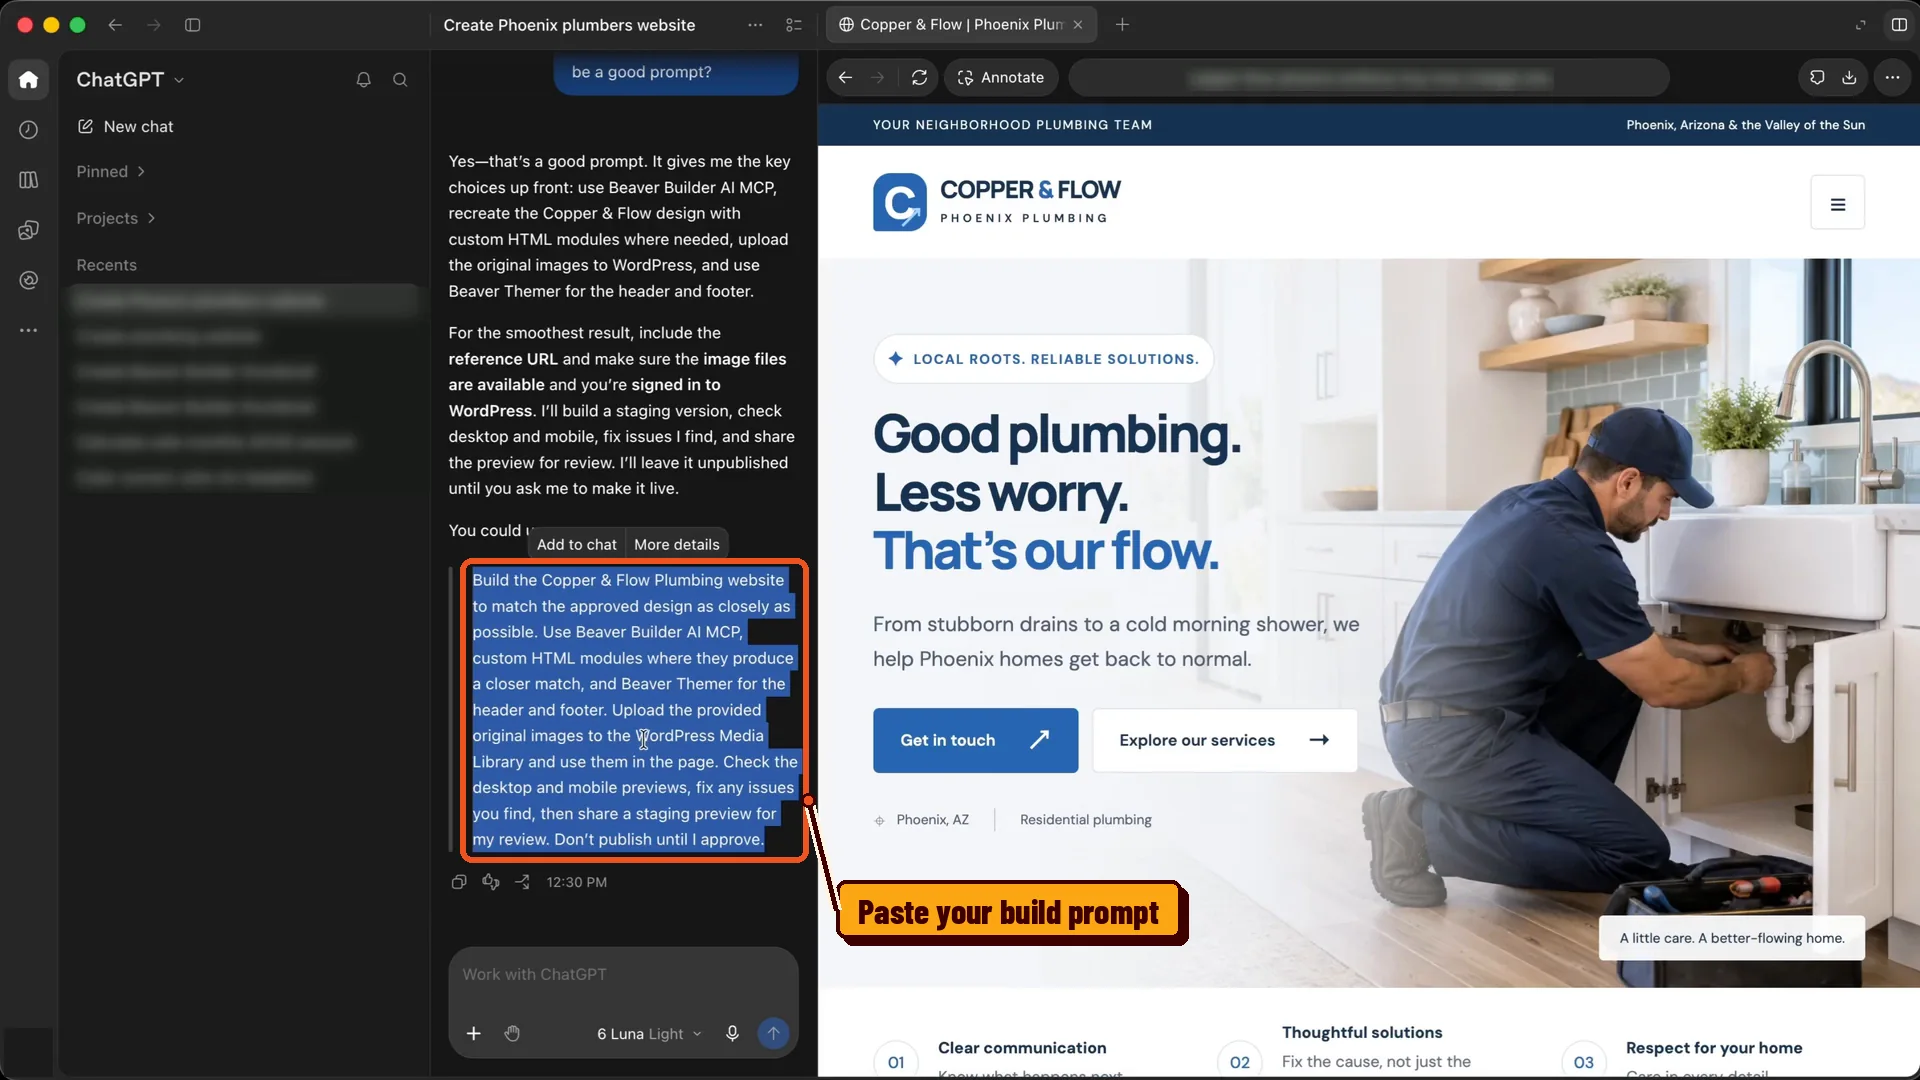
Go back to the chat where you designed your site. That way ChatGPT already has the design in front of it. Then give it a prompt. Here’s the one I used:
Build the Copper & Flow Plumbing website to match the approved design as closely as possible. Use Beaver Builder AI MCP, custom HTML modules where they produce a closer match, and Beaver Themer for the header and footer. Upload the provided original images to the WordPress Media Library and use them in the page. Check the desktop and mobile previews, fix any issues you find, then share a staging preview for my review. Don’t publish until I approve.
Swap in your own site’s name. Here’s why each part is in there:
- “Match the approved design” tells ChatGPT the design is done, so it copies it instead of getting creative.
- “Custom HTML modules where they produce a closer match” gives it room to get the tricky sections right.
- “Beaver Themer for the header and footer” means your header and footer get built as Themer layouts, not stuck inside the page.
- “Upload the provided original images” puts your photos on your own site.
- “Check the desktop and mobile previews” makes ChatGPT check its own work and fix what it finds.
- “Don’t publish until I approve” keeps you in control. Nothing goes live without you.
Want native Beaver Builder modules instead of custom HTML? Go to Settings > Beaver Builder AI > Settings. The MCP Layout Mode setting lets you pick Native Modules, Custom Modules, or Hybrid. You can also choose whether native sections use rows and columns or box modules.
Step 2: Review the staging draft
Now let it do its thing. Mine took about 16 minutes, so grab a coffee.
When it’s done, ChatGPT tells you the staging draft is ready and gives you a preview link. Mine also listed what it did:
- Uploaded the plumbing images to the Media Library and used them on the page
- Checked desktop and phone-width layouts, then fixed the mobile layout and the hero contrast
- Confirmed the header menu works on mobile
- Built the header and footer as Beaver Themer drafts, set to show only on the Copper & Flow pages
Nothing was published, just like I asked.
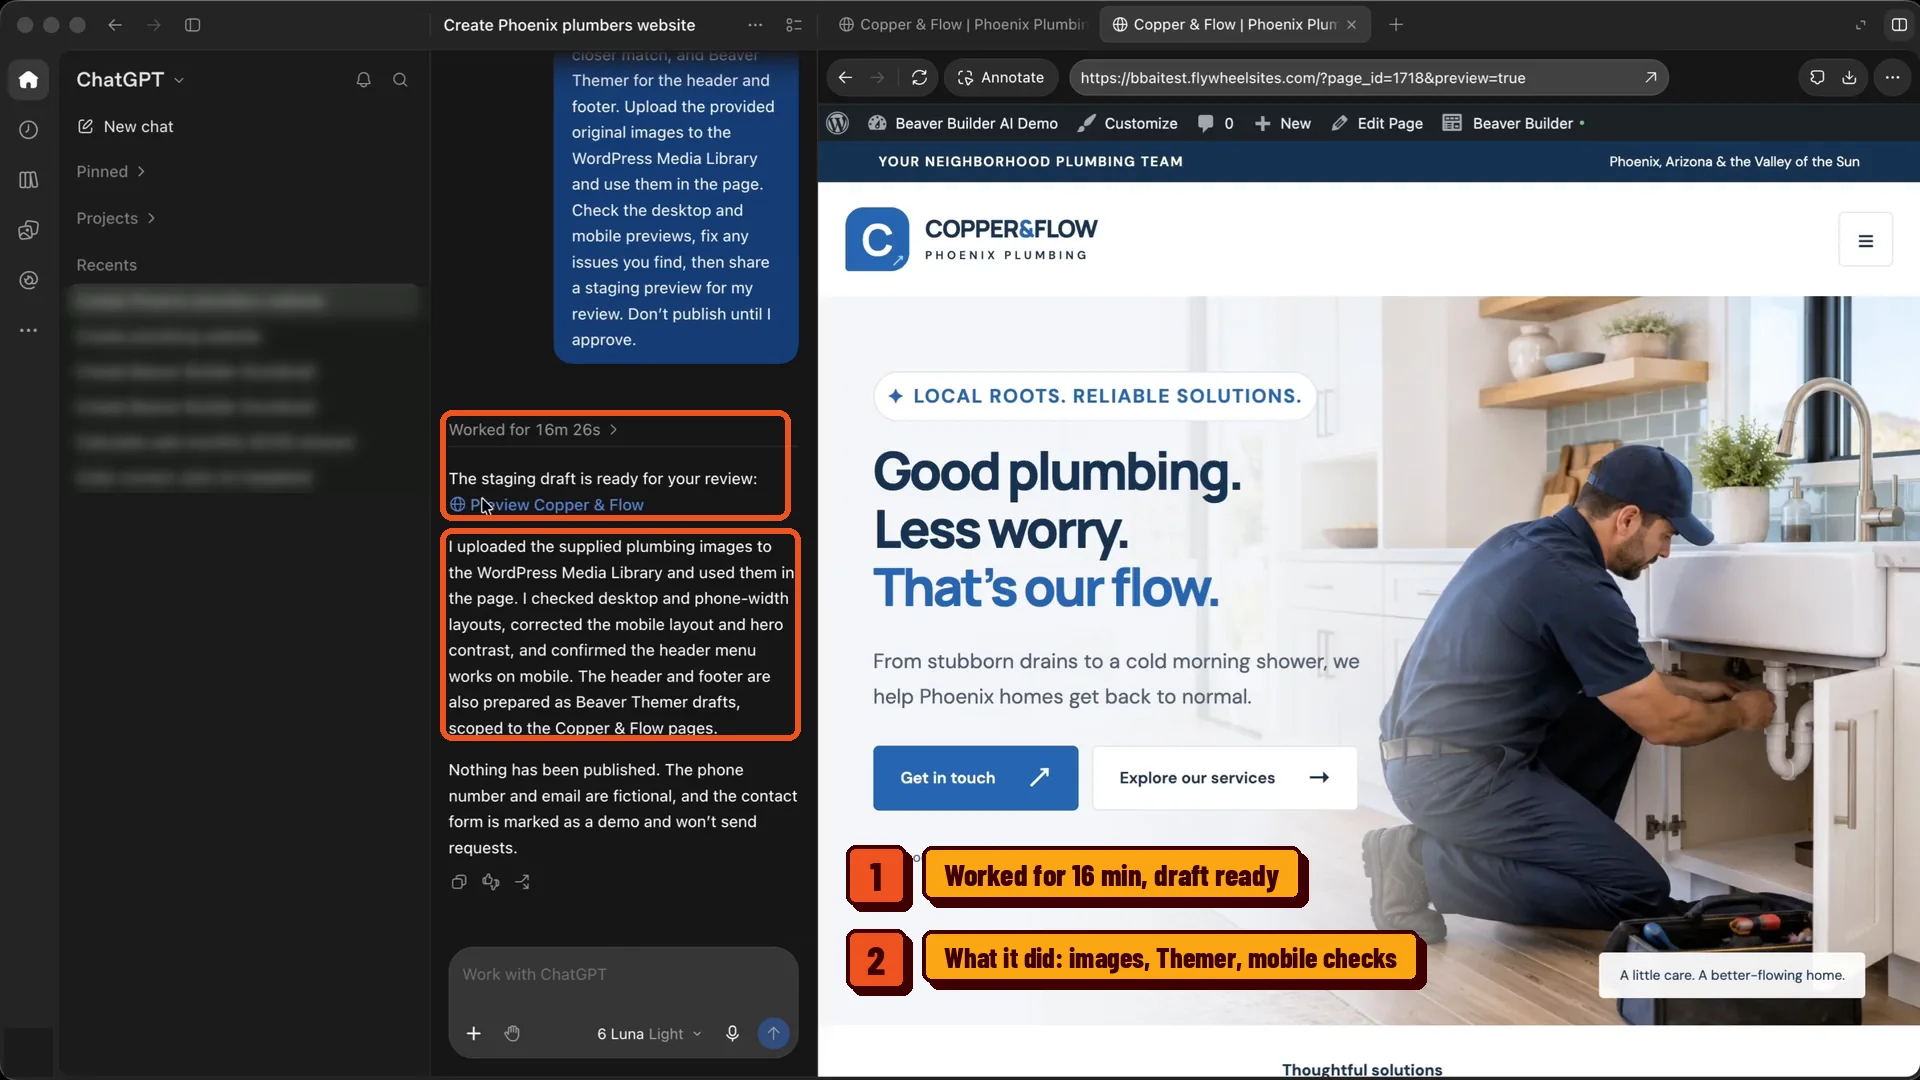
Click the preview link and take a look. Mine looked just like the original design. The hover effects, images, content, accordion, and contact form all came through.
One heads up. ChatGPT told me the phone number and email were made up. It also set the contact form as a demo that won’t send. If you’re building a real site, swap in real contact details and test your form before you publish.
Step 3: Check your Media Library
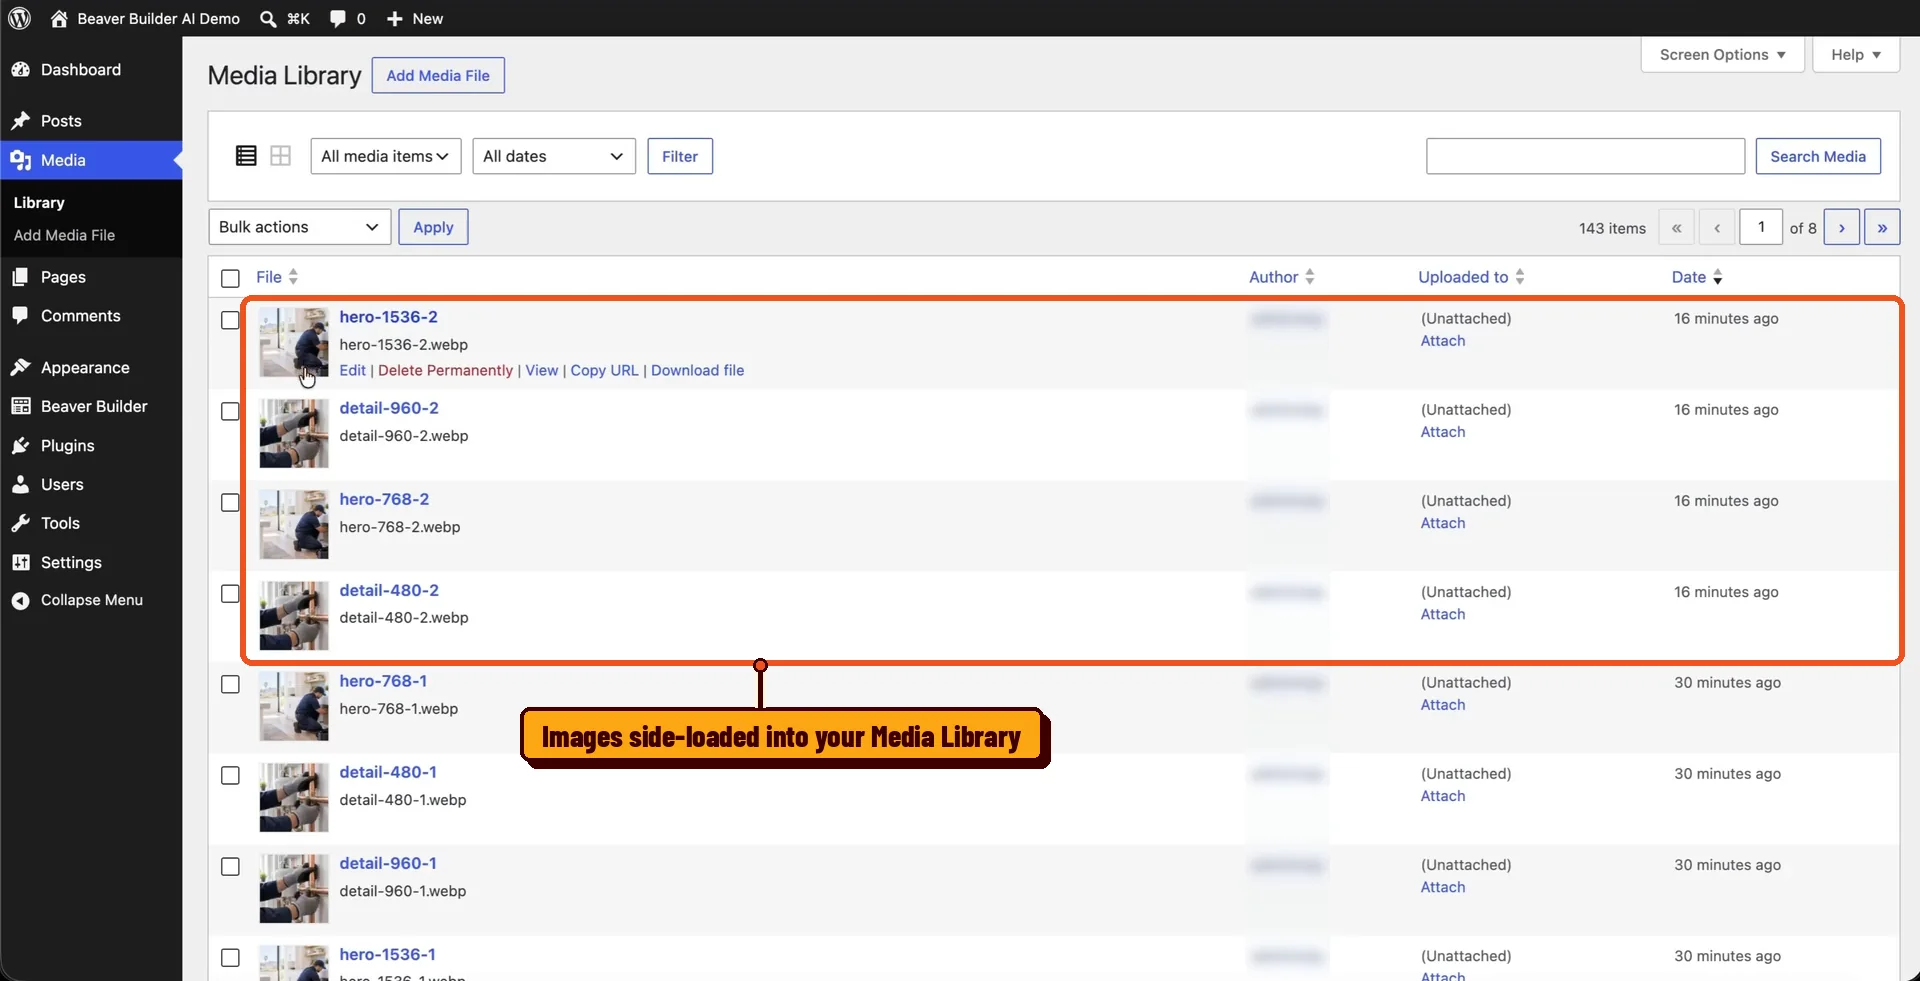
Want proof the images really moved? Open Media > Library in your dashboard.
ChatGPT side-loaded every image from the design. They’re hosted on your WordPress site now, not on ChatGPT.
Part 3: Edit the page in Beaver Builder
Now that it’s in WordPress, you might be wondering: can I edit this page?
Yes, you totally can. It’s a Beaver Builder page, so you edit it the way you edit any Beaver Builder page.
Step 1: Edit text right on the page
Click Beaver Builder to open the page in the builder. Then click any section and you’ll see plenty of options.
Want to update the copy? Click the text and start typing. You can bold it, italicize it, and change the heading level from the little toolbar.
Step 2: Open Styles for more control
Click the three dots on a section and choose Styles. A settings panel opens on the right side, and everything in it matches the section you picked.
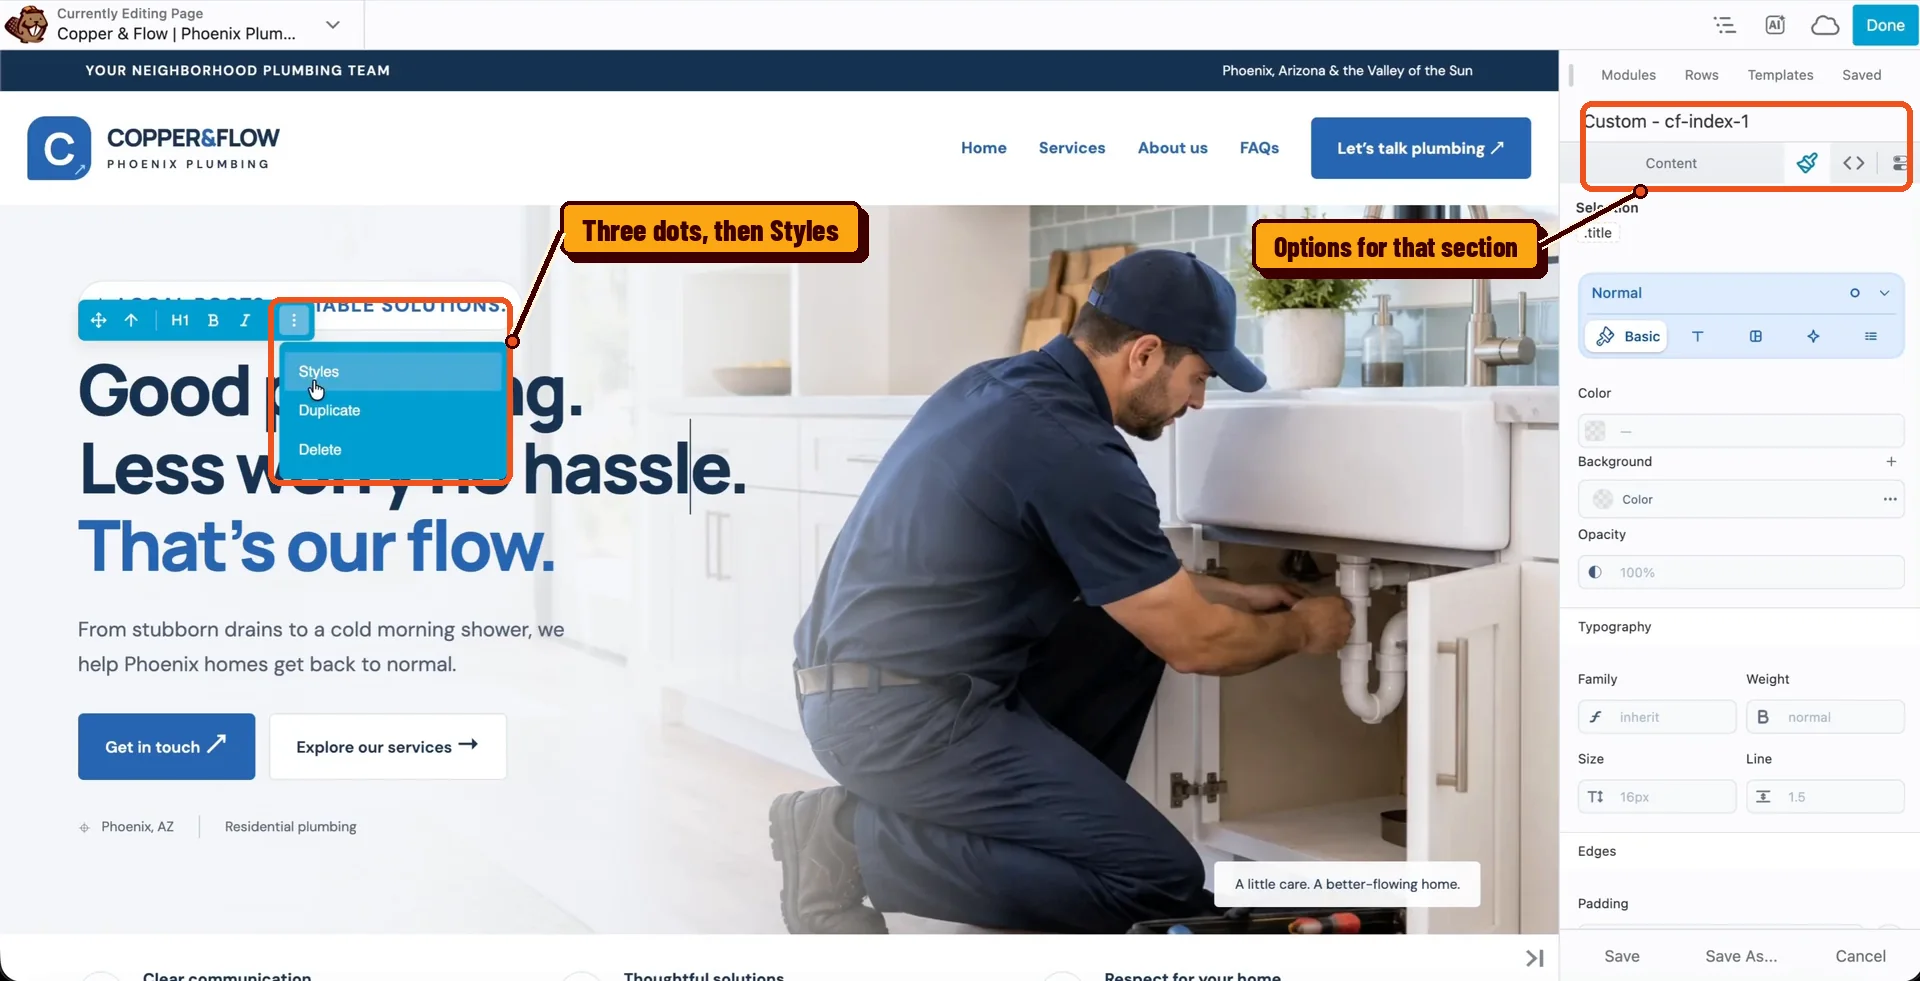
It has a few tabs across the top:
- Content is where you replace images and edit the title, the text, the icons, and the buttons.
- Design is where you adjust the design system settings.
- Code gives you the HTML, CSS, and JavaScript for that section.
- Advanced has the things you’d expect from any Beaver Builder module: margins, breakpoints, display settings, and more.
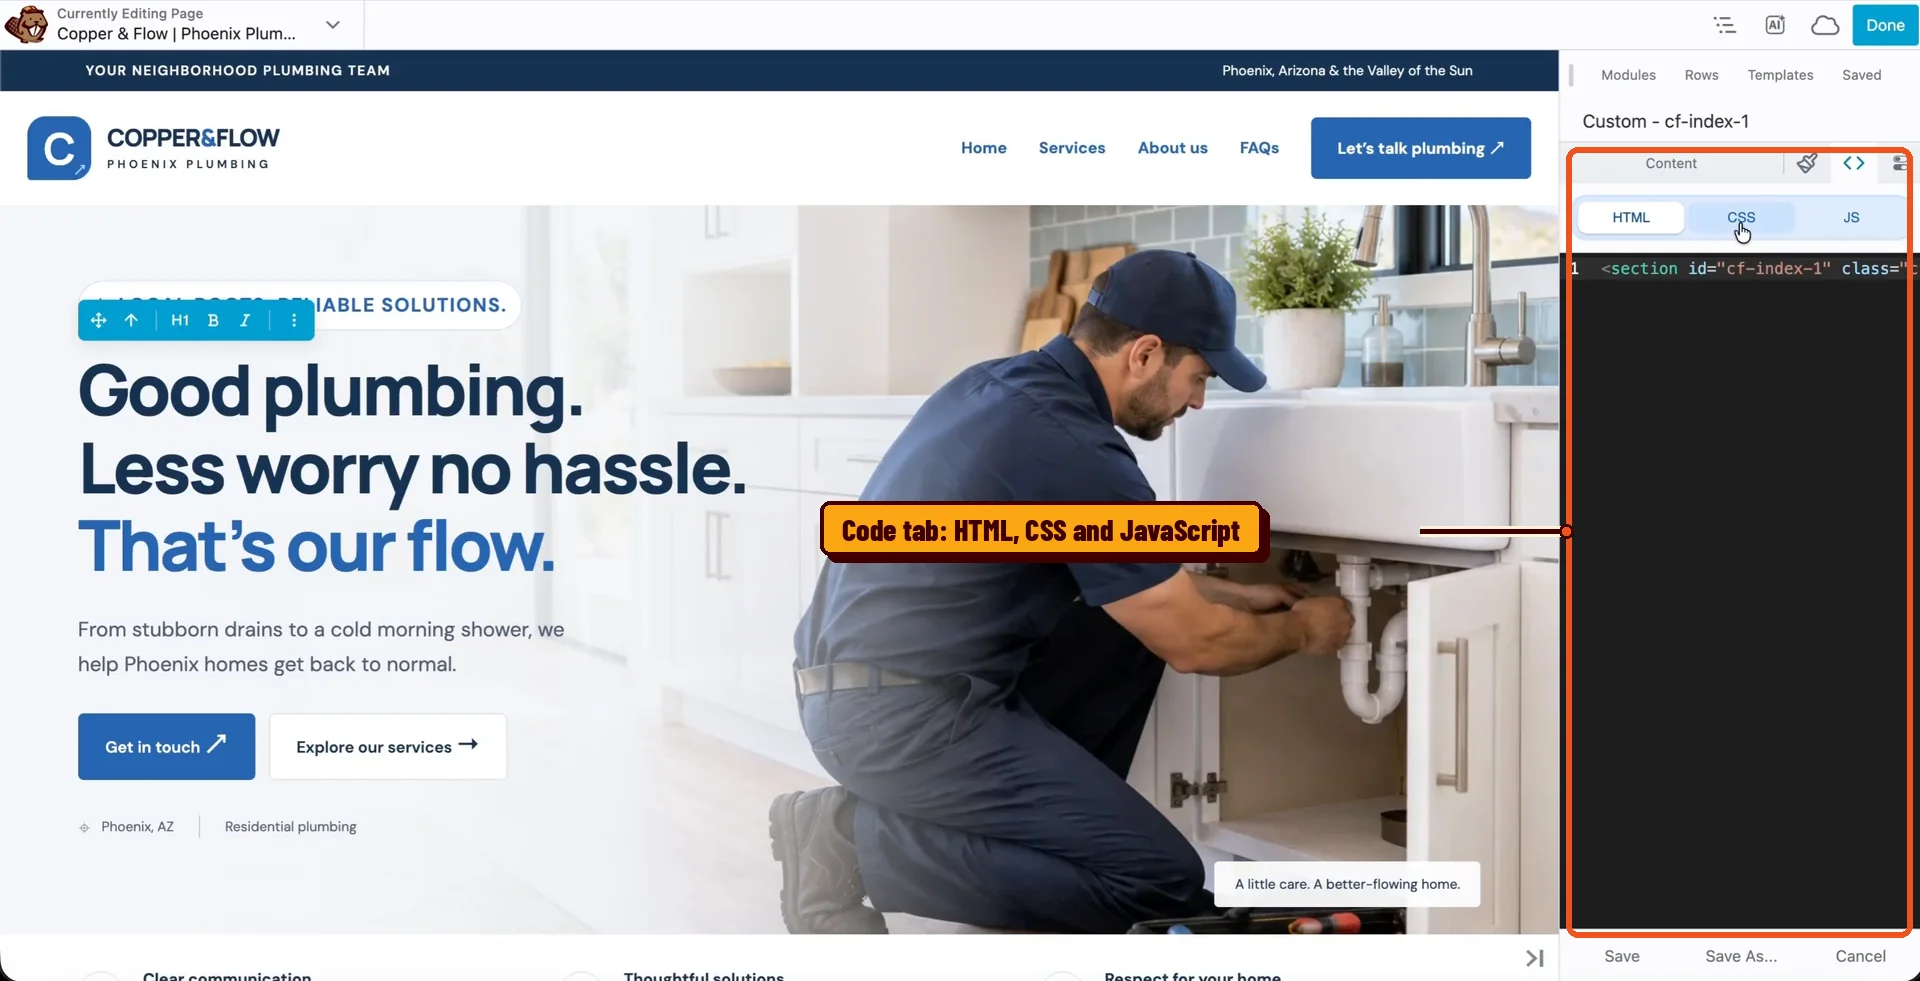
You can also drag and drop sections around, duplicate them, and delete them. All the stuff you already like about building with Beaver Builder works here too.
Step 3: Ask the AI chat inside WordPress
This next part is really cool. Click the AI button at the top of the builder and a Beaver Builder AI chat box opens. You can prompt it right inside WordPress, for anything on this page. This article walks you through how to setup up the AI chat capability in Beaver Builder.
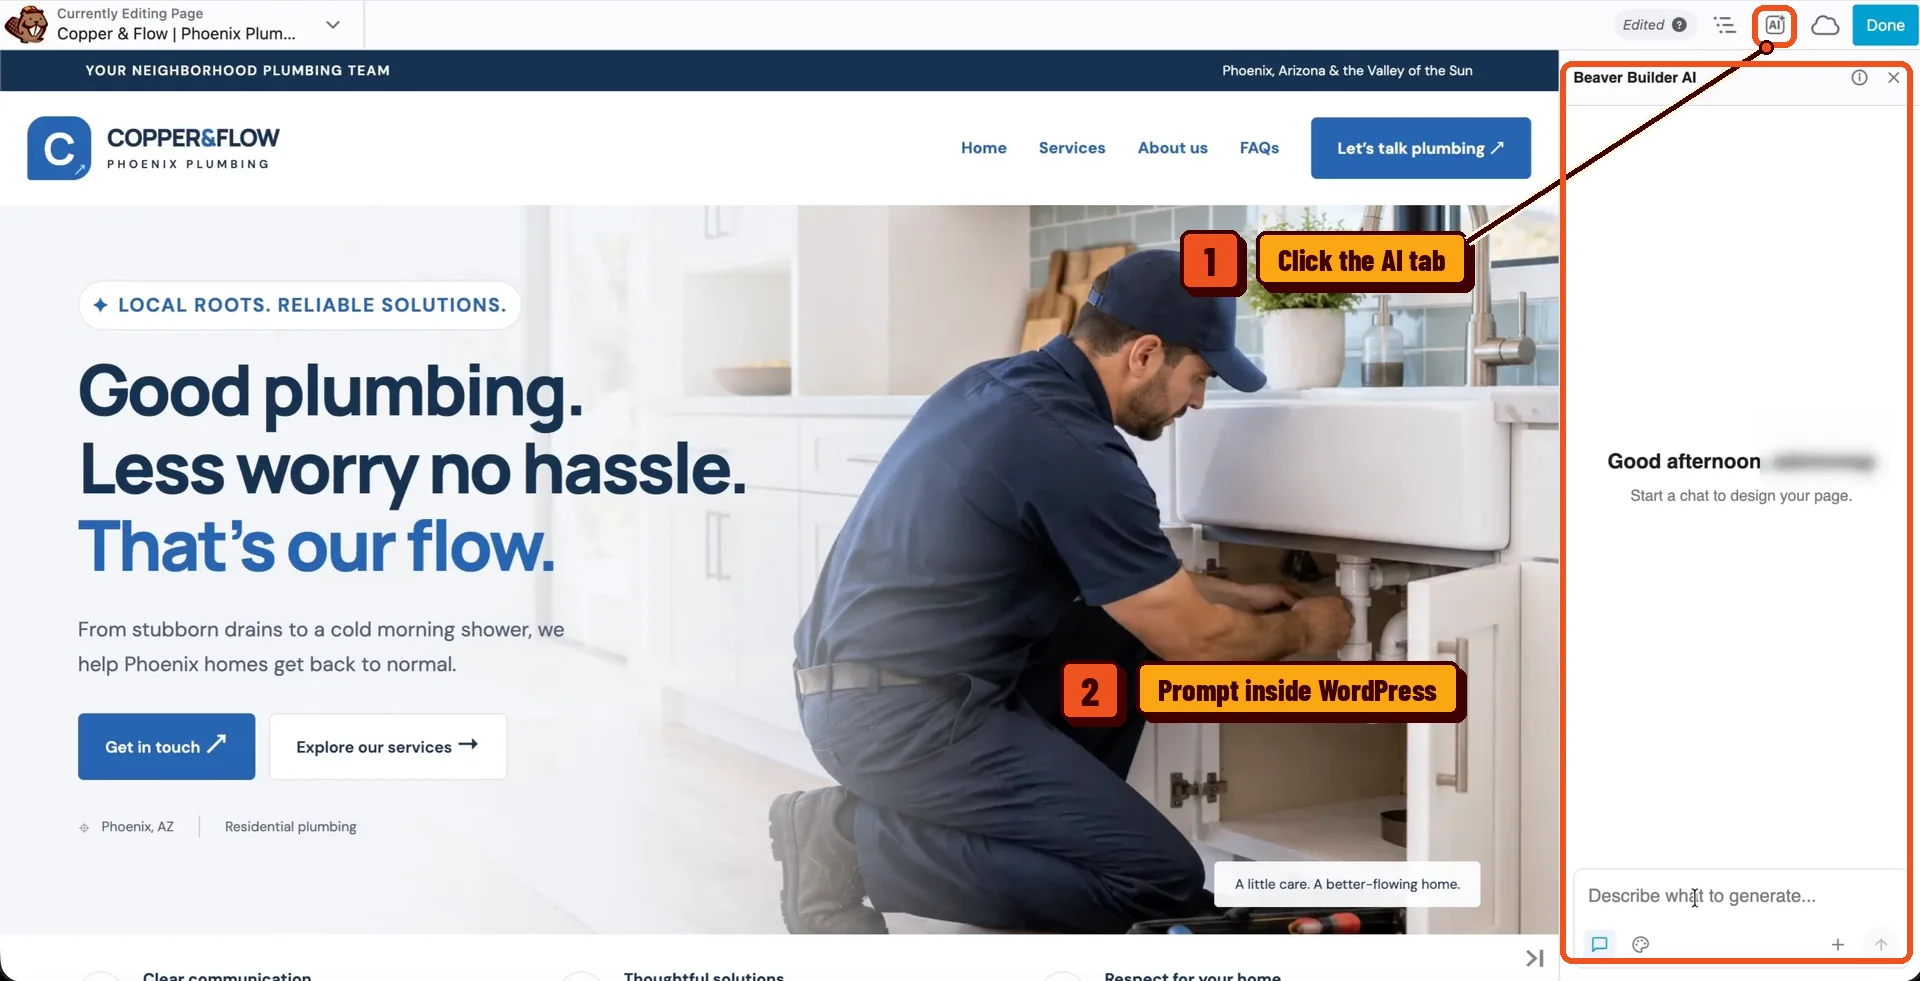
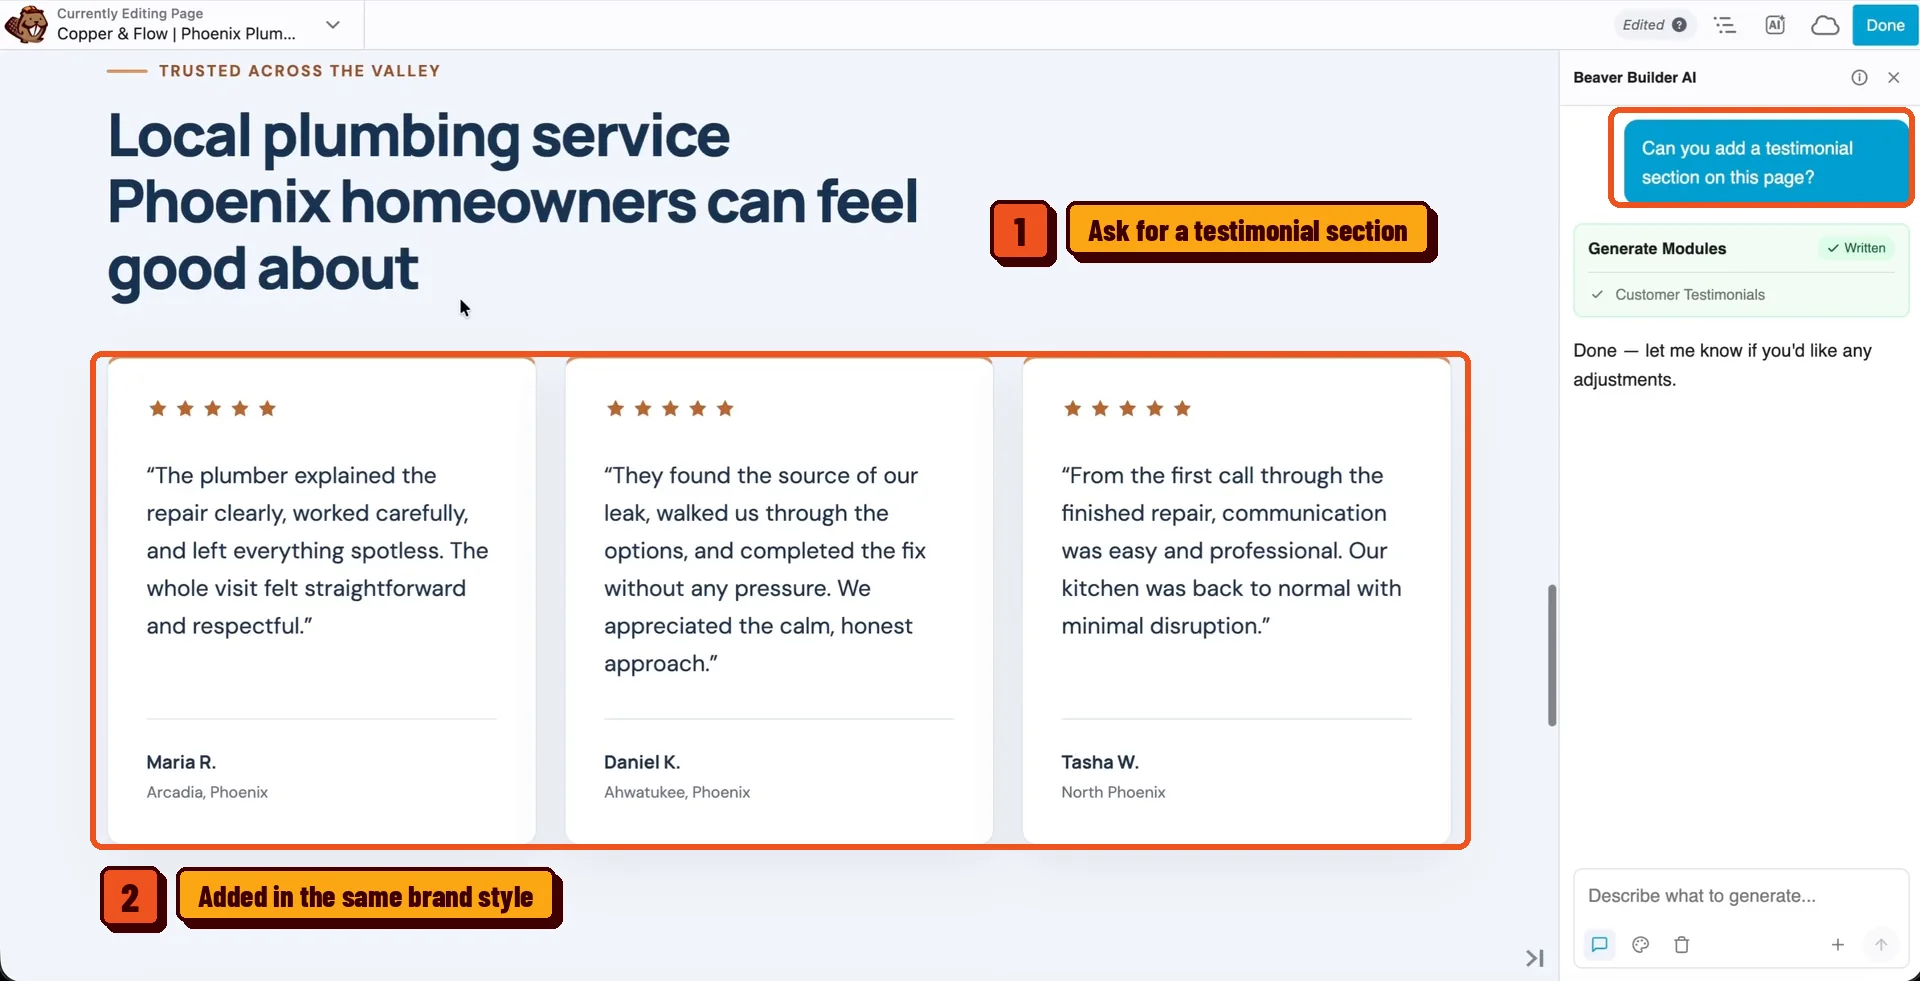
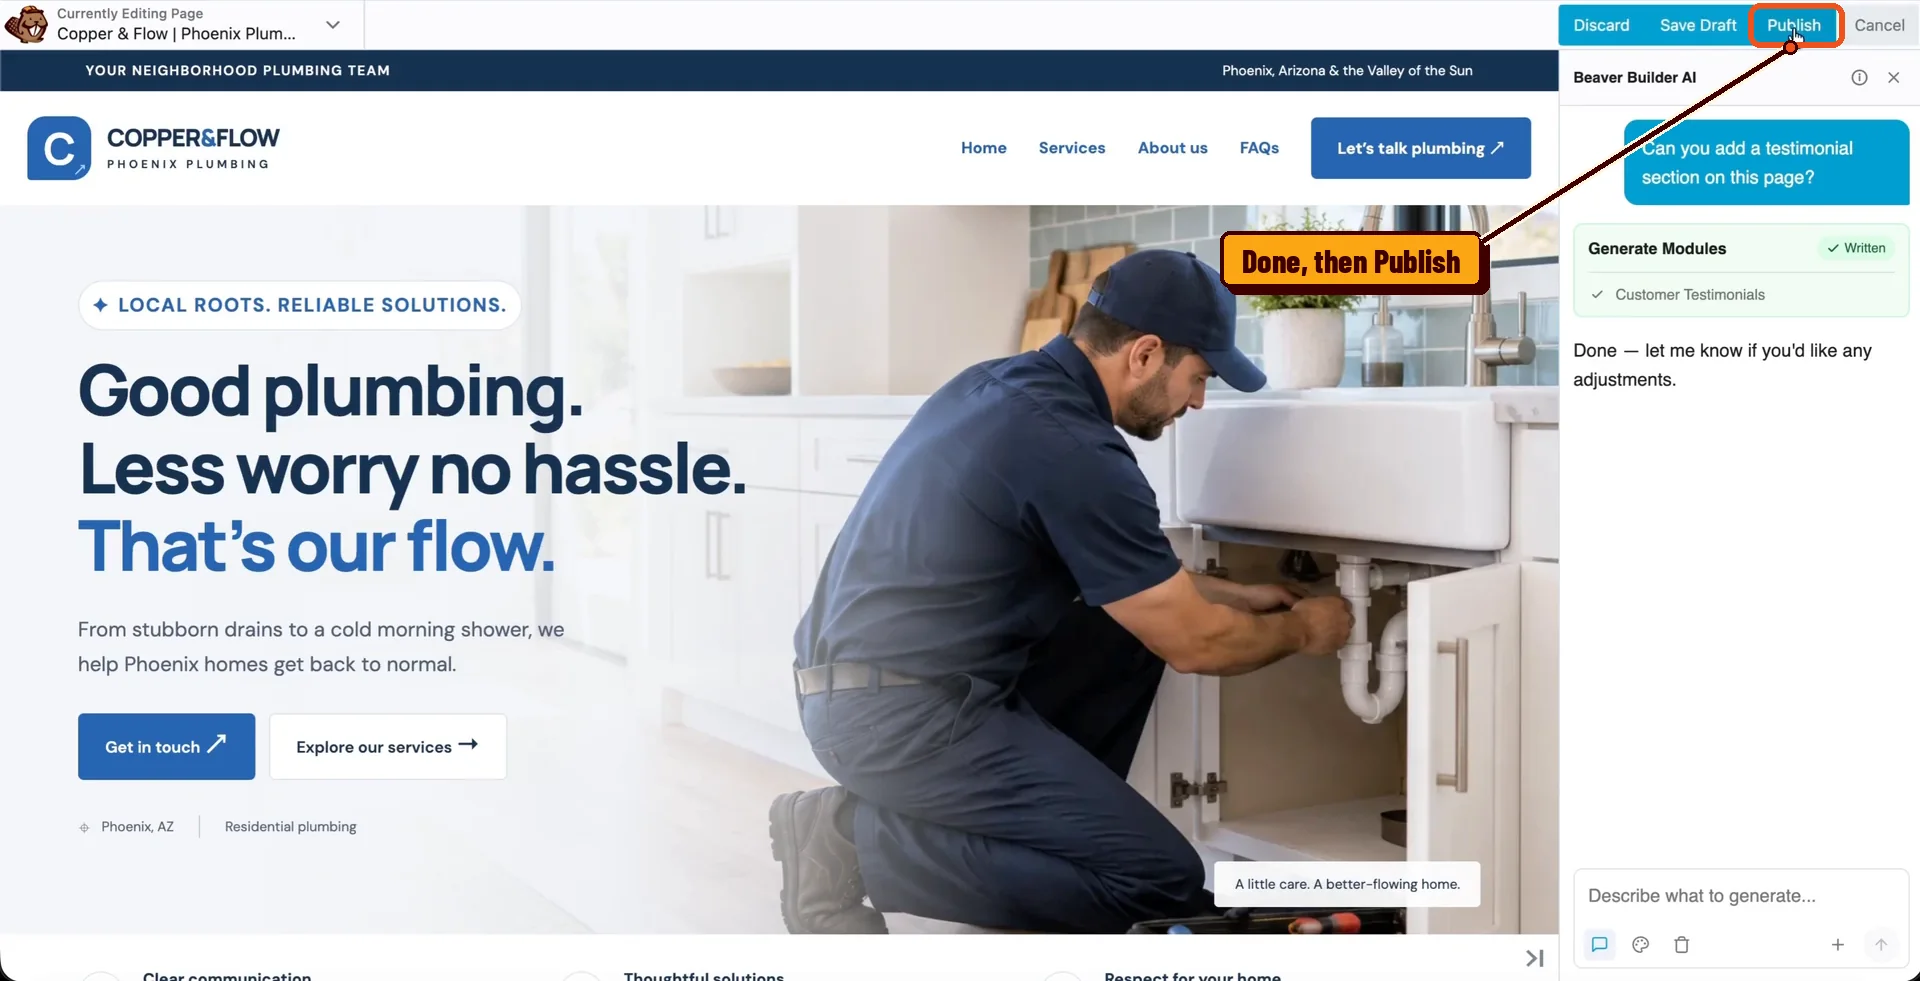
Let’s say I want a testimonial section. I typed: “Can you add a testimonial section on this page?”
It said “Done” and added one using the same brand style and fonts as the original design. You can keep making changes in that chat as you go.
Step 4: Publish
Happy with it? Click Done, then Publish.
That’s it. You now have a full page that started in ChatGPT and lives in WordPress. It’s fully editable and mobile responsive.
Who this workflow is for
If you like designing in ChatGPT, this saves you the worst part: rebuilding it by hand. Design it in ChatGPT, convert it to WordPress, and edit it in Beaver Builder.
If you run an agency, it’s a nice way to get a client site started fast. You still hand off a normal WordPress site your client can edit. Pair it with a Design System and every new page Beaver Builder AI builds after that stays on brand.
Designing in other AI tools too? The same idea works for transferring a Claude design to WordPress and converting a Lovable design to WordPress. Not sure when to use the chat, MCP, or Design Kits? Here are three ways to build with Beaver Builder AI.
FAQ
Yes. It’s a Beaver Builder page. You can edit text on the page, open Styles for each section, edit the code, and drag, duplicate, or delete sections.
Not if you tell it not to. My prompt says “Don’t publish until I approve,” and ChatGPT left the page as a draft with a preview link.
Into your WordPress Media Library. ChatGPT uploads them, so they’re hosted on your own site.
Not with this setup. One of the site requirements is that your site is publicly reachable over HTTPS.
It’s up to you. The MCP Layout Mode setting in Beaver Builder AI lets you choose Native Modules, Custom Modules, or Hybrid. My prompt also let ChatGPT use custom HTML modules where they matched the design better.
You need a plan that lets you add custom MCP apps. OpenAI is still rolling this out, so check OpenAI’s help article for the current list.
Try it on your site
Want to see Beaver Builder AI before you install anything? Try it free. Drop in your name and email and you get a link to a live playground. Nothing to download.
Already a Beaver Builder customer? Grab the Beaver Builder AI plugin from your My Account page. Not sure which plan includes it? The pricing page lays it out.
Setup docs live at docs.wpbeaverbuilder.com/bb-ai. For what’s new, read the 1.0 release post and the 1.0.1 update.
Tried it? I’d love to hear how it went. Send us your feedback.
Start here

Beaver Builder AI Demo
Build a page with AI on a site that already has Beaver Builder and Beaver Themer installed. Free AI credits included.
Our Newsletter
Our newsletter is personally written and sent out about once a month. It's not the least bit annoying or spammy.
We promise.
Try Beaver Builder Today
Related articles
Beaver Builder AI MCP Settings: Layout Mode and Layout Structure Explained
 -
September 23, 2026
-
September 23, 2026
Beaver Builder AI has two MCP settings that shape AI-built pages. MCP Layout Mode controls what AI builds with: Native…
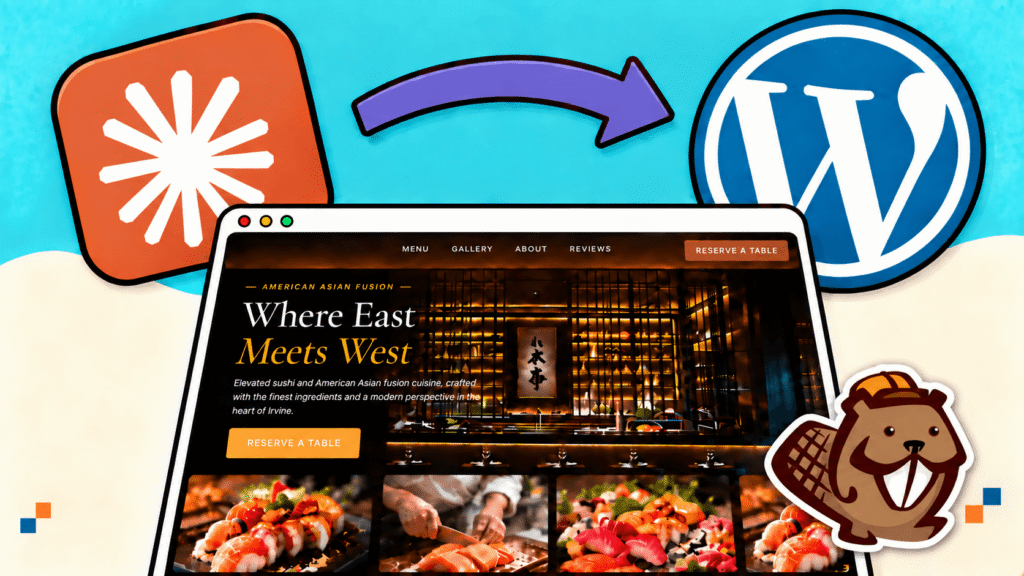
How to Transfer a Claude Design to WordPress (Beaver Builder AI)
 -
September 18, 2026
-
September 18, 2026
Designed a page in Claude? Two ways to transfer a Claude design to WordPress with Beaver Builder AI. Both fully...

Beaver Builder AI 1.0.1: Native Layouts, Easier Connection Troubleshooting, and More
-
September 18, 2026
Released 09/14/2026. Requires Beaver Builder 2.11 or later. Full technical changelog: wpbeaverbuilder.com/change-logs Beaver Builder AI 1.0.1 is now available, bringing…
Join the community
We're here for you
There's a thriving community of builders and we'd love for you to join us. Come by and show off a project, network, or ask a question.


Since 2014
Ready to build?
The WordPress page builder agencies and freelancers have trusted since 2014. Now with AI.