
Headers and footers are among the most repetitive parts of building a WordPress website. AI can speed up the process, but generating a design is only part of the job. You or your client still needs to be able to open, edit, and maintain the finished layouts in WordPress. That’s where editable AI-generated layouts come in.
In this tutorial, you’ll learn how to connect Claude to WordPress through Beaver Builder AI and MCP, then use Claude to create editable Beaver Themer header and footer layouts with native Beaver Builder modules. From there, you can open the layouts in Beaver Builder, make changes visually, publish them, and test them across desktop, tablet, and mobile.
We’ll walk through the complete workflow from connecting Claude to your WordPress site to testing the finished header and footer.
Table of Contents
- What You Need
- Step 1: Connect Claude to WordPress
- Step 2: Configure Beaver Builder AI MCP Settings
- Step 3: Prepare Your Menu and Logo
- Step 4: Build the Header and Footer With AI
- Step 5: Edit the Header and Footer in Beaver Builder
- Step 6: Verify Beaver Themer Location Rules
- Step 7: Publish and Test Header and Footer Layouts
- Build Faster Without Giving Up Your Workflow
- Frequently Asked Questions
- Up Next in This Series
What You Need
Before you start, make sure you have:
- Claude account
- WordPress 6.9+
- Beaver Builder 2.11+
- Beaver Builder AI 1.0.1+
- Beaver Themer
- WordPress MCP Adapter
Beaver Builder AI is included with Beaver Builder’s Plus, Professional, and Unlimited plans. The Starter plan doesn’t include AI, so you’ll need Plus or higher to follow along. Or try the workflow on our live demo site create.wpbeaverbuilder.com/try.
Step 1: Connect Claude to WordPress
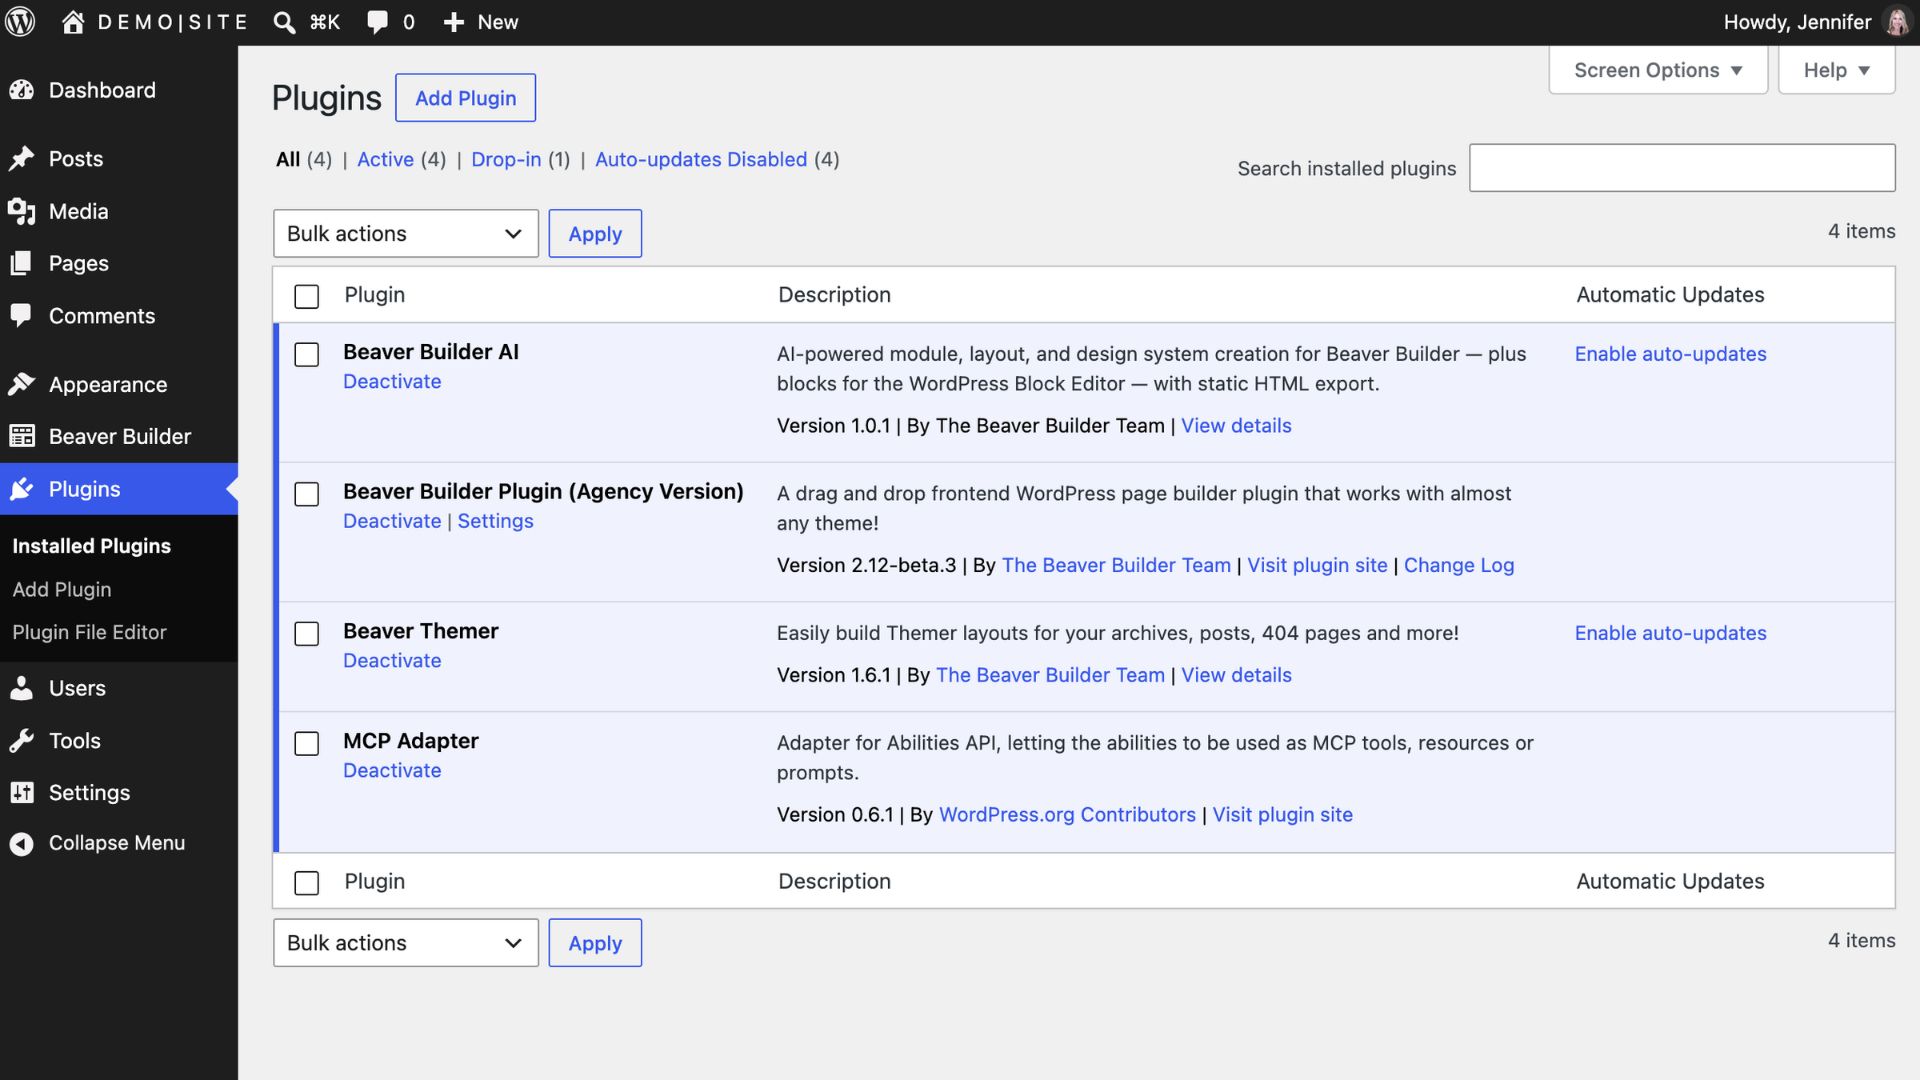
First, make sure Beaver Builder, Beaver Builder AI, Beaver Themer, and the WordPress MCP Adapter are installed and active on your WordPress site:
Then go to Settings → Beaver Builder AI → MCP Connection. You’ll see two options: Connect via Beaver Builder AI or Connect Manually. We’ll use Connect via Beaver Builder AI since we are connecting to a live site:
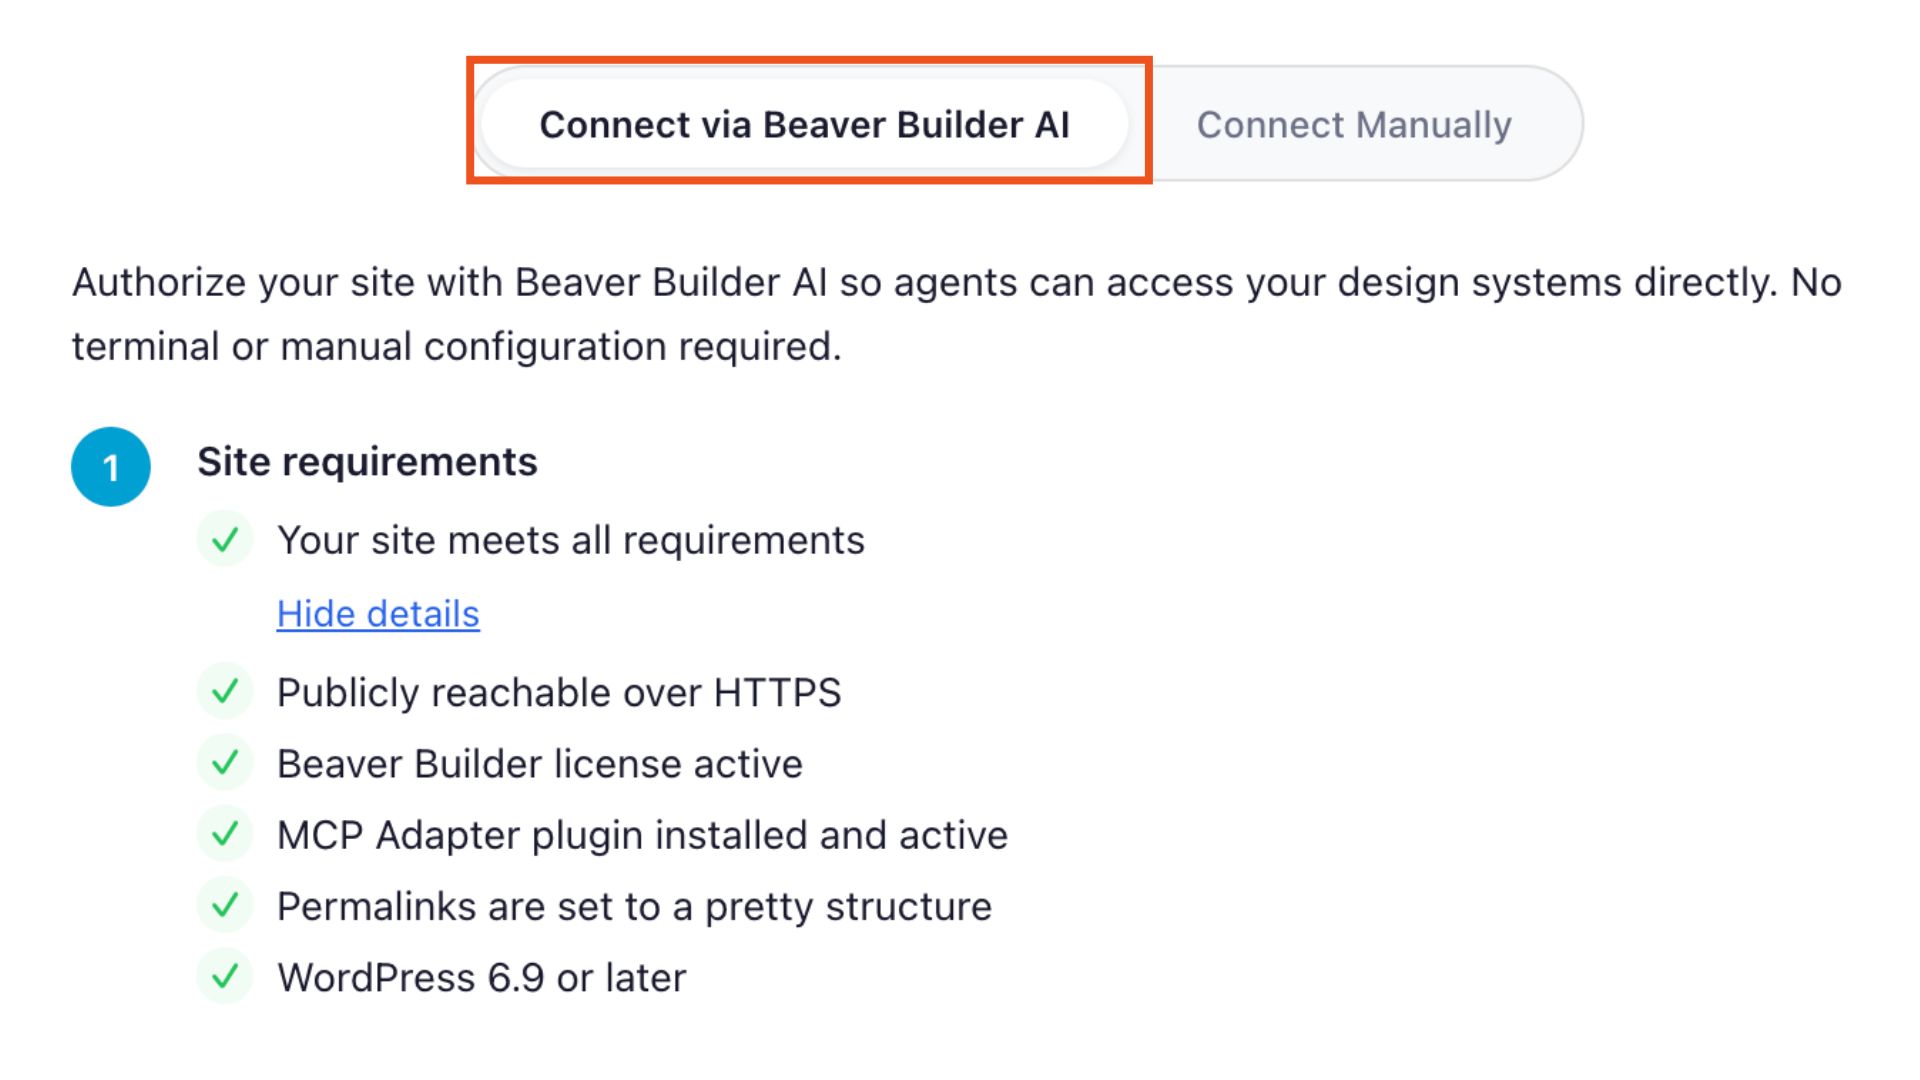
This option runs a requirements check before connecting. As shown in the screenshot above, your site needs to meet a few prerequisites, including HTTPS, a valid Beaver Builder license, the MCP Adapter plugin, WordPress 6.9 or later, and pretty permalinks.
If you’re setting up a fresh WordPress site, go to Settings → Permalinks and select Post Name. On an existing site, use caution when changing the permalink structure because it can change your existing URLs.
Click Connect via Beaver Builder AI and authorize the connection. Beaver Builder AI will provide an MCP Endpoint URL. Copy the URL. Then open Claude and go to Settings → Connectors → Add custom connector. Paste the endpoint URL and complete the authorization.
Once connected, Claude can use Beaver Builder’s MCP tools to create and modify supported WordPress content on your site.
Beaver Builder AI 1.0.1 added a Test Connection tool. On the MCP Connection screen, click Having trouble connecting? and choose Test Connection. It runs a live check from your site and helps point you to the problem.
Step 2: Configure Beaver Builder AI MCP Settings
Before you ask Claude to build your header and footer, configure how MCP should structure the layouts. Open the Settings tab in Beaver Builder AI. You’ll find two settings: MCP Layout Mode and MCP Layout Structure.
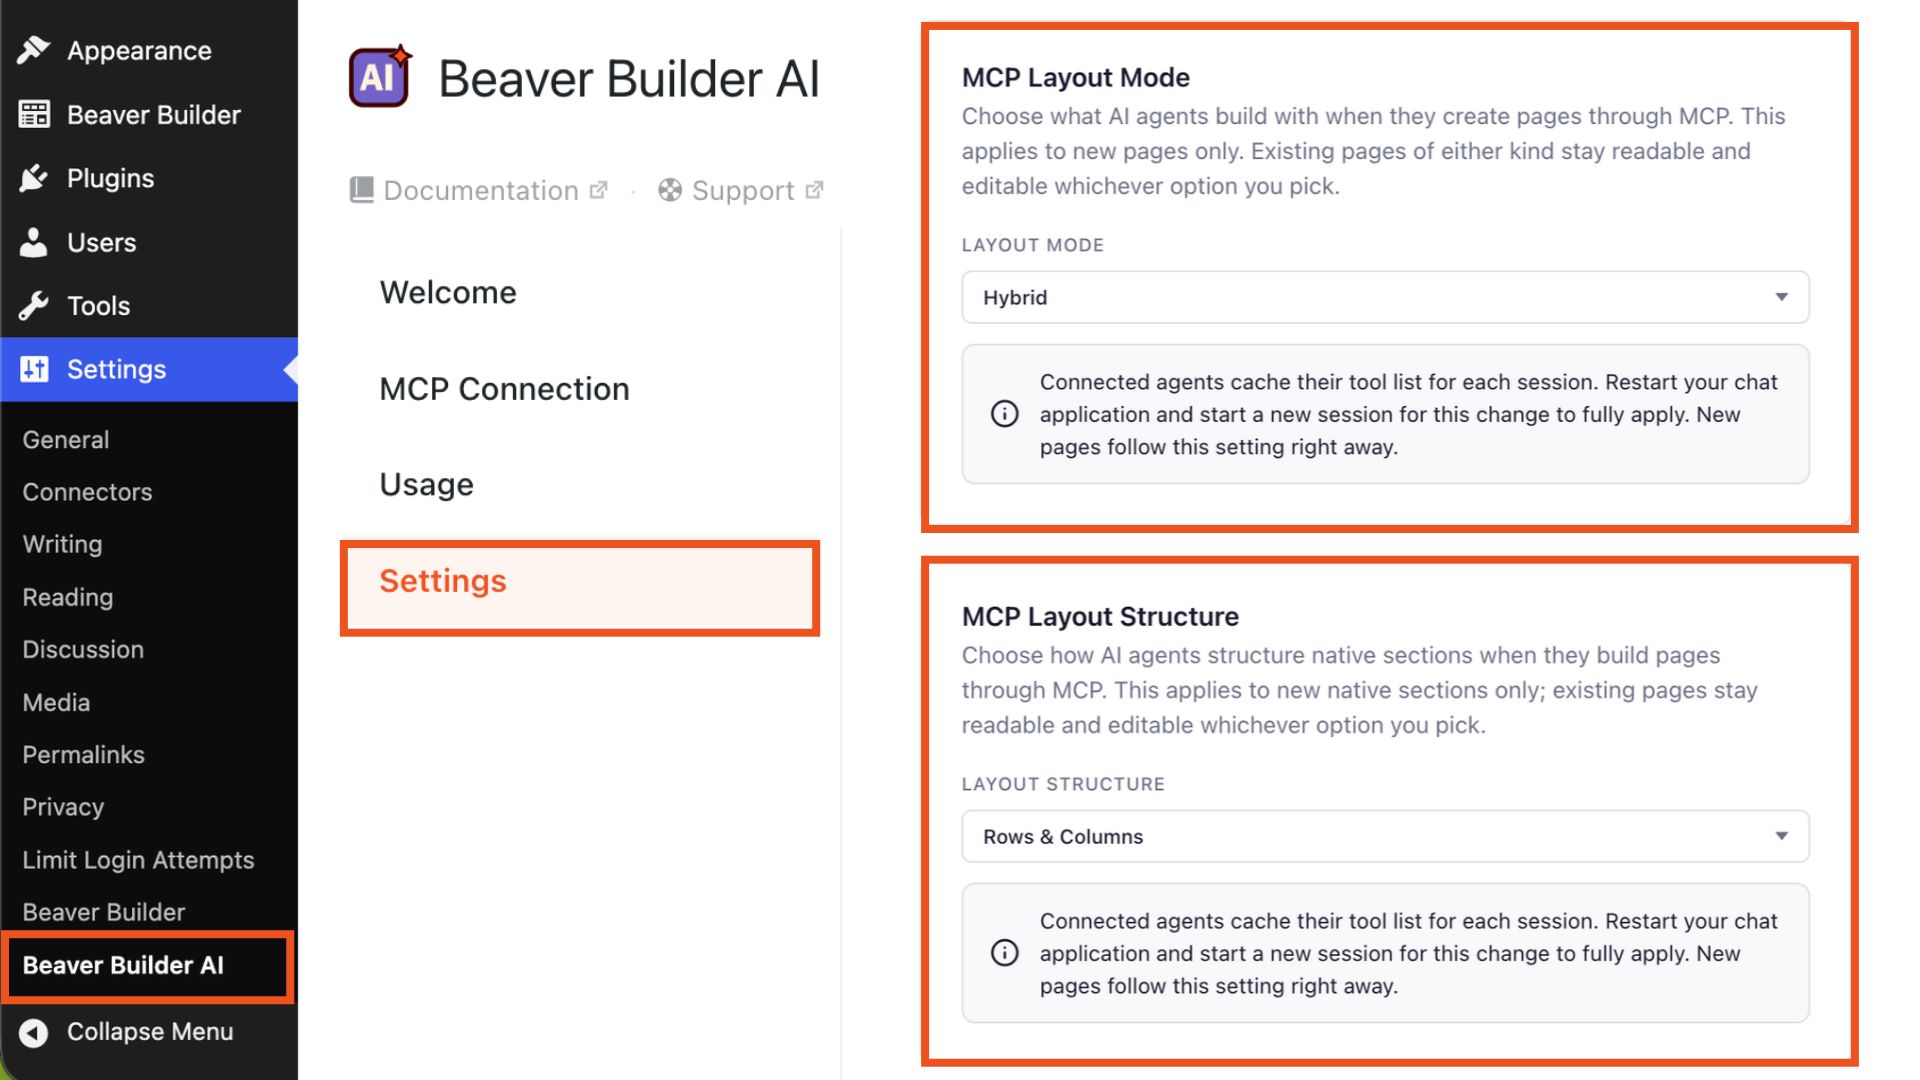
MCP Layout Mode controls what Claude can use to build new layouts:
- Native: Claude uses Beaver Builder’s native modules.
- Custom: Claude uses Custom Modules with generated HTML and CSS.
- Hybrid: Claude can use both.
MCP Layout Structure controls how native sections are structured. You can choose Rows/Columns or Box Modules.
For this tutorial, we’re using:
- MCP Layout Mode: Hybrid
- MCP Layout Structure: Rows/Columns
These settings only apply to new layouts. Existing layouts stay readable and editable no matter which option you pick. For a deeper explanation of these settings, read our guide to Beaver Builder AI MCP Settings: Layout Mode and Layout Structure Explained.
Step 3: Prepare Your Menu and Logo
Before prompting Claude, prepare the content it will use to build the header and footer.
Create the Menu
Create the WordPress menu you want Claude to use in the header and footer.
Upload Your Logo
Upload your logo to the Media Library and copy its File URL. You’ll pass that public URL to Claude in the prompt.
Coming soon: Beaver Builder AI 1.1, now in alpha, is adding new MCP abilities such as creating and editing WordPress menus and finding Media Library items. Once available, these steps can be handled through Claude as part of the workflow.
Step 4: Build the Header and Footer With AI
With the menu, logo, and MCP settings in place, you’re ready to build the WordPress header.
Create a Beaver Themer header for my [WEBSITE NAME] website using the existing [MENU NAME] WordPress menu. Set it to display on the entire site. Use the site’s default design system for colors and typography.
Use this logo image: [IMAGE URL]
Place the logo on the left, the navigation menu in the center using a Menu module, and a call-to-action button on the right. Build it using native Beaver Builder modules. Make the header responsive for tablet and mobile.
You don’t have to be this specific in your prompts. If you want Claude to make more of the design decisions, you can give it a general direction and let it come up with the layout.
For client work, though, you’ll often already have a design direction, brand guidelines, or a specific layout in mind. In that case, being more specific helps Claude build something that matches the design you’re working toward rather than making those decisions for you.
Claude creates the Beaver Themer layout through MCP and sets its location rules.
The footer follows the same process. It just carries more content, so the prompt gets longer:
Create a Beaver Themer footer for my [WEBSITE NAME] website.
Use this logo image: [IMAGE URL]
Include the company name, [COMPANY NAME], with the tagline [TAGLINE], and a [CTA BUTTON TEXT] button.
Add navigation links using the existing [MENU NAME] WordPress menu.
Include this contact information:
- Address: [ADDRESS]
- Phone: [PHONE NUMBER]
- Email: [EMAIL ADDRESS]
Add social icons for [SOCIAL PLATFORMS].
Include a copyright line.
Use the site’s default design system, build it using native Beaver Builder modules, and make the layout responsive for tablet and mobile.
Let Claude go to work. When it finishes, you’ll have a footer with the content you provided.
Step 5: Edit the Header and Footer in Beaver Builder
This is where the workflow pays off. Open the header or footer in Beaver Builder and look at what Claude built. You’ll find real rows, columns, and native modules:
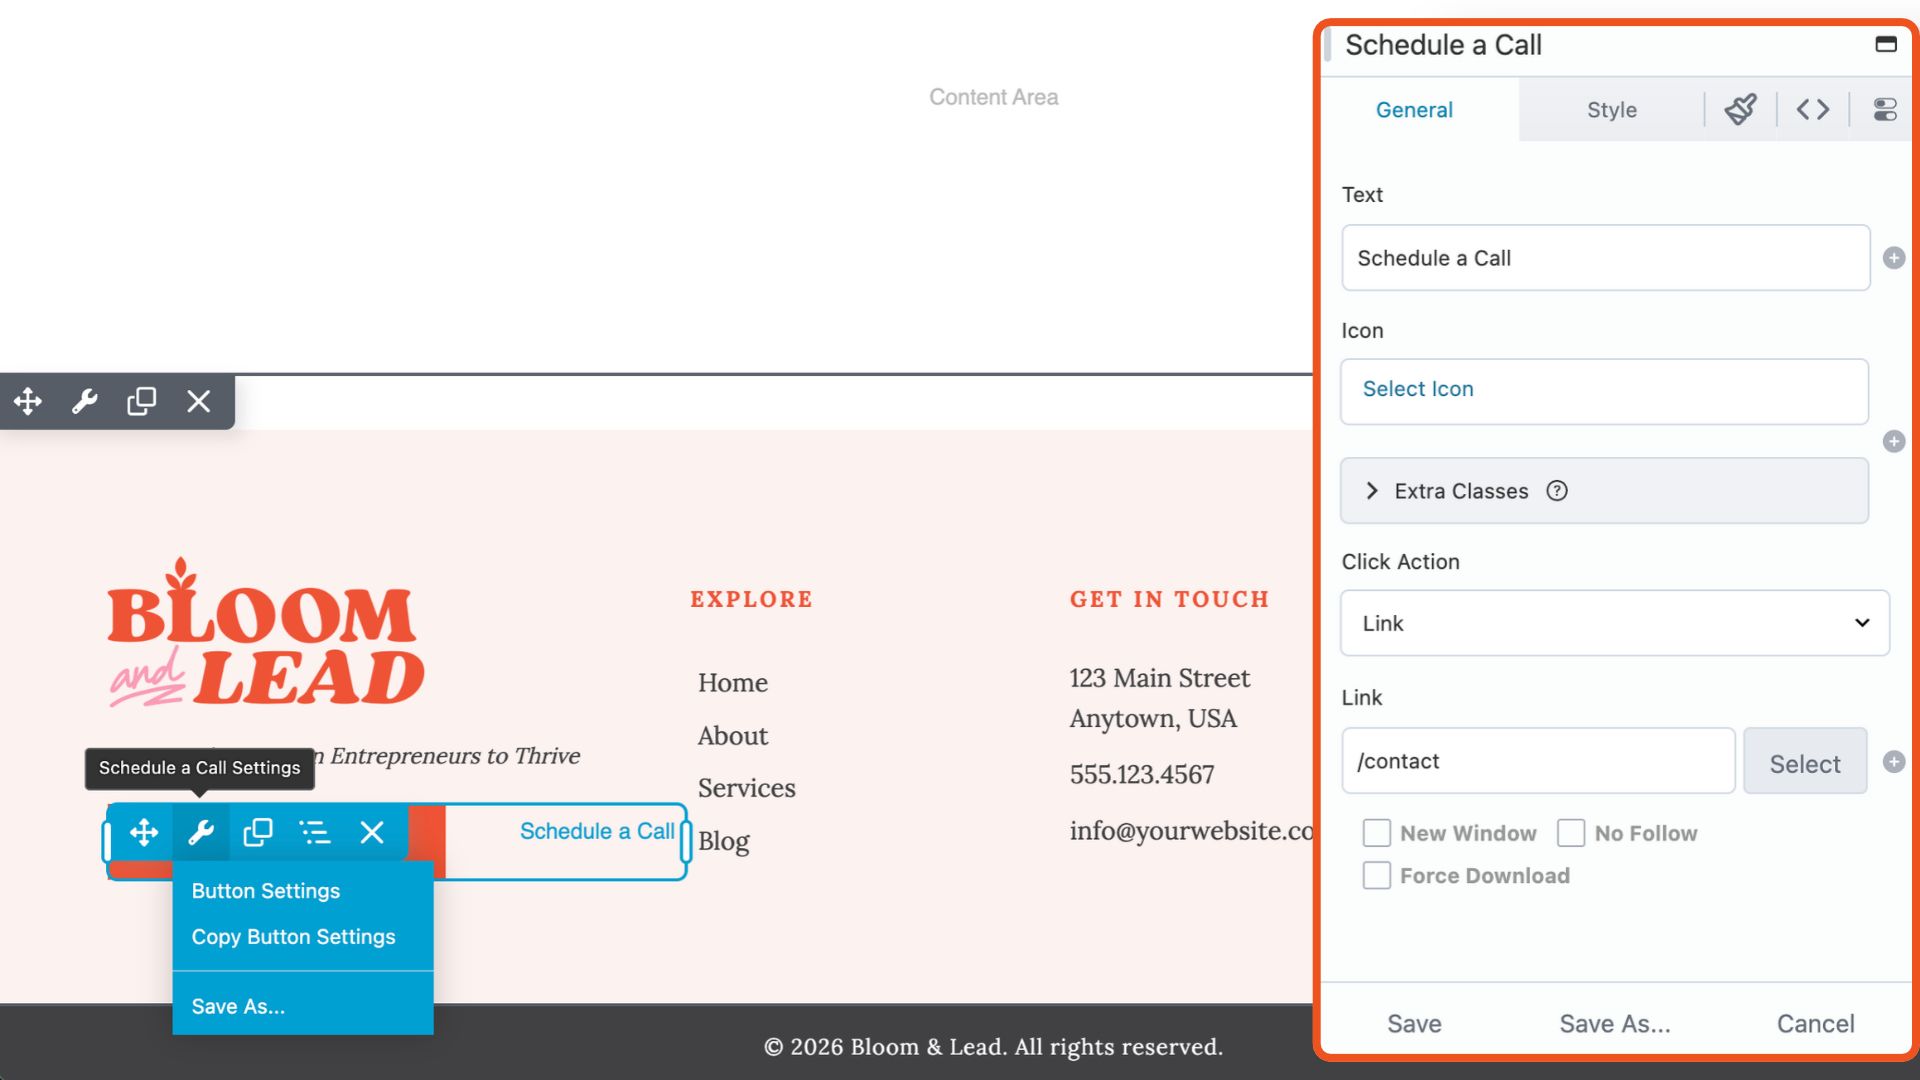
Because Claude built the layout with native Beaver Builder modules, you can edit it the same way you would any other Beaver Builder layout. Change the spacing. Adjust the typography and colors. Update the button or the menu settings. Nothing is locked in a code block you have to untangle.
Step 6: Verify Beaver Themer Location Rules
Beaver Themer lets you control where your headers, footers, and other Themer layouts appear on your WordPress site. You can assign a layout to the entire site or use location rules to target specific pages, post types, archives, or other areas of your site.
MCP can create the Beaver Themer layouts and set their location rules for you, but it’s worth checking that those rules are correct.
Go to Beaver Themer → Themer Layouts and check the Location setting for your header and footer:
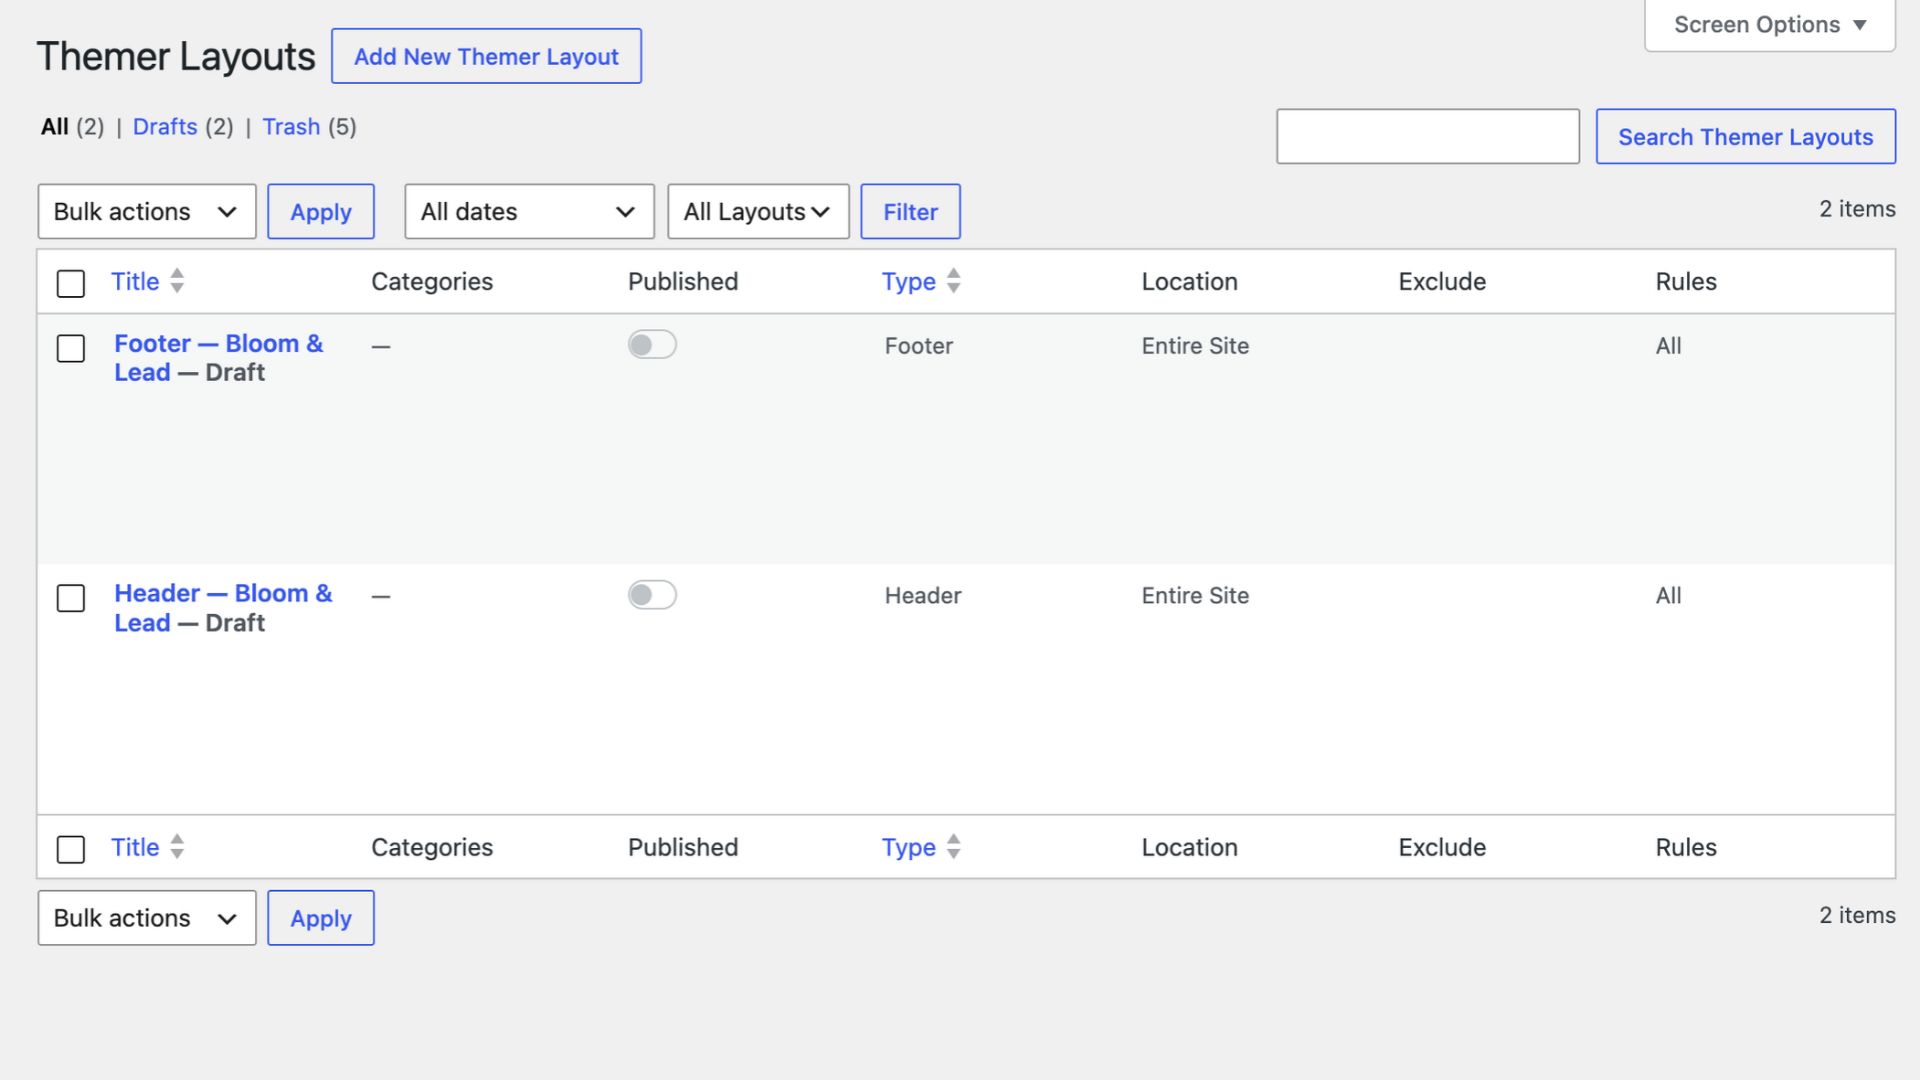
In this example, both layouts are set to display across the entire site. If your project requires more specific targeting, you can adjust the location rules here.
Step 7: Publish and Test Header and Footer Layouts
You may notice both layouts are saved as drafts. Claude creates the Beaver Themer layouts and configures their location rules, but they remain unpublished until you publish them.
Before publishing, verify the layouts in Beaver Builder. Then preview the site across desktop, tablet, and mobile to confirm the header and footer render as intended.
Check the navigation as well. Make sure menu links point to the correct pages and that the layouts maintain the expected spacing, alignment, and hierarchy at each breakpoint.
Finally, test the header and footer on a few pages to confirm the Themer location rules are behaving as expected.
Build Faster Without Giving Up Your Workflow
That’s the advantage of this AI web design workflow: Claude handles the repetitive layout work, while you retain control of the finished WordPress layouts.
Ready to try it? Beaver Builder AI is available with Plus, Professional, and Unlimited plans. Or try the workflow on our live demo site.
Frequently Asked Questions
With Beaver Builder AI and MCP, Claude can create Beaver Themer header and footer layouts on your WordPress site. It uses native Beaver Builder modules, so you can open and edit every part of the layout afterward.
You don’t need Beaver Themer to build a custom header and footer. The advantage of using Beaver Themer is that you can control where headers and footers display on your site through location rules.
Claude saves new Beaver Themer layouts as drafts. Open the layout in Beaver Builder, click Done, and choose Publish. Then confirm the location rules under Beaver Themer → Themer Layouts.
Beaver Builder AI is included with the Plus, Professional, and Unlimited plans. The Starter plan does not include it. Compare Beaver Builder plans.
On the MCP Connection screen, click Having trouble connecting? and choose Test Connection. It runs a live check from your site. Also confirm your site uses HTTPS, has a valid license, runs WordPress 6.9 or later, and uses pretty permalinks
Up Next in This Series
Want to understand how MCP Layout Mode and Layout Structure shape what Claude builds? The next article explains each setting and when to use it.
Understanding Beaver Builder AI MCP Settings →

Start here

Beaver Builder AI Demo
Build a page with AI on a site that already has Beaver Builder and Beaver Themer installed. Free AI credits included.
Our Newsletter
Our newsletter is personally written and sent out about once a month. It's not the least bit annoying or spammy.
We promise.
Try Beaver Builder Today

Related articles

How to Convert a ChatGPT Site to WordPress (Beaver Builder AI)
 -
October 1, 2026
-
October 1, 2026
Hey everyone! If you’ve built a website design in ChatGPT, you’ve probably wondered how to get your ChatGPT site to…
Beaver Builder AI MCP Settings: Layout Mode and Layout Structure Explained
 -
September 23, 2026
-
September 23, 2026
Beaver Builder AI has two MCP settings that shape AI-built pages. MCP Layout Mode controls what AI builds with: Native…

How to Transfer a Claude Design to WordPress (Beaver Builder AI)
 -
September 18, 2026
-
September 18, 2026
Designed a page in Claude? Two ways to transfer a Claude design to WordPress with Beaver Builder AI. Both fully...
Join the community
We're here for you
There's a thriving community of builders and we'd love for you to join us. Come by and show off a project, network, or ask a question.


Since 2014
Ready to build?
The WordPress page builder agencies and freelancers have trusted since 2014. Now with AI.