
How to Convert Figma Design to WordPress (Claude + Beaver Builder AI)
 -
October 9, 2026
-
October 9, 2026
How do you turn a Figma design into a WordPress site without rebuilding every section by hand? It’s a common challenge for web designers who want to move from an approved design to a working website without spending days recreating layouts.
With Claude and Beaver Builder AI, you can turn your Figma design into an editable WordPress draft in a fraction of the time. Review the result, fine-tune it in Beaver Builder, and publish when you’re ready.
This guide walks you through the complete Figma to WordPress workflow, from the one-time setup to the repeatable process you can use for every page on your site:
Table of Contents
- Why Figma and Beaver Builder Work Well Together
- What You'll Need
- Part One: One-Time Setup
- Part Two: Build each Page
- Remove the Default Header and Footer
- Turn Figma Designs Into Editable WordPress Pages
Why Figma and Beaver Builder Work Well Together
Figma gives web designers precise control over layouts, typography, colors, and spacing, along with real-time collaboration. But once a design is approved, someone still needs to turn it into a working website.
Beaver Builder makes that next step easier. Its drag-and-drop visual editor lets you build responsive WordPress pages, fine-tune layouts on different devices, and add custom code when you need more control.
For agencies and freelancers, the appeal goes beyond the editor. Beaver Builder has a long-standing reputation for stability, predictable updates, and developer-friendly markup. You can build client sites with the flexibility to customize them, maintain them, and hand them off without making every future change a developer task.
Claude and Beaver Builder AI help bridge the gap between design and development. Claude uses your Figma design as a reference, while Beaver Builder AI lets you turn that work into an editable WordPress page.
The result isn’t a flattened mockup or a page you can’t change. It’s an editable layout you can refine visually, adjust for mobile, and maintain as your client’s website evolves.
What You’ll Need
Before you start, you’ll need the following:
- Figma design
- Claude account
- WordPress 6.9+
- Beaver Builder 2.11+
- Beaver Builder AI 1.0.1+
- WordPress MCP Adapter
- Beaver Themer (optional)
You can use Figma’s free Starter plan for this workflow, although Figma limits how frequently AI tools can access files depending on your plan.
Beaver Builder AI is included with the Plus, Professional, and Unlimited plans. You can download the Beaver Builder plugins from your My Account page.
Want to experiment with this Figma to WordPress workflow without setting up your own WordPress site? You can also follow along using the Beaver Builder live demo.
Part One: One-Time Setup
You only need to complete these steps once. After that, you can use the same setup for additional Figma pages.
Step 1: Start With Your Figma Design
Start with the Figma design you want to turn into a WordPress page. In this tutorial, we’re using a homepage for a fictional business called Craft Solutions, designed with Figma’s free Starter plan:
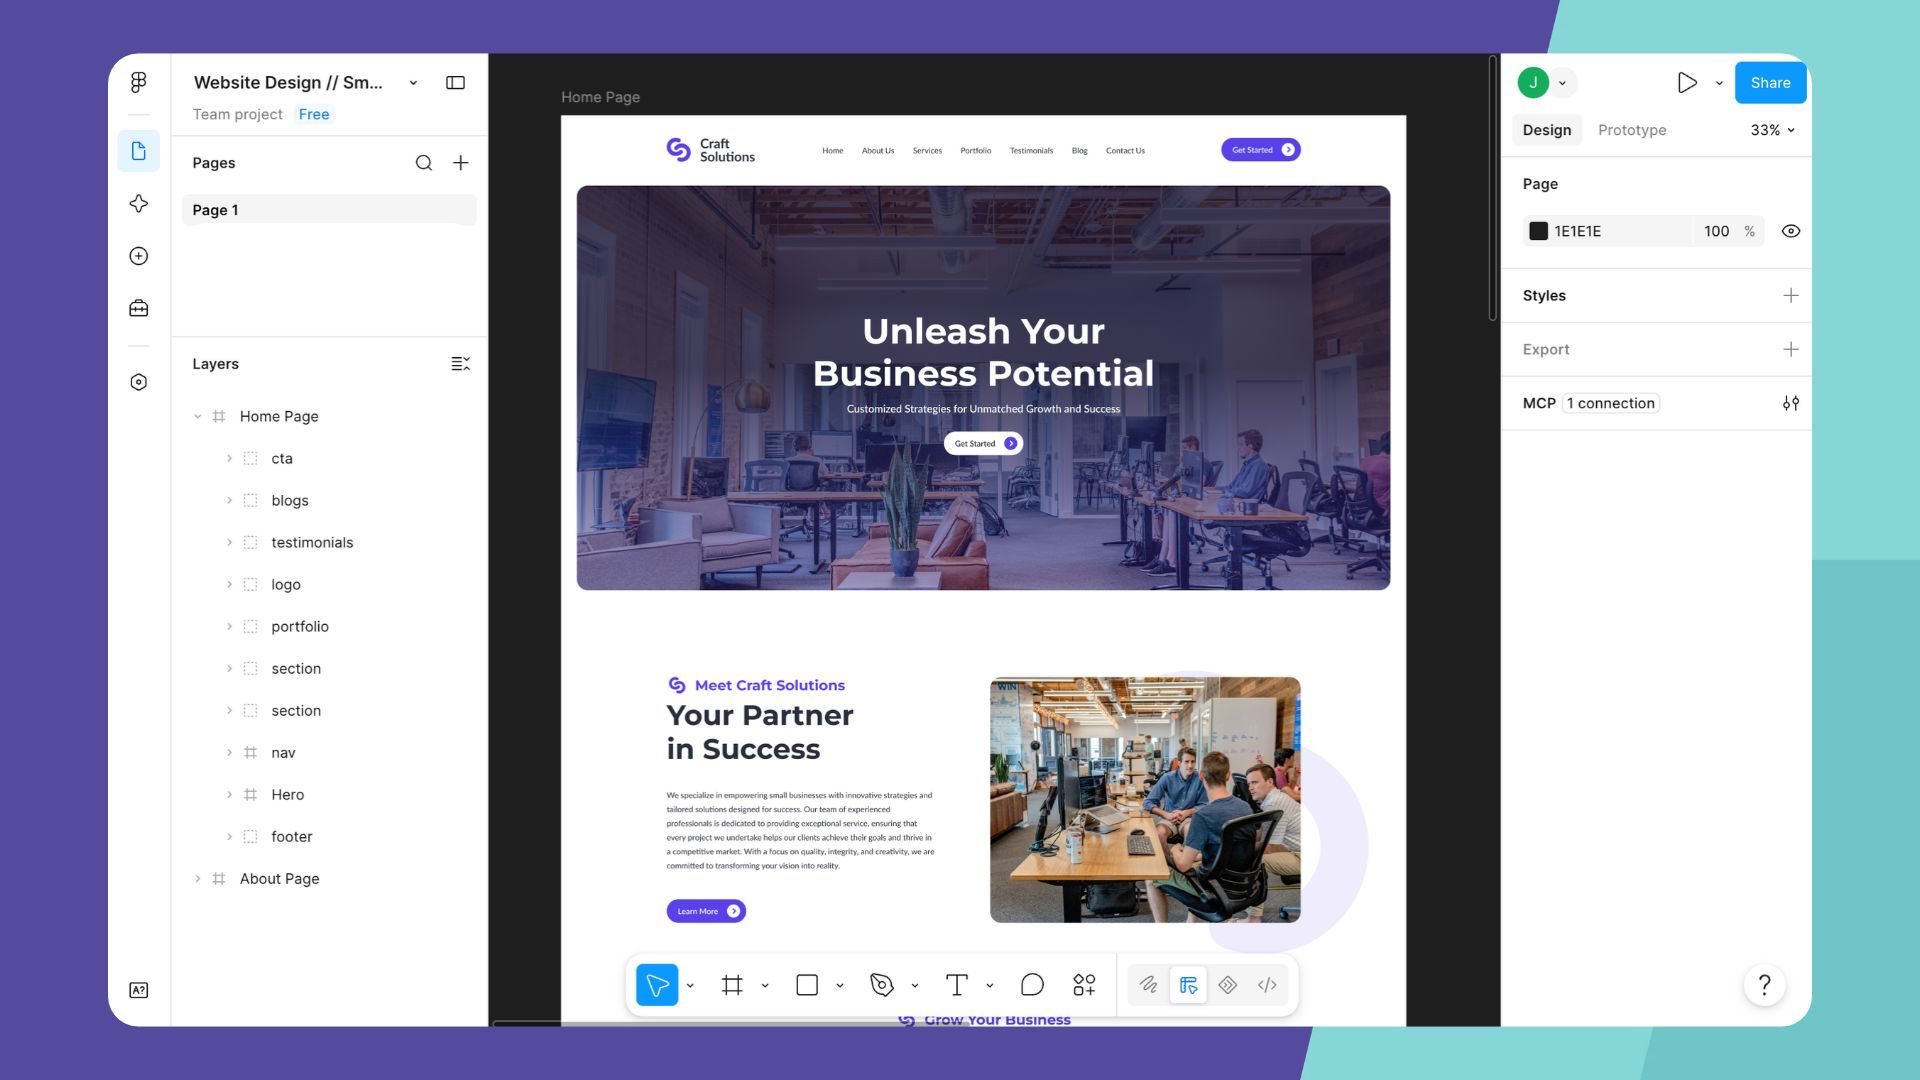
Open the Figma file and select the frame you want Claude to build. We will come back to this in part two.
Step 2: Connect Figma to Claude
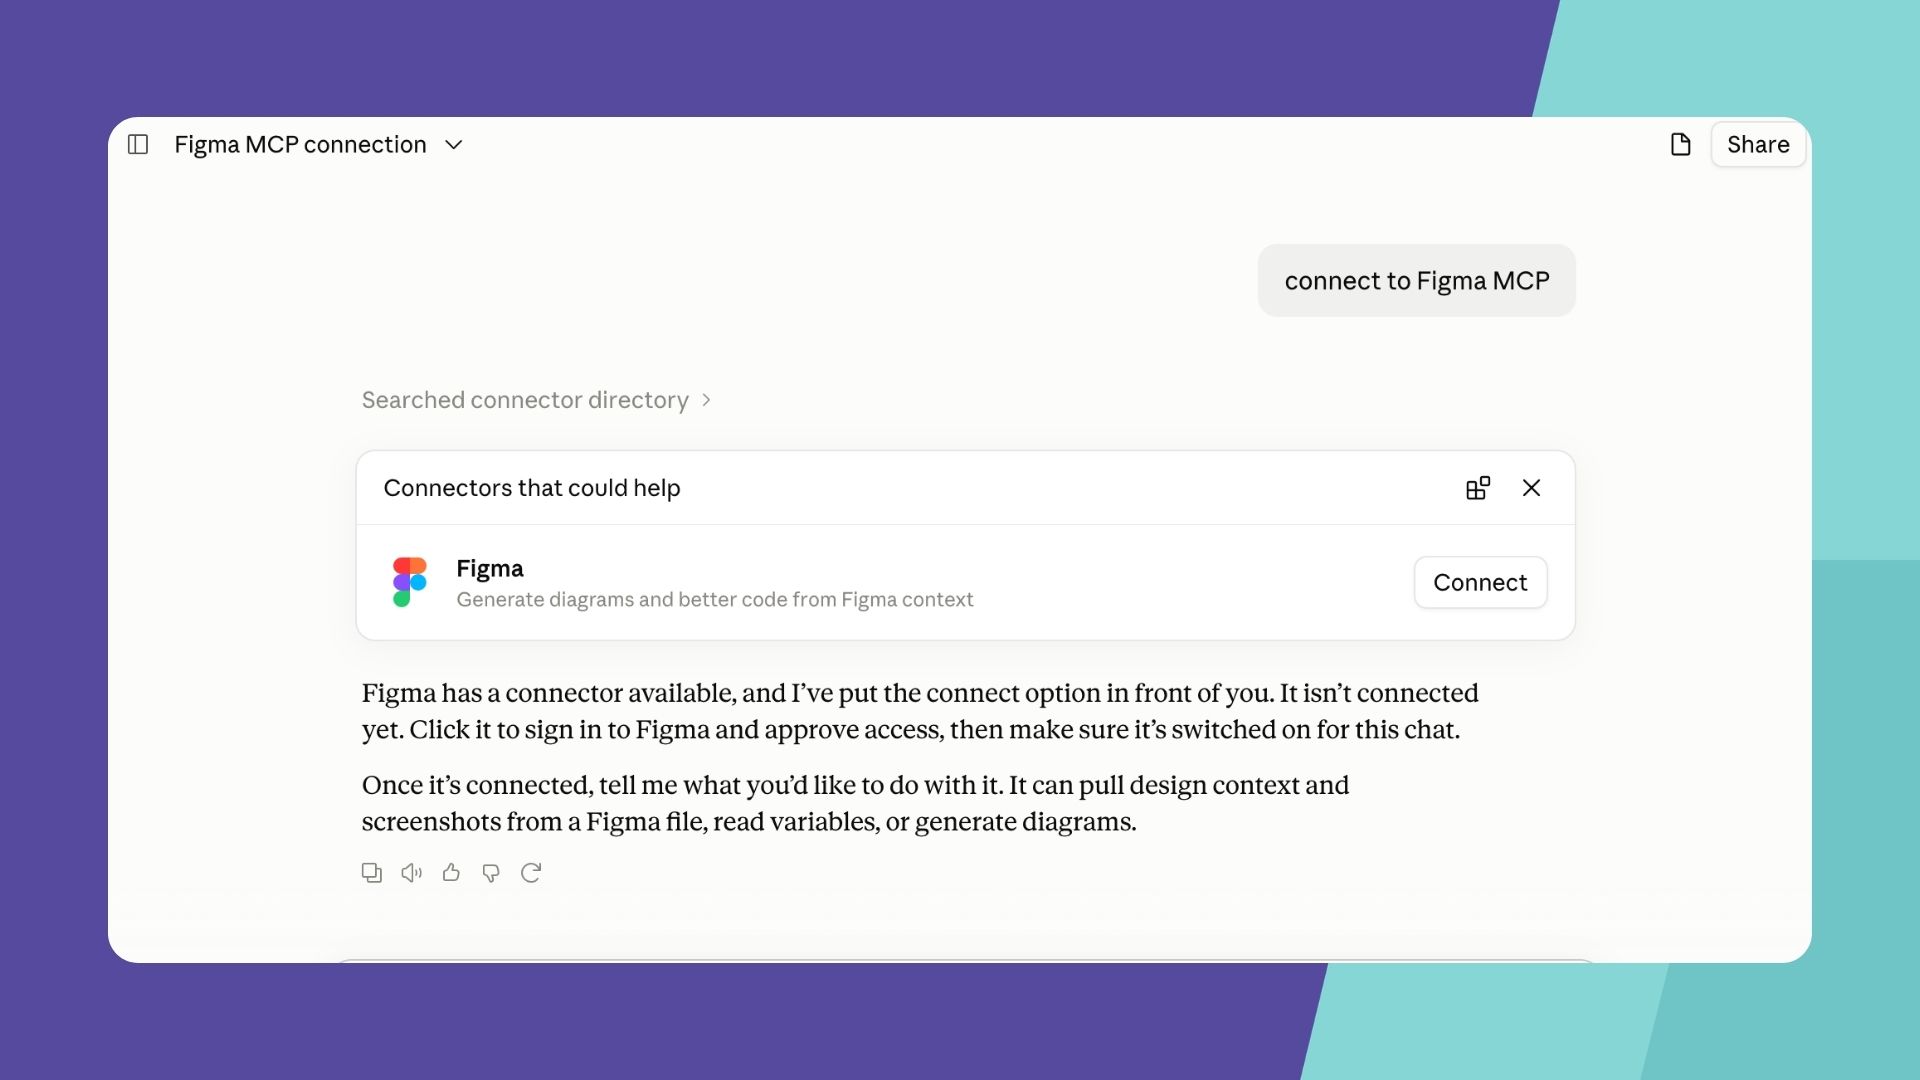
The Figma MCP connector lets Claude read your design files for you. The easiest way to set it up is to ask Claude to connect Figma. Claude finds the connector and shows a Connect button.
Click Connect. Figma asks you to sign in and approve access:
Note: Figma limits how often an AI tool can read your files, and the limit depends on your plan. At the time of recording, the free Starter plan allowed up to 20 calls per month. A Professional plan with a full seat allowed up to 200 per day.
Step 3: Connect Claude to WordPress
Now you’ll connect Claude to your WordPress site. First, make sure Beaver Builder, Beaver Builder AI, and the WordPress MCP Adapter are installed and active on your site.
Then go to Settings → Beaver Builder AI → MCP Connection. You’ll see two options: Connect via Beaver Builder AI or Connect Manually. Choose Connect via Beaver Builder AI.
This option runs a requirements check before connecting. Your site needs:
- HTTPS and public access
- A valid Beaver Builder license
- The MCP Adapter plugin
- WordPress 6.9 or later
- Pretty permalinks
Setting up a fresh WordPress site? Go to Settings → Permalinks and select Post name. On an existing site, proceed with caution. Changing the permalink structure can change your existing URLs.
Click Authorize. Beaver Builder AI gives you an MCP Endpoint URL. Copy it.
Next, open Claude and go to Connectors → Add custom connector. Paste the endpoint URL and complete the authorization.
Now confirm the connection works. Ask Claude:
Confirm that you have an active Beaver Builder MCP connection to my WordPress site. Don’t make any changes yet.
Beaver Builder AI 1.0.1 added a Test Connection tool. On the MCP Connection screen, click Having trouble connecting? and choose Test Connection. It runs a live check from your site and helps point you to the problem.
Step 4: Configure Beaver Builder AI MCP Settings
Two settings control how Claude builds your page. In the WordPress dashboard, go to Settings → Beaver Builder AI → Settings to find them:
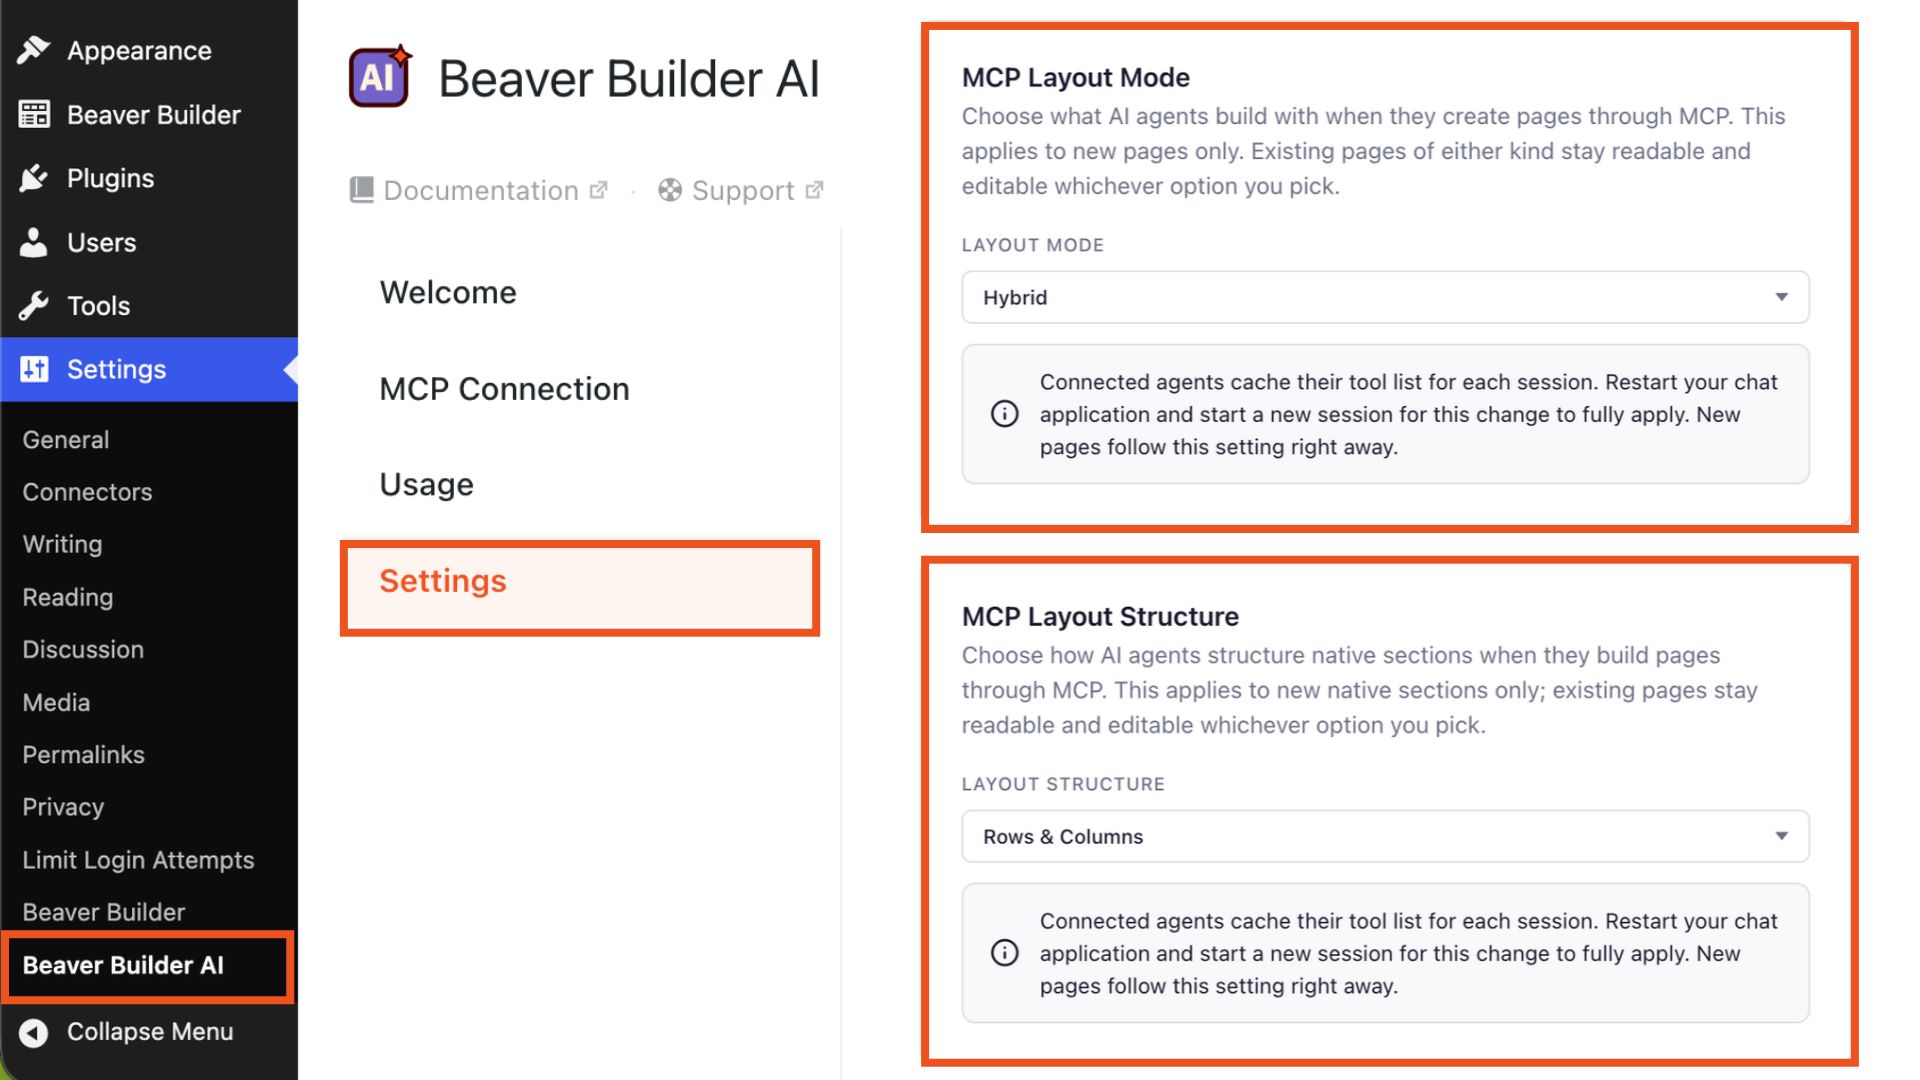
MCP Layout Mode controls what Claude can use to build new pages:
- Native: Claude uses Beaver Builder’s native modules.
- Custom: Claude uses Custom Modules with generated HTML and CSS.
- Hybrid: Claude can use a combination of both.
MCP Layout Structure controls how native sections are built. Choose Rows/Columns or Box Modules.
These settings apply to new pages only. Your existing pages stay readable and editable no matter which option you pick.
Not sure which combination fits? Read our guide to Beaver Builder AI MCP Settings: Layout Mode and Layout Structure Explained.
That’s the one-time setup. From here, you and Claude build pages.
Part Two: Build each Page
Once the initial setup is complete, the process becomes much simpler. Repeat these steps for every page you want to convert.
Step 1: Copy Your Figma Frame Link
In Figma, select the page or frame you want Claude to build. Click Share, then Copy link.
You’ll give this link to Claude in the next step.
Step 2: Give Claude the Figma Link and Your Instructions
Paste the link into Claude along with your prompt. Swap in the name of your Figma frame and the name of your WordPress site so Claude builds on the right one.
Here’s a prompt you can adapt:
Here’s a Figma design: [PASTE FIGMA LINK]
Rebuild the [SCREEN NAME] screen as a Beaver Builder page on [SITE URL] using Beaver Builder AI.
- Check that every section and image landed, then send me the preview link.
- Pull the design from Figma, including a screenshot to match against.
- Put the photos in the WordPress Media Library so they don’t expire.
- Build it as one HTML file first and show me before pushing.
- Make it responsive. If the design is mobile only, make a sensible desktop layout.
- Push it as a draft. Don’t publish.
You don’t have to be this specific. If you want Claude to make more design decisions, give it a general direction. For client work, specific prompts usually win. They help Claude match the design you already approved.
I have found this checkpoint-based approach to be one of the most useful parts of the workflow. Instead of asking AI to build directly on your site and hoping the result is right, you get a chance to review the page before it reaches WordPress.
Step 3: Review the HTML Checkpoint
Claude stops and asks you to review the HTML file before it builds anything in WordPress:
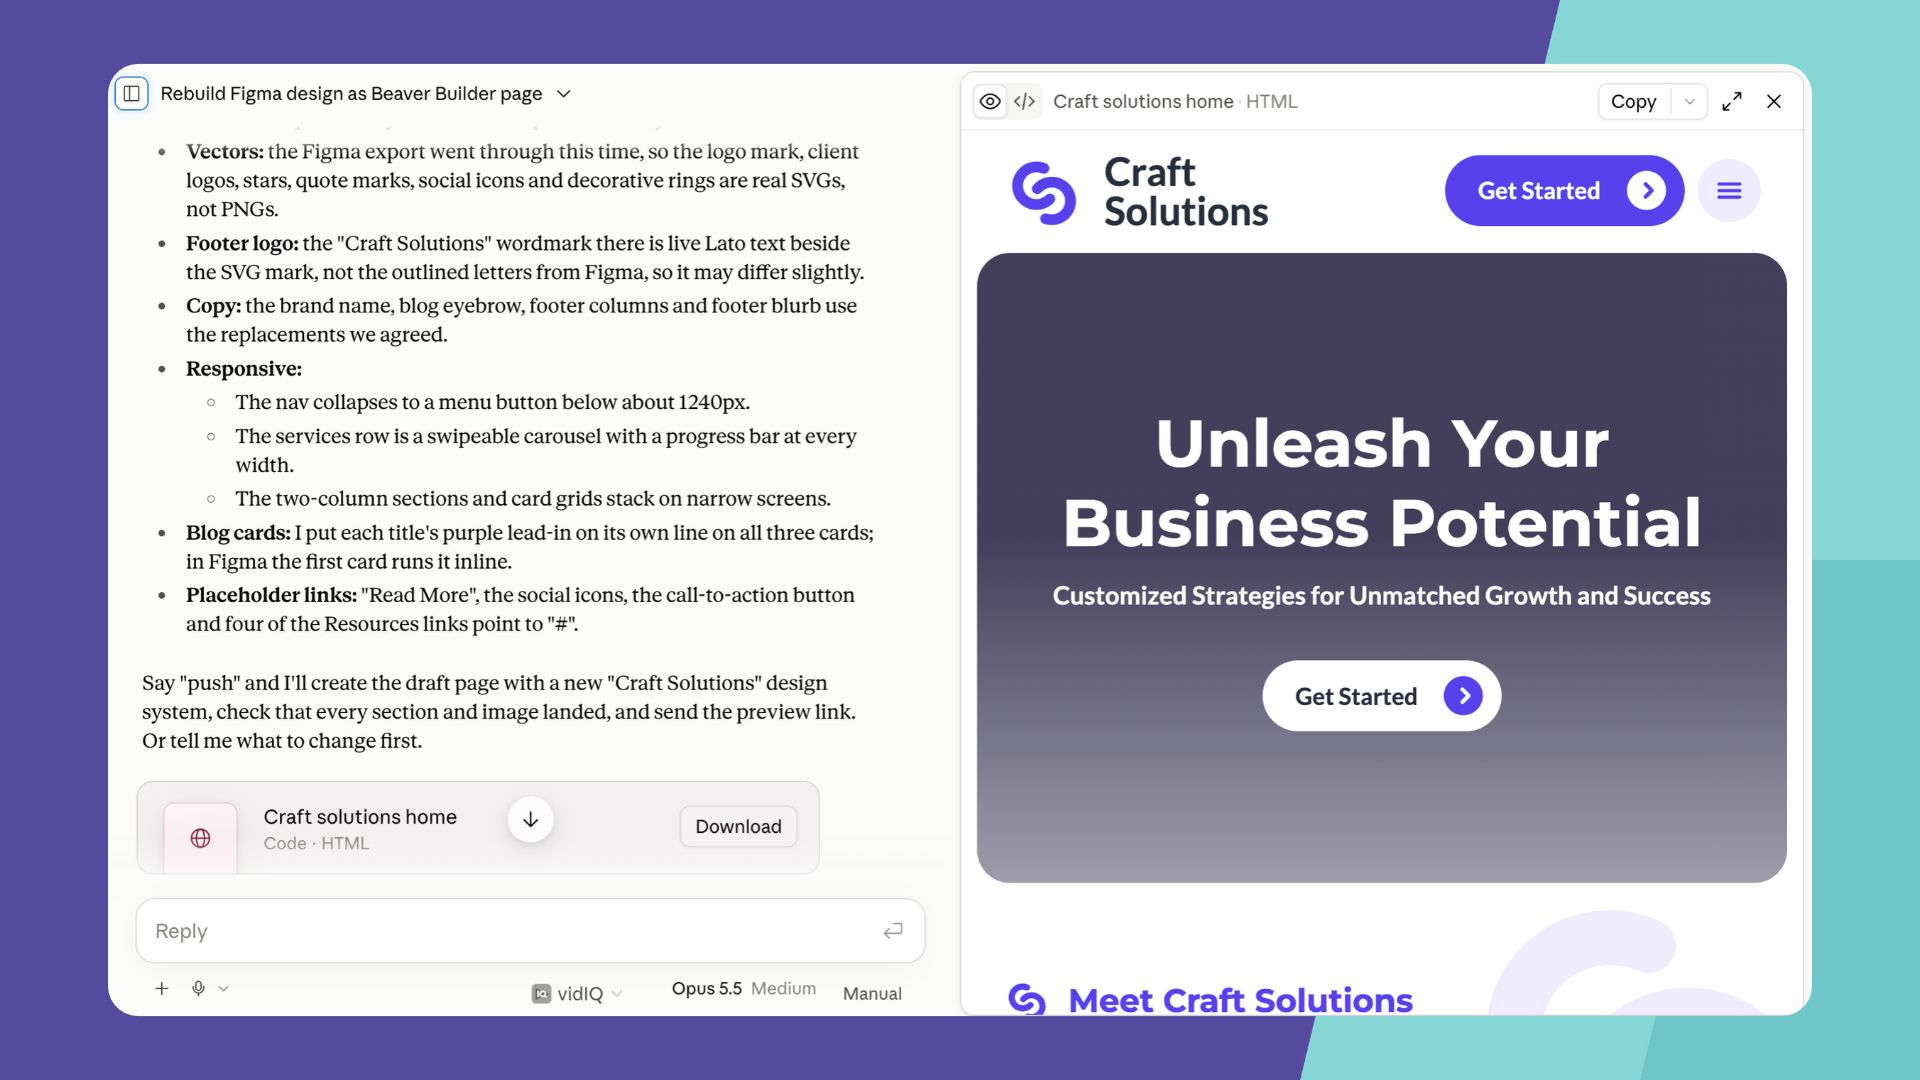
For example, if a section is missing or an image isn’t correct, ask Claude to fix it before the page is pushed to WordPress. Once you’re happy with the result, tell Claude to continue.
Step 4: Push the Page to WordPress and Edit in Beaver Builder
Tell Claude to push the page to Beaver Builder as a draft. Claude then reads the page back. It confirms that every section landed and that your images point to your media library. When it finishes, it sends you a draft preview link.
Click the preview link and open the page in the Beaver Builder editor. Start with the page structure. You’ll find rows, columns, native modules, and custom modules that Claude created through MCP:
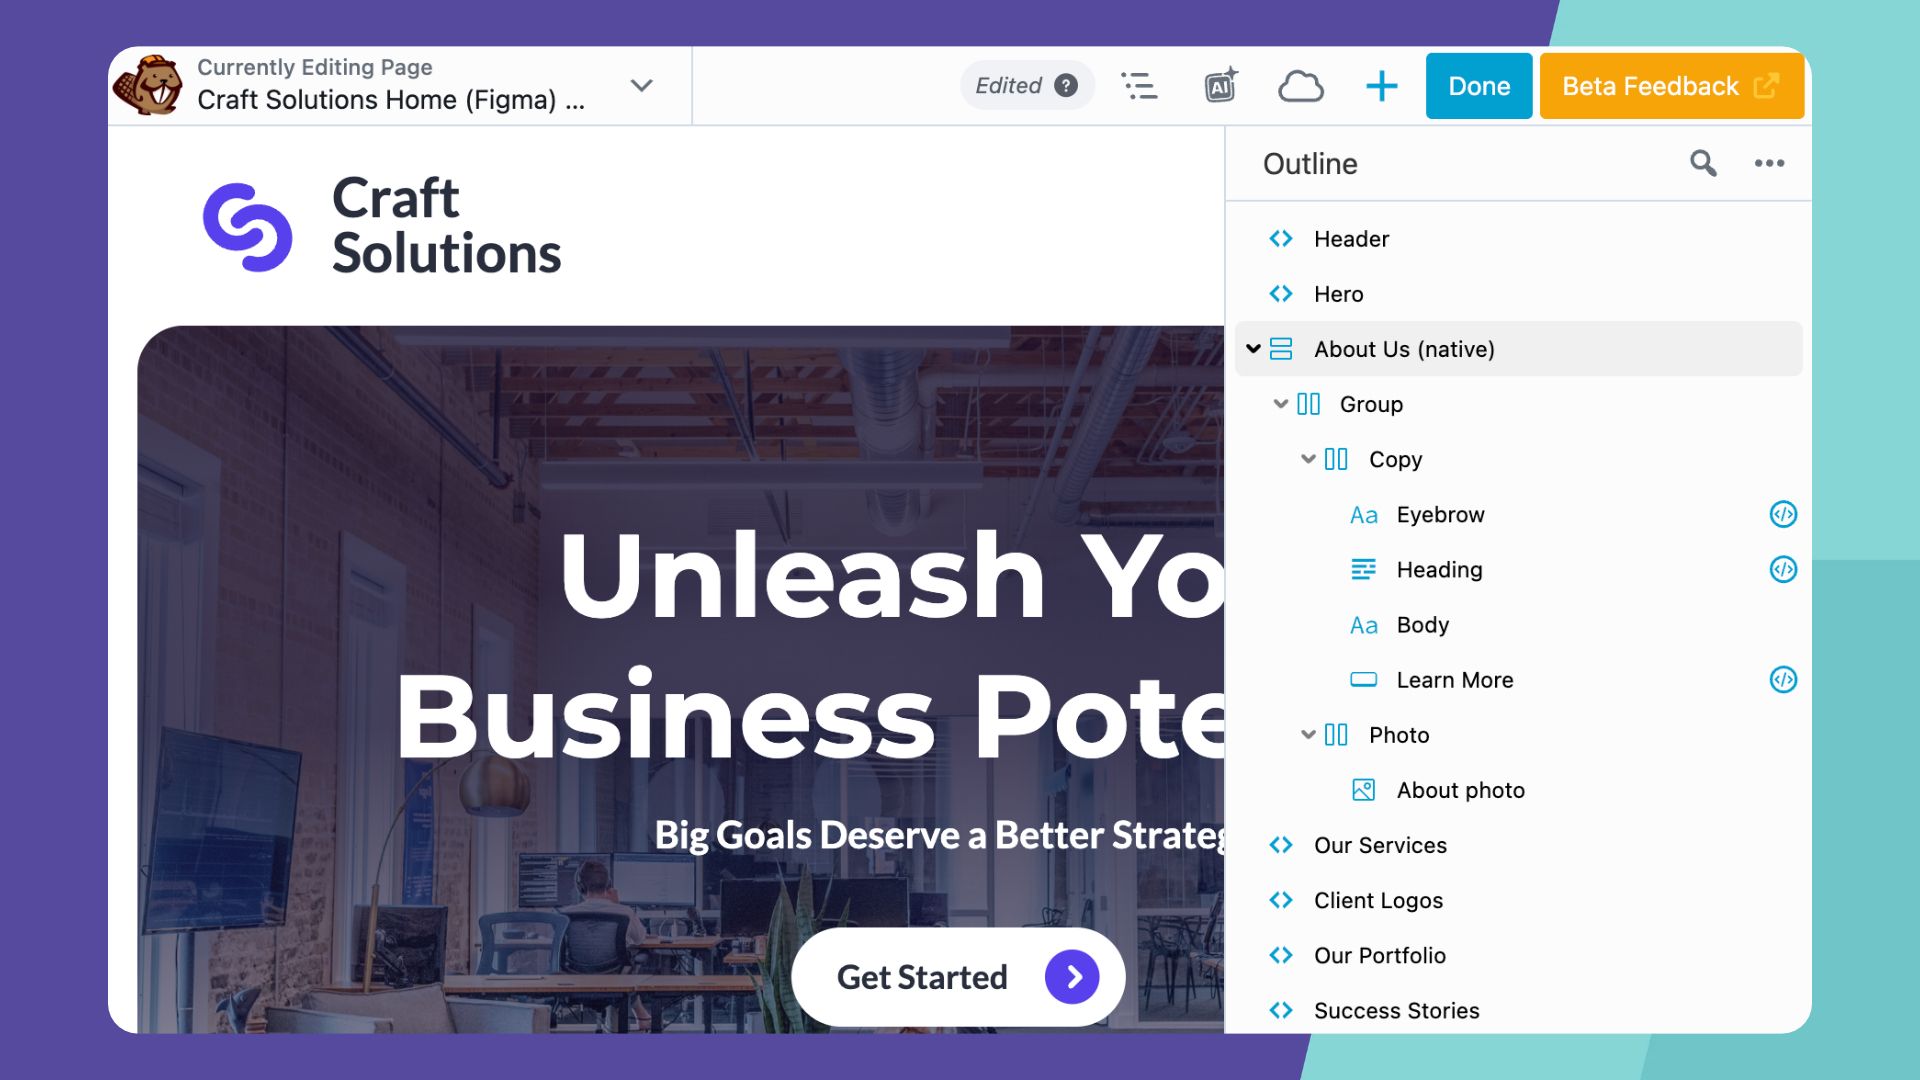
- Native modules have the traditional Beaver Builder settings.
- Custom modules are editable too. Their Design and Code tabs let you work with visual settings or the underlying code.
Want the Design and Code tabs on native modules as well? Enable them on the Beaver Builder settings page under the Advanced tab.
Next, check the responsive layouts. Switch to tablet and mobile and review each one. To fix anything, you can ask Claude to make the change, or edit the page in Beaver Builder yourself.
Once you’re happy with the layout, repeat this process for each remaining page in your Figma design. You can also keep chatting with Claude to build and refine additional pages as you go.
Remove the Default Header and Footer
If your draft displays the Beaver Builder Theme’s default header and footer, switch the page template to No Header / Footer under Page → Template, then save.
Using Beaver Themer? Skip the page-by-page approach. Ask Claude to build your header and footer as reusable Themer layouts instead. You build them once and they apply across your site. Read How to Build an Editable WordPress Header and Footer With AI for the full walkthrough.
Turn Figma Designs Into Editable WordPress Pages
Moving from Figma to WordPress doesn’t have to mean rebuilding every section by hand or settling for a static design. With Claude and Beaver Builder AI, you can turn your Figma designs into editable WordPress pages while keeping control of the final result.
Claude handles the translation work. You review the output, refine the layout in Beaver Builder, and decide when each page is ready to publish. Your designs become real WordPress pages built with native Beaver Builder modules and custom modules, giving you and your clients the flexibility to make changes long after launch.
Spend less time rebuilding designs and more time creating great websites.
Ready to try it? Beaver Builder AI is available with Plus, Professional, and Unlimited plans. Or try the workflow on our live demo site.
Designing in Claude instead of Figma? Read How to Transfer a Claude Design to WordPress.

Start here

Beaver Builder AI Demo
Build a page with AI on a site that already has Beaver Builder and Beaver Themer installed. Free AI credits included.
Our Newsletter
Our newsletter is personally written and sent out about once a month. It's not the least bit annoying or spammy.
We promise.
Try Beaver Builder Today

Related articles

How to Build an Editable WordPress Header and Footer With AI
-
October 2, 2026
Headers and footers are among the most repetitive parts of building a WordPress website. AI can speed up the process,…

How to Convert a ChatGPT Site to WordPress (Beaver Builder AI)
 -
October 1, 2026
-
October 1, 2026
Hey everyone! If you’ve built a website design in ChatGPT, you’ve probably wondered how to get your ChatGPT site to…

Beaver Builder AI MCP Settings: Layout Mode and Layout Structure Explained
-
September 23, 2026
Beaver Builder AI has two MCP settings that shape AI-built pages. MCP Layout Mode controls what AI builds with: Native…
Join the community
We're here for you
There's a thriving community of builders and we'd love for you to join us. Come by and show off a project, network, or ask a question.


Since 2014
Ready to build?
The WordPress page builder agencies and freelancers have trusted since 2014. Now with AI.