
In a previous article, we covered what Beaver Builder AI is and how it works. Now let’s take a look at the different ways you can build with it.
Beaver Builder AI gives you three workflows: built-in chat for visual editing inside WordPress, MCP for connecting an AI agent directly to your site, and Design Kits for building locally before importing into WordPress.
Here’s a quick overview of all three, followed by a closer look at how each workflow works in practice.
Three Ways to Build with Beaver Builder AI
Beaver Builder AI is designed to fit how you already build:
| Method | Where you work | Best for |
| Built-in Chat | Inside WordPress | Visual editors, content-first workflows |
| MCP Connection | Your AI agent (Claude, Cursor, etc.) | Developers, power users, programmatic control |
| Design Kits | Your local machine | Working outside WordPress before importing |
The good news is you’re not limited to a single workflow. You can combine methods depending on the project or task. For example, you might use the Beaver Builder AI chat for quick page generation and visual editing, MCP for larger AI-assisted changes across a site, and Design Kits for building locally before importing into WordPress.
1. Built-in Chat: Visual AI Inside WordPress
The built-in chat works directly inside Beaver Builder or the WordPress Block Editor. Once it’s set up, you can open any page, describe what you want, and the AI builds or edits it in real time:
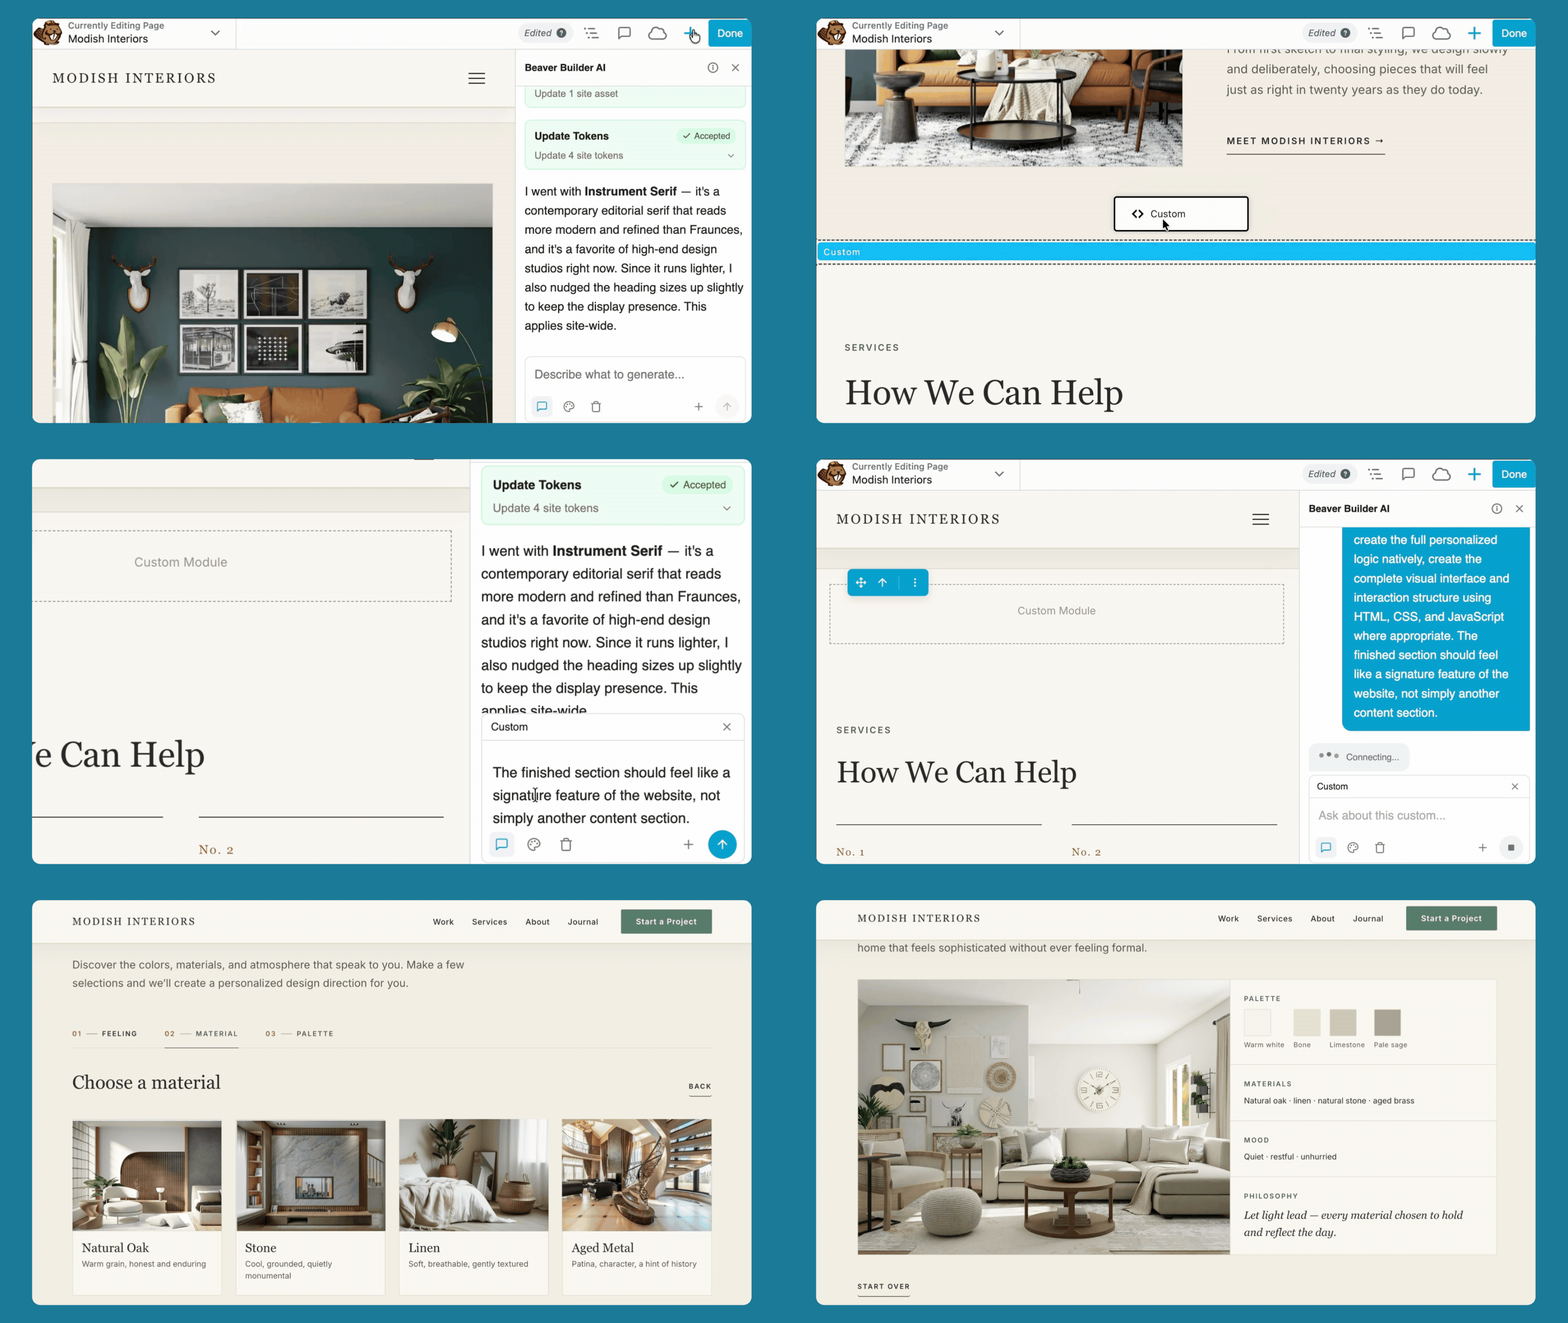
This is the most visual workflow. The AI can see what you’re viewing, what’s selected, and where you’re scrolling, so it’s easy to target a section and describe what you want to do next.
You stay inside WordPress the entire time while refining the page conversationally.
A few things to know before you start:
- You’ll need your own AI provider’s API key.
- API usage bills directly to your AI account.
- No additional setup is required beyond connecting your key.
Typical workflow: Open a page → describe a change or new section → review the result → refine manually or with follow-up prompts.
How to Set Up Beaver Builder AI Chat →
2. MCP Connection: Build Through Your AI Agent
Model Context Protocol (MCP) is an open standard that lets AI tools communicate with external services. With MCP, you connect an AI agent like Claude Desktop, Cursor, or Codex directly to your WordPress site:
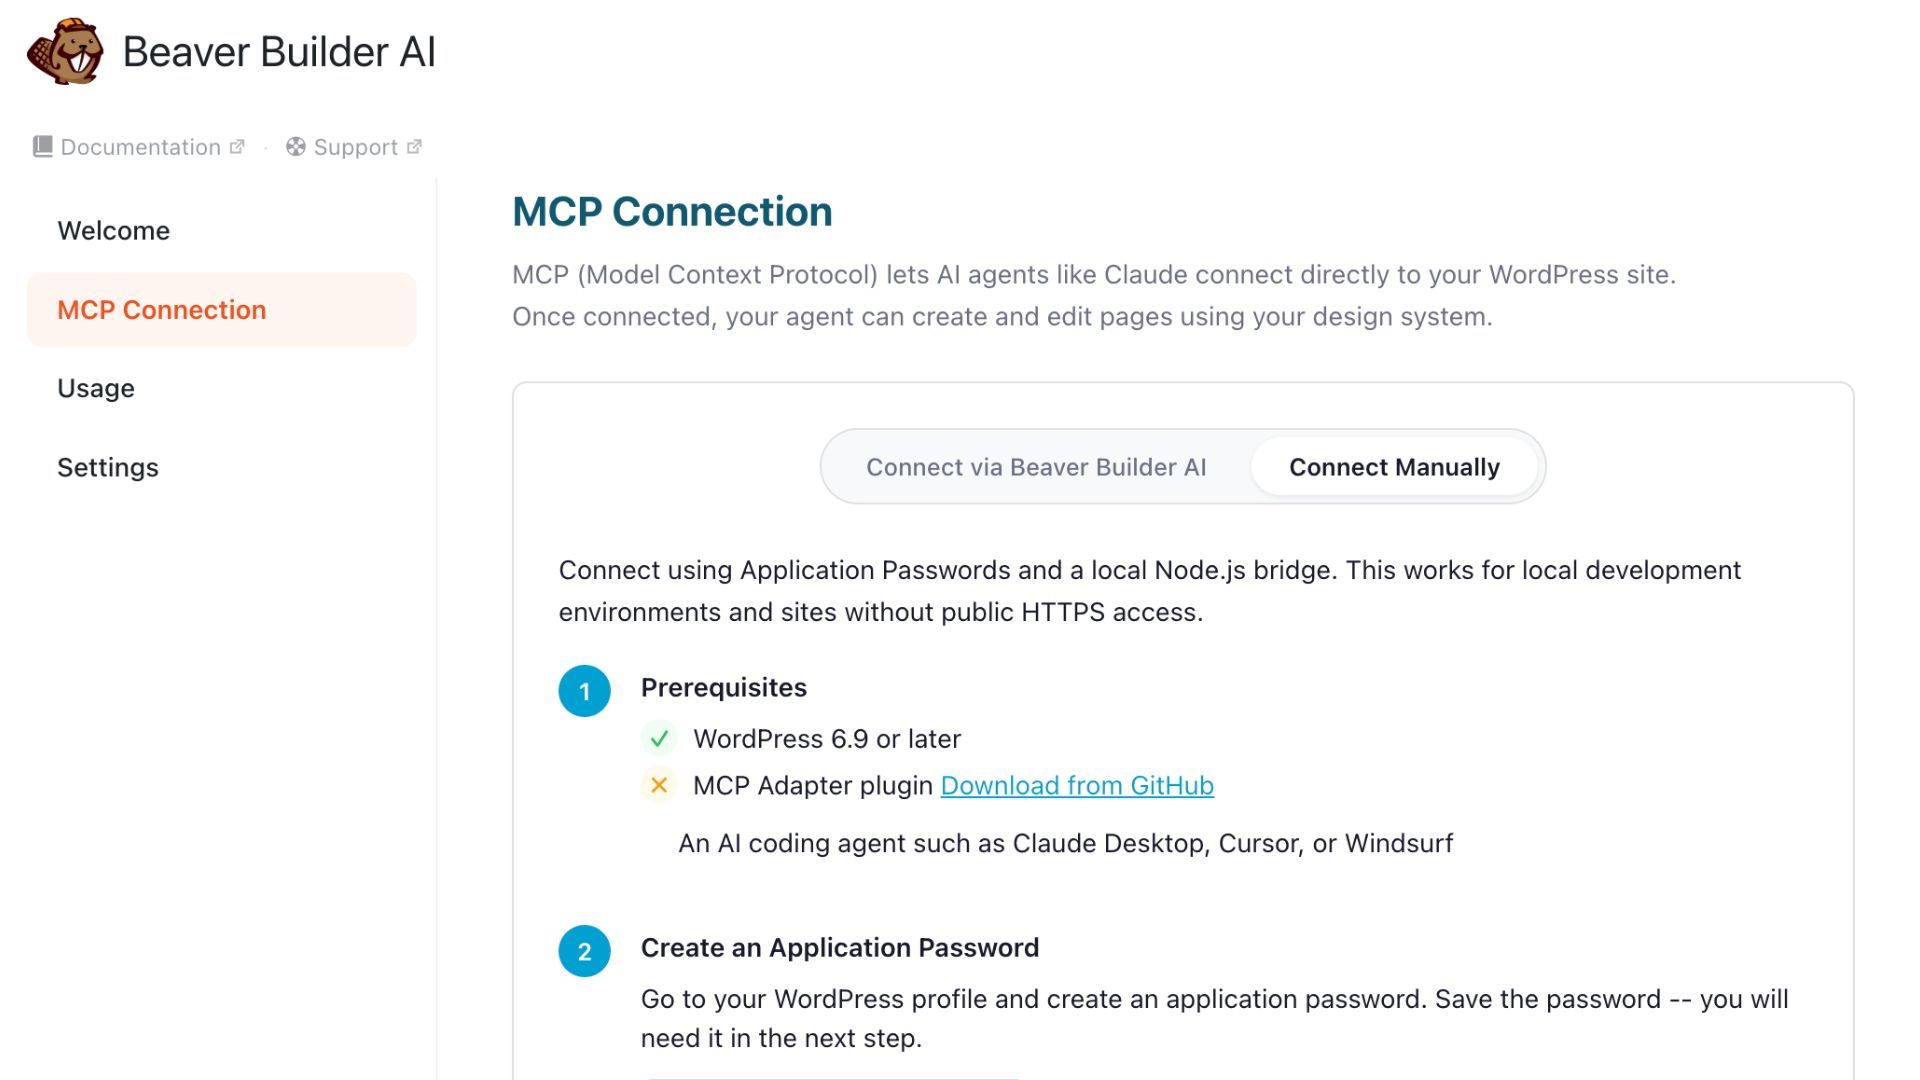
Instead of working inside WordPress, you build and manage pages from inside your AI agent. The agent can create layouts, edit content, manage design systems, and make changes across your site while WordPress stays in the background.
There are two ways to connect:
- Connect via Beaver Builder AI: Let Beaver Builder AI handle the authorization process for you. No terminal or manual configuration required.
- Connect manually: Uses WordPress Application Passwords and a local Node.js bridge. Requires WordPress 6.9+ and the MCP Adapter plugin.
Typical workflow: Open Claude Desktop (or another agent) → describe what you want → the agent creates or edits pages on your site → review in WordPress → iterate.
3. Design Kits: Build Locally with AI Outside WordPress
Design Kits are self-contained folders of HTML files that let you build entire pages outside WordPress. You download a starter kit, open it in any AI tool that can write HTML, and use the built-in design system as the foundation for your pages. When you’re ready, you import the result into WordPress:
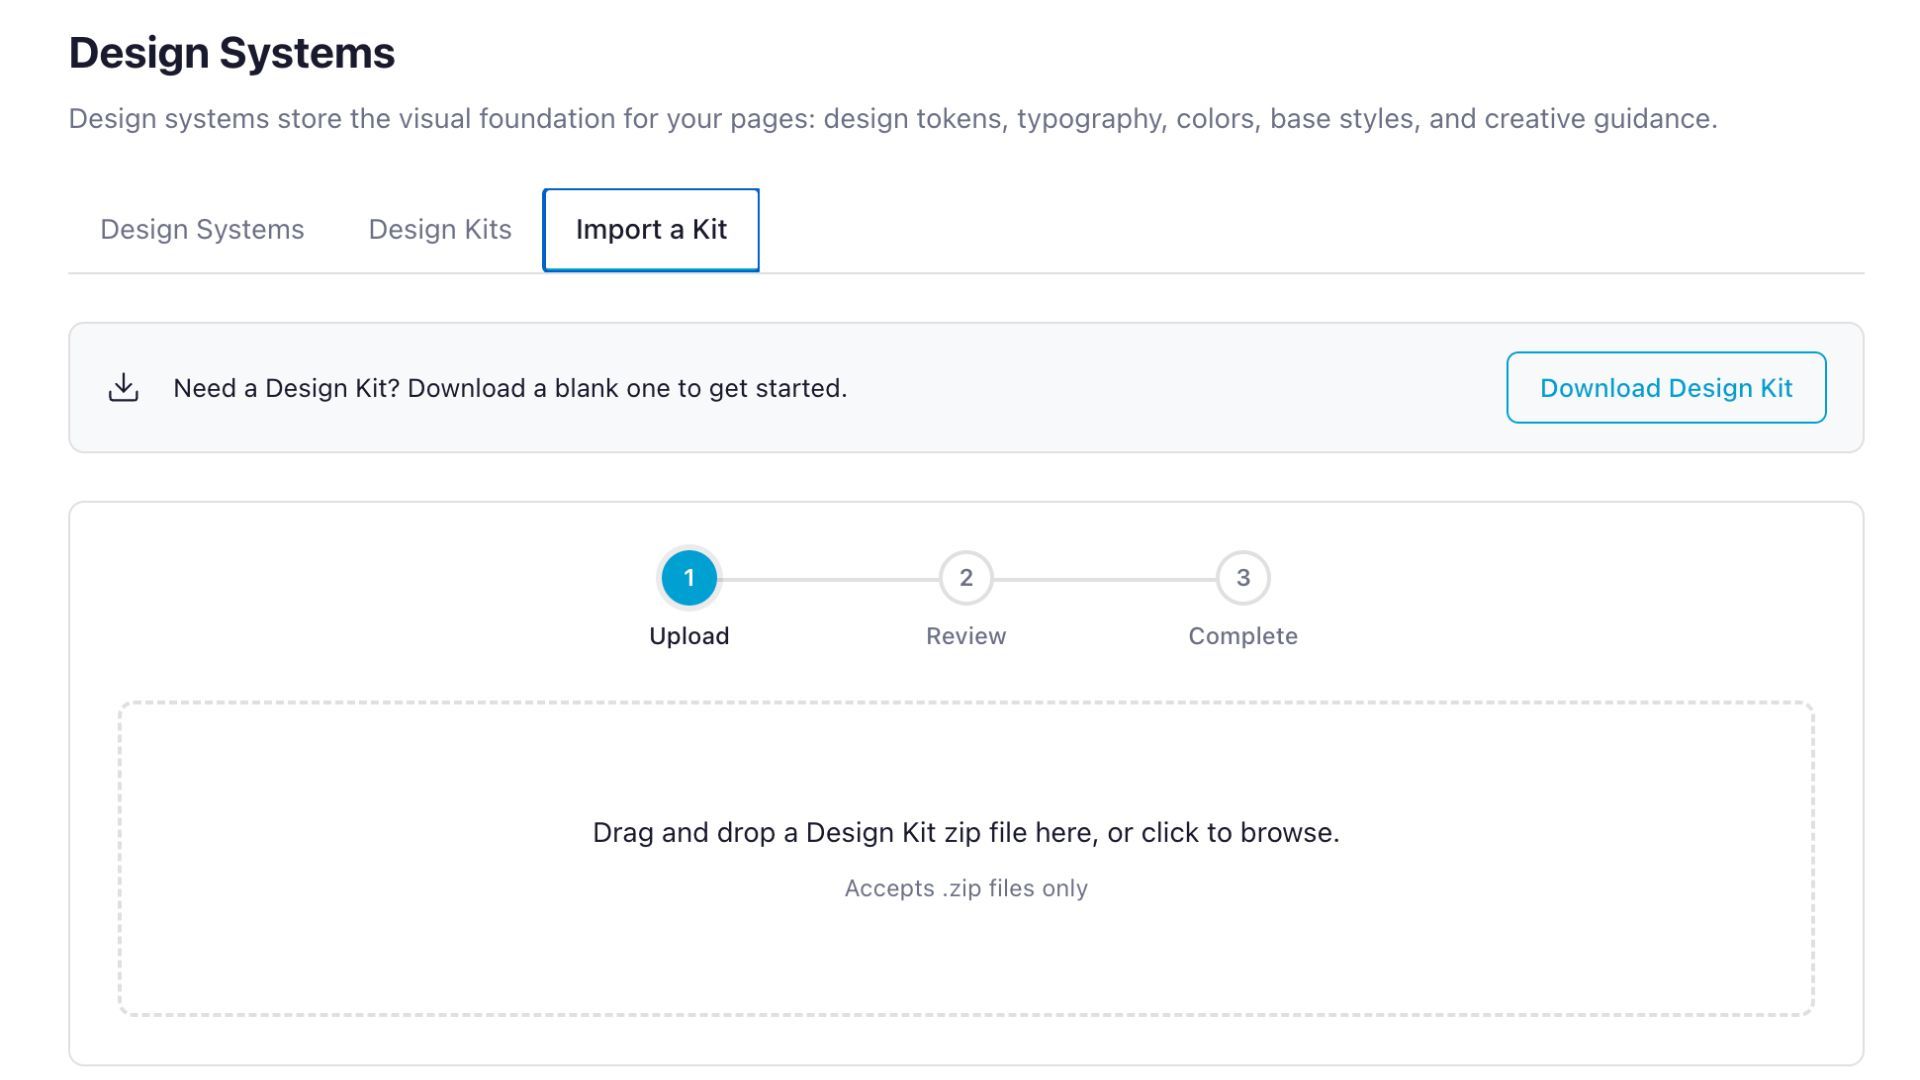
Design Kits are fully provider-agnostic. They work with tools like Claude Code, ChatGPT, Gemini, or any AI coding assistant. You’re not tied to a specific platform, and you don’t need WordPress running during the build process.
Typical workflow: Download a starter kit → open it in your AI coding tool → describe pages and sections → generate HTML layouts → import into WordPress when ready.
Which Workflow Should You Use?
Start with the built-in chat if you want the fastest and most visual way to work with Beaver Builder AI. The feedback loop is immediate, and you can refine pages directly inside WordPress.
Use MCP if you want deeper control or already work inside an AI agent like Claude Desktop or Cursor. It’s especially useful for managing design systems, handling larger updates, or working across multiple pages.
Use Design Kits if you prefer building outside WordPress first, want full control over the HTML, or like working locally with your AI coding tool of choice.
You’re not limited to a single workflow. Many users combine methods depending on the task, using MCP for larger structural work, the built-in chat for everyday editing, and Design Kits for planning full site builds before import.
The next article walks through installing Beaver Builder AI, connecting your API key, and generating your first page. How to Set Up Beaver Builder AI Chat→
Want to see Beaver Builder AI in action? Jump into the new AI demo and start building right away. No installation or setup required. Try Beaver Builder AI →

Start here

Beaver Builder AI Demo
Build a page with AI on a site that already has Beaver Builder and Beaver Themer installed. Free AI credits included.
Our Newsletter
Our newsletter is personally written and sent out about once a month. It's not the least bit annoying or spammy.
We promise.
Try Beaver Builder Today
Related articles
How to Build an Editable WordPress Header and Footer With AI
 -
October 2, 2026
-
October 2, 2026
Headers and footers are among the most repetitive parts of building a WordPress website. AI can speed up the process,…
How to Convert a ChatGPT Site to WordPress (Beaver Builder AI)
 -
October 1, 2026
-
October 1, 2026
Hey everyone! If you’ve built a website design in ChatGPT, you’ve probably wondered how to get your ChatGPT site to…
Beaver Builder AI MCP Settings: Layout Mode and Layout Structure Explained
-
September 23, 2026
Beaver Builder AI has two MCP settings that shape AI-built pages. MCP Layout Mode controls what AI builds with: Native…
Join the community
We're here for you
There's a thriving community of builders and we'd love for you to join us. Come by and show off a project, network, or ask a question.


Since 2014
Ready to build?
The WordPress page builder agencies and freelancers have trusted since 2014. Now with AI.