
How to Set Up Online Ordering for Your Restaurant Using WooCommerce
WooCommerce is a flexible ecommerce plugin that lets you sell practically any product, including delicious restaurant meals. However, just because WooCommerce can be used in the food industry, that doesn’t mean it provides everything you need. You need additional features if you want to set up online ordering for your restaurant.
Fortunately, with the right plugins, you can transform WooCommerce into a complete restaurant ordering system your customers and staff will love to use. In this post, we show you how to do just that. Let’s get started!
Why You Might Want to Set Up Online Ordering for Your Restaurant
The internet has completely changed the way we think about food. People worldwide visit restaurant websites, download dedicated food delivery apps such as DoorDash and Uber Eats, and regularly get their favorite meals delivered directly to their doors.
In fact, global revenue in the online food delivery sector has almost doubled since 2017. Furthermore, it is expected to reach nearly $97 billion by 2024. If your restaurant isn’t already offering online ordering, you may be missing out on a huge chunk of potential revenue.
By offering takeout or delivery, you can often connect with an entirely new audience who may be unable or unwilling to visit you in person. This strategy can help expand your reach.
Assuming that you make a good first impression, you might even turn these first-time customers into loyal repeat clients who provide your restaurant with revenue for months or even years to come.
To help you secure more business, you can combine the convenience of online ordering with the immediacy and reduced costs of in-person pickup. You might even accept pre-orders to gain more sales.
Today, the restaurant industry is fiercely competitive. Giving customers this level of flexibility and convenience places you one step ahead of your competition. You could even become the top place to eat in town!
How to Set Up Online Ordering for Your Restaurant Using WooCommerce (In 4 Steps)
There is no shortage of ecommerce and online ordering software. However, the WooCommerce plugin is hugely popular, powering around 4.5 million websites.
This plugin is easy to set up, and supports over a hundred payment gateways, including common names such as PayPal and Stripe. There’s also a huge range of addons you can use to extend the core WooCommerce plugin.
For these reasons, we’ll be using WooCommerce throughout this post. We’re going to assume that you’ve configured the plugin and added all the items that are available for delivery. With that covered, let’s dive in!
Step 1: Set Your Opening and Closing Times
Unless you offer takeout 24/7, you should specify your delivery hours. If you neglect this step, your customers might place orders when no one is available to cook and deliver their food. This would result in a poor customer experience, and possibly even some negative reviews.
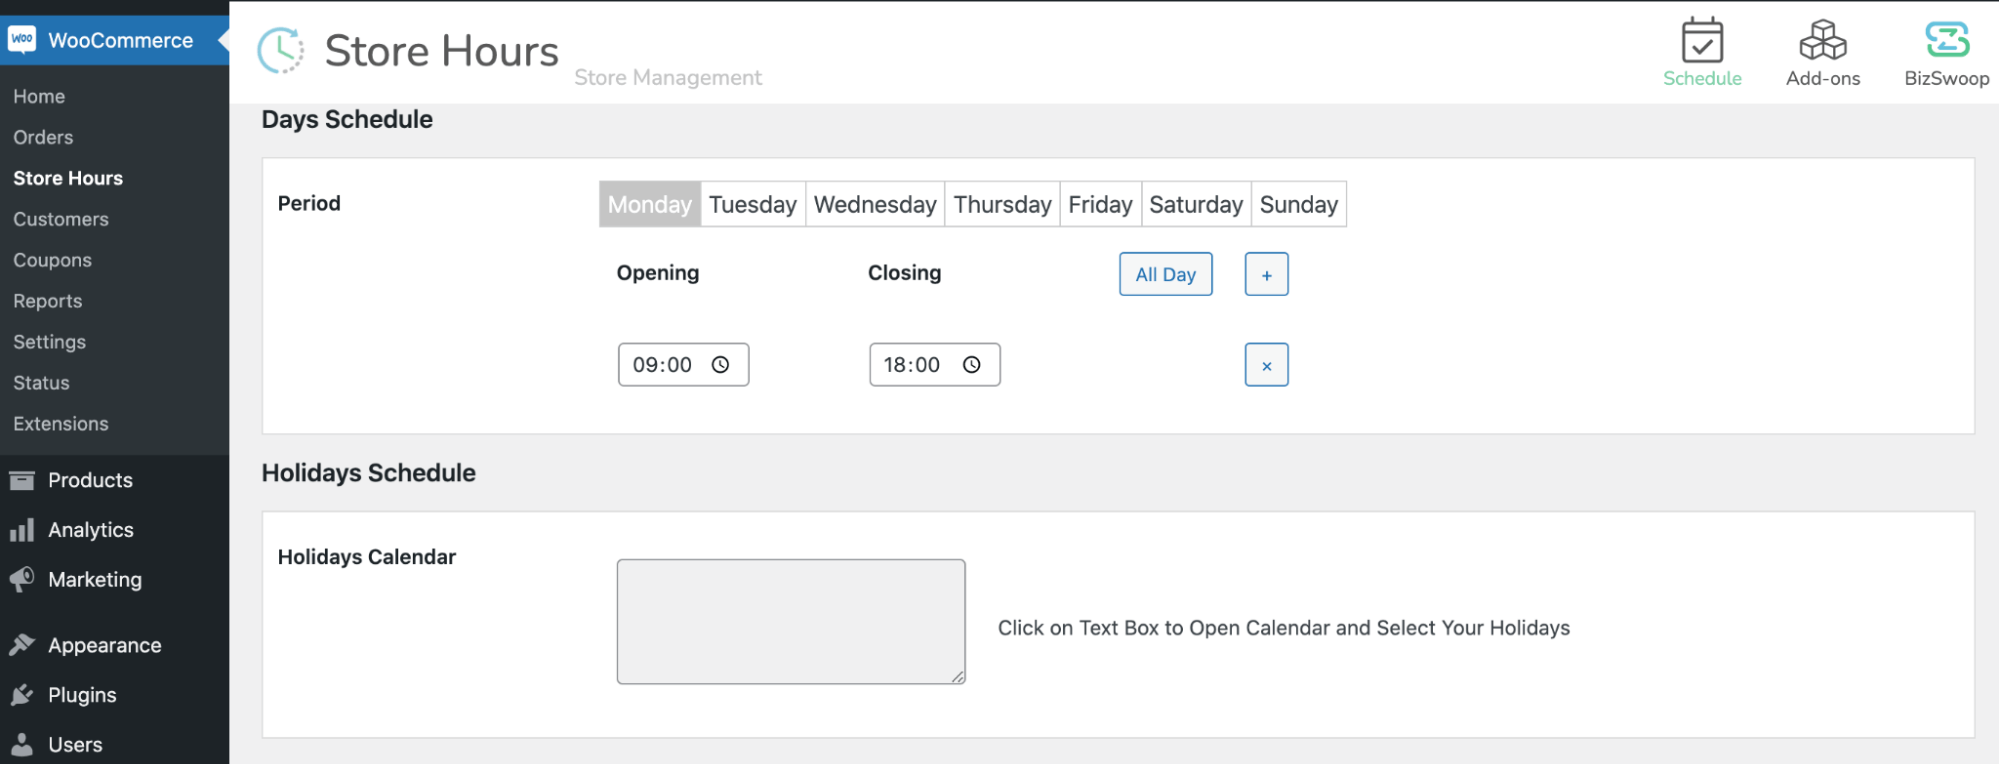
You can quickly and easily set your schedule using the plugin Store Hours Manager for WooCommerce. This plugin enables and disables the WooCommerce checkout automatically to match your opening and closing hours:

After activating Store Hours Manager, navigate to WooCommerce > Store Hours and enter your opening and closing times:
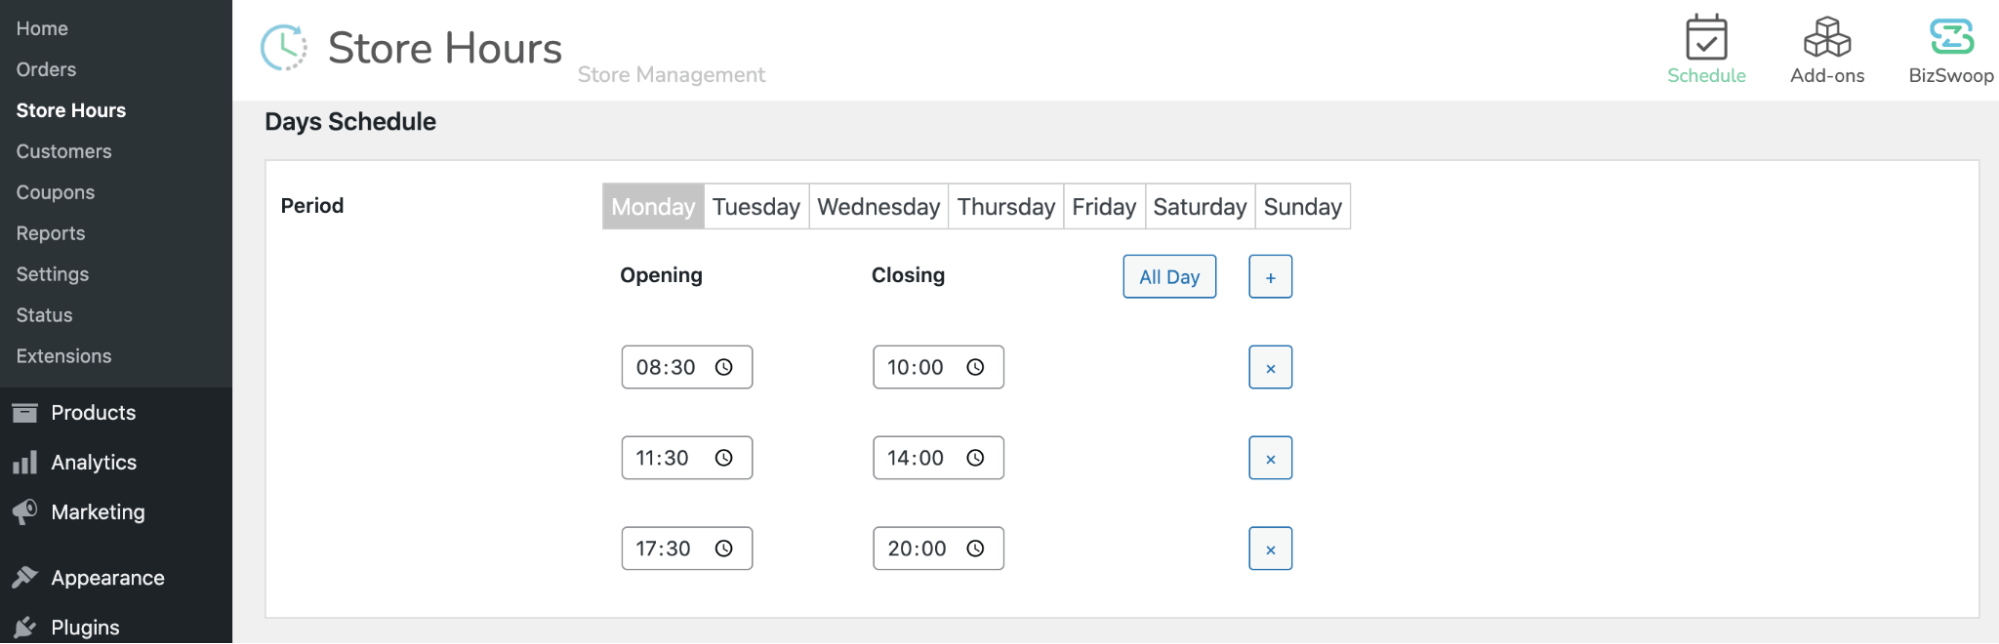
Many restaurants take breaks throughout the day, for example in between lunchtime and evening service. You can add multiple time slots to the same day using the + button:
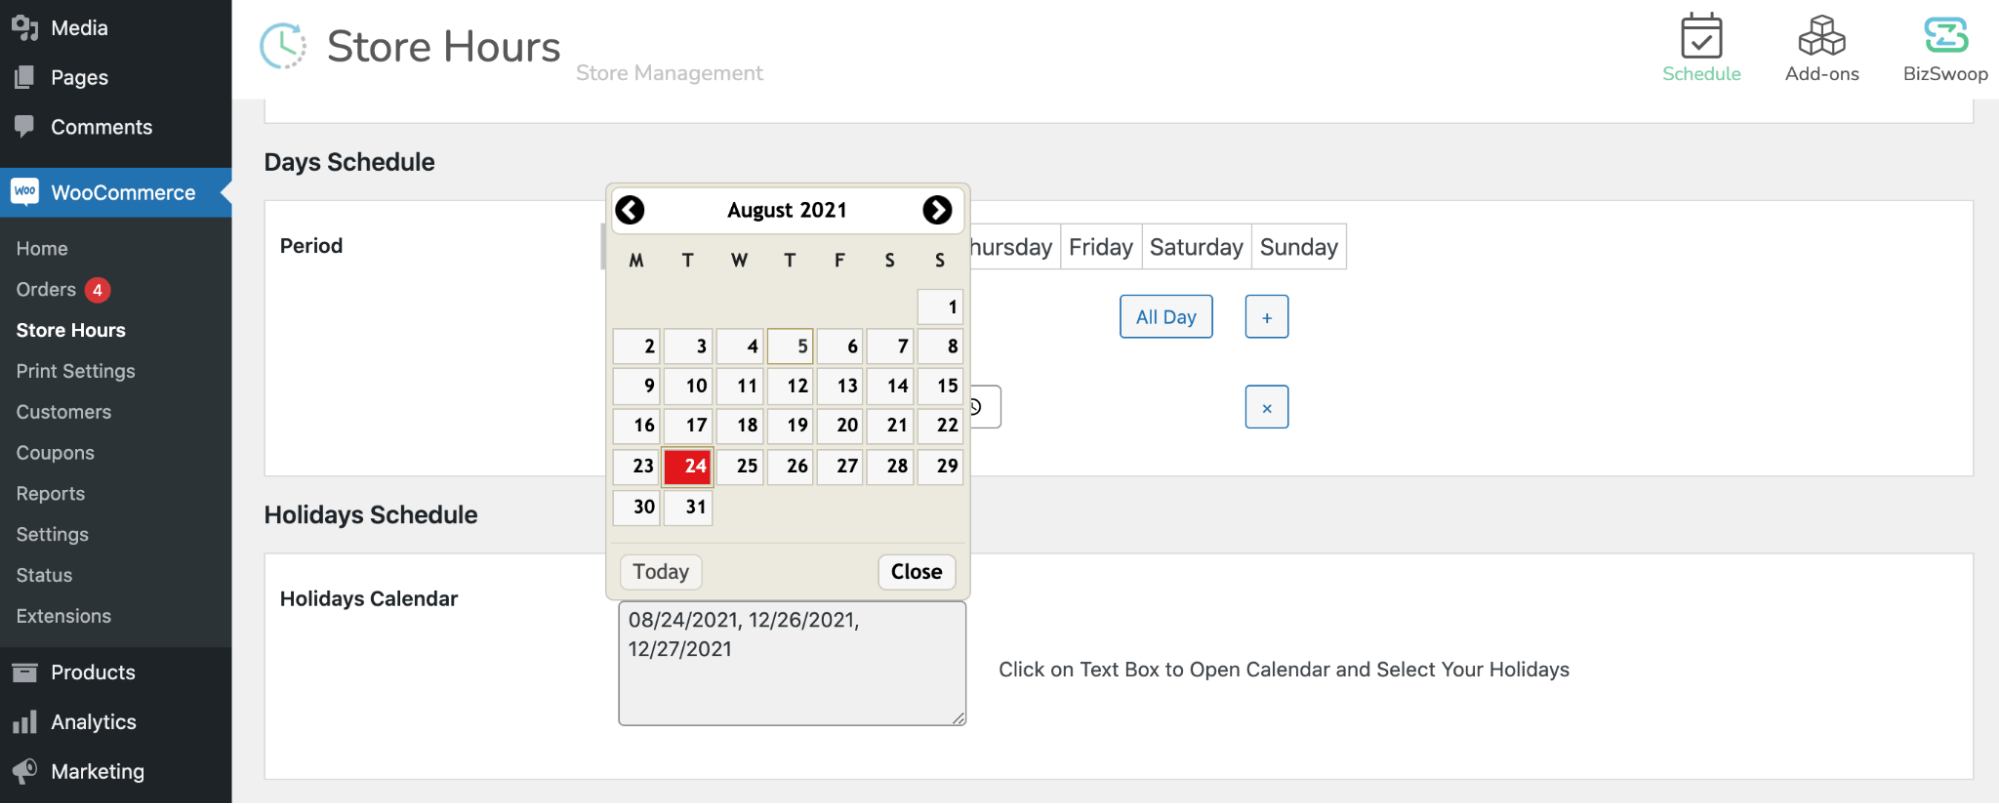
In the Holidays Schedule section, you can enter any days that your restaurant is completely closed for business. When you’re happy with your schedule, click Save Changes:
After setup, Store Hours Manager disables the checkout whenever you’re closed. If you need to manually override these settings for special circumstances, go to WooCommerce > Store Hours and enable Ordering Status in the Force Override Store Schedule section:
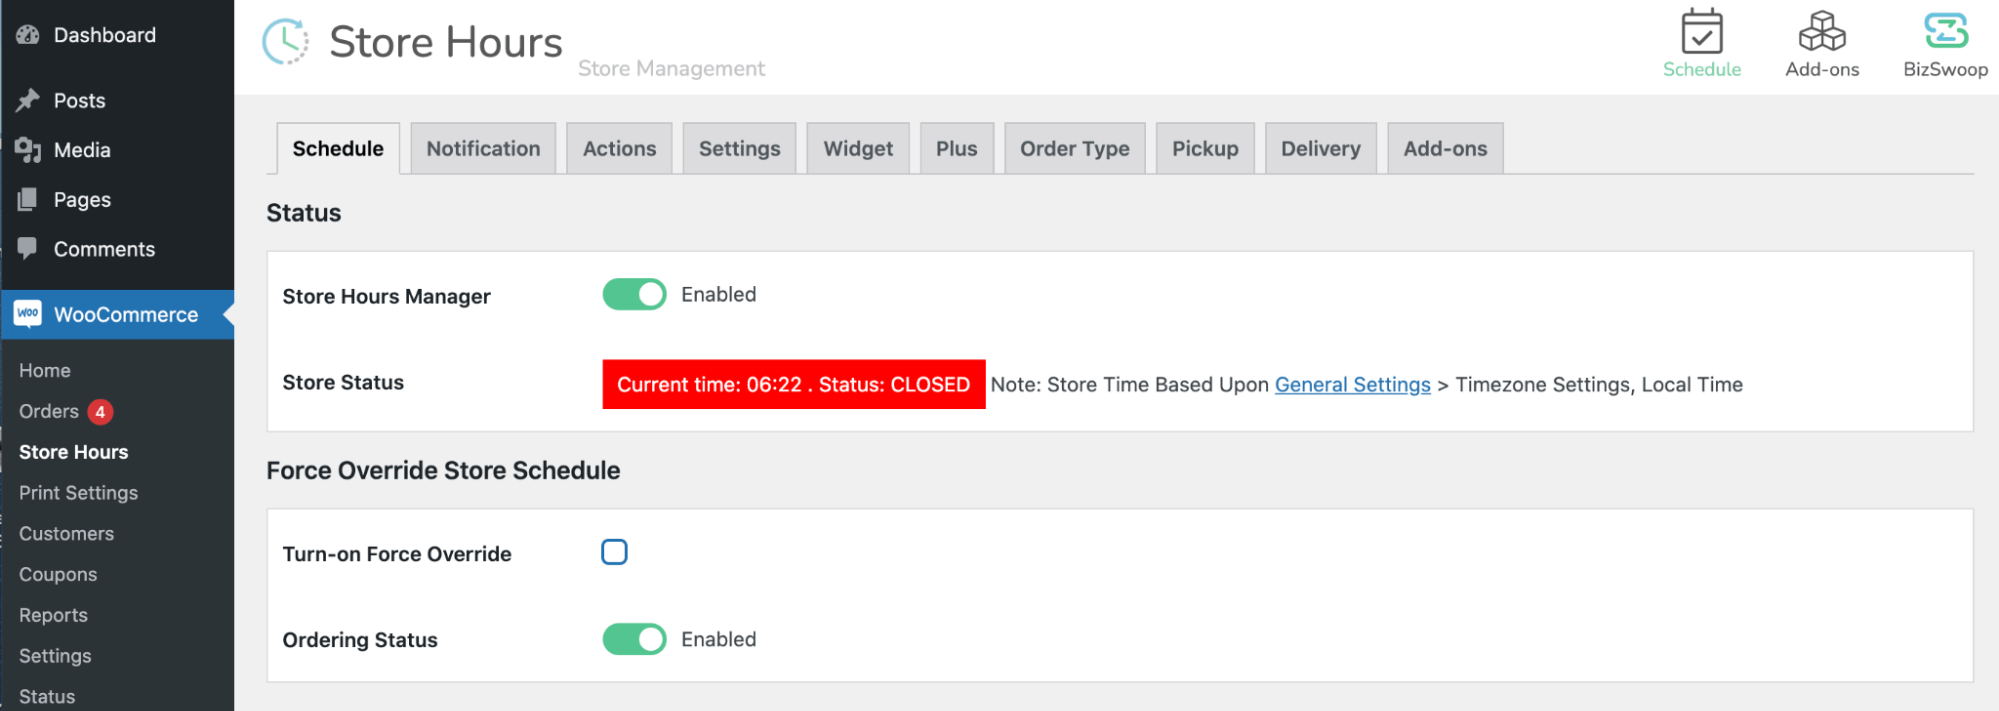
This setting is useful if you’re ever forced to close your doors at short notice. For example, your head chef has just called in sick, you’ve sold out of stock early, or you need to suspend takeout in order to cater a private function.
Step 2: Add a ‘Store Closed’ Notification and Countdown
Next, you can specify which actions customers can perform while your store is closed for business. To make these changes, select the Actions tab:
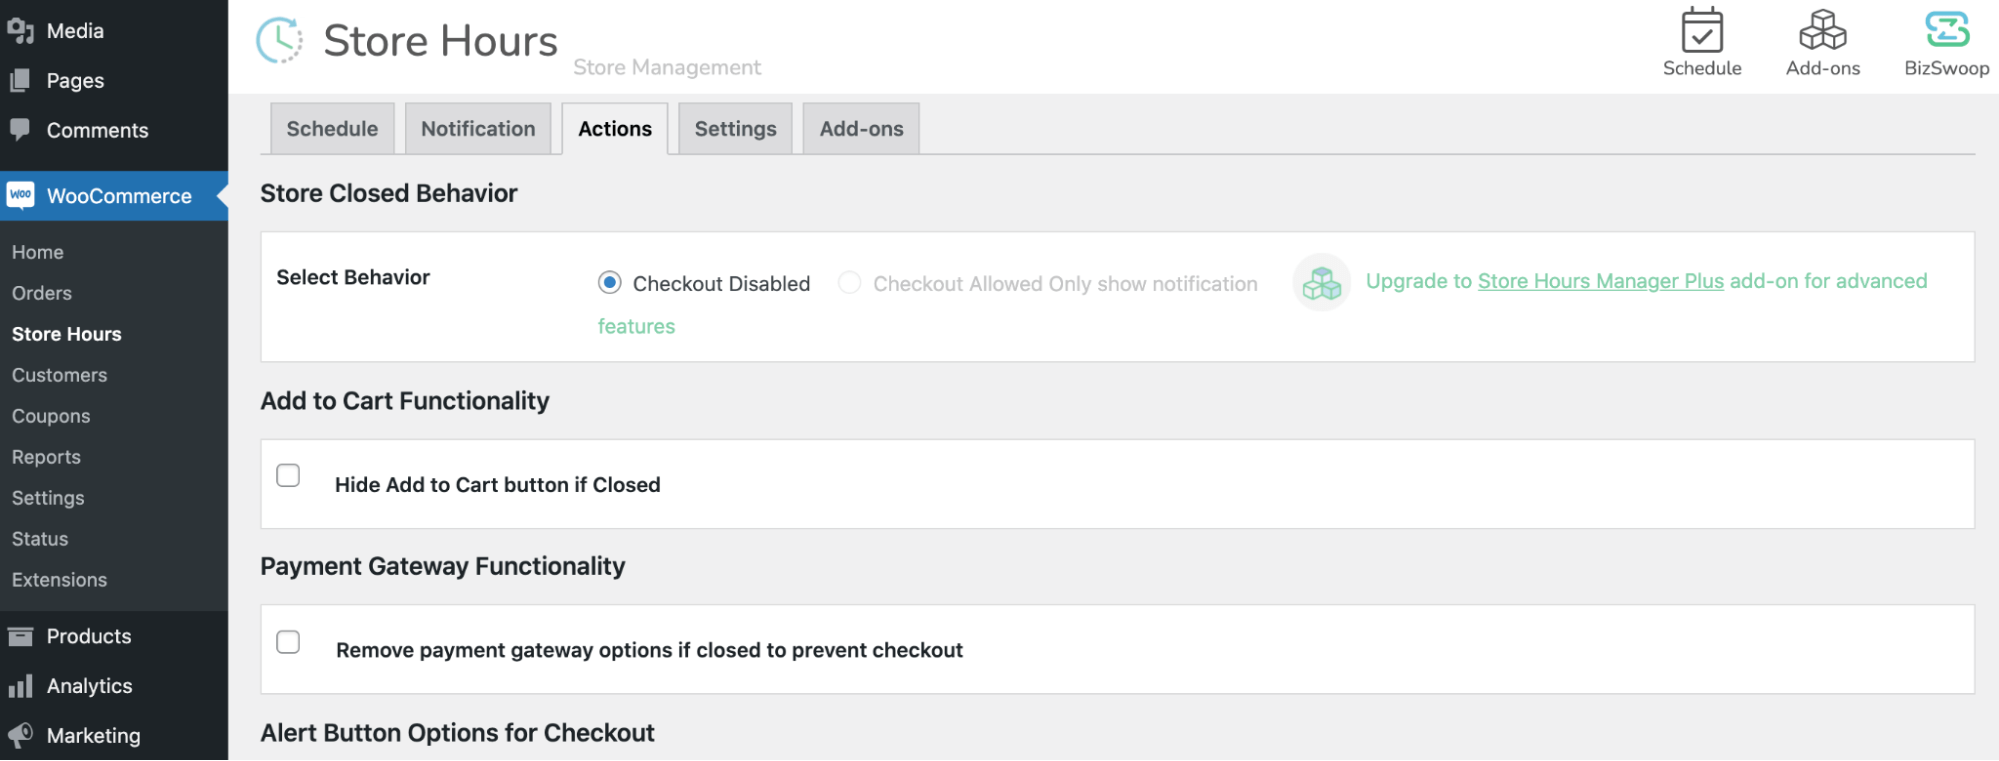
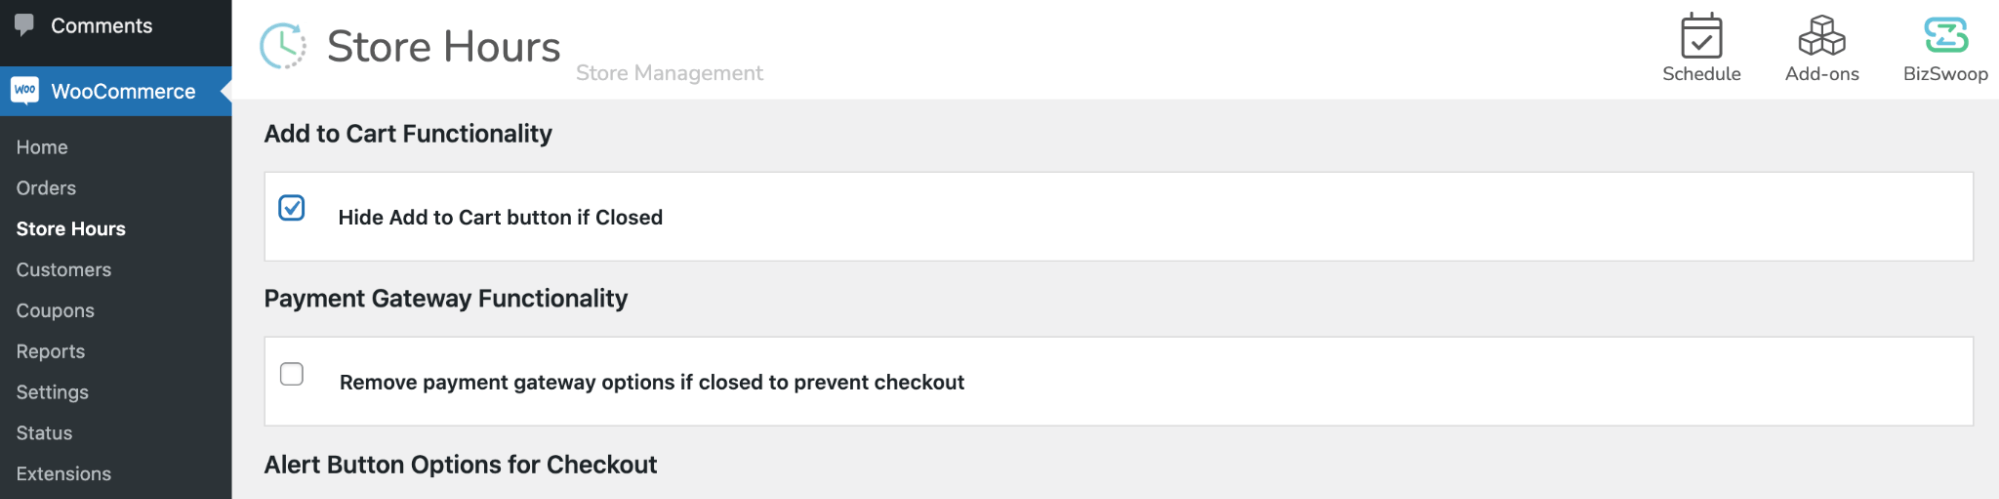
By default, Store Hours Manager will disable the checkout whenever your restaurant is closed. However, customers can still add items to their shopping carts. This is useful if you plan to accept pre-orders.
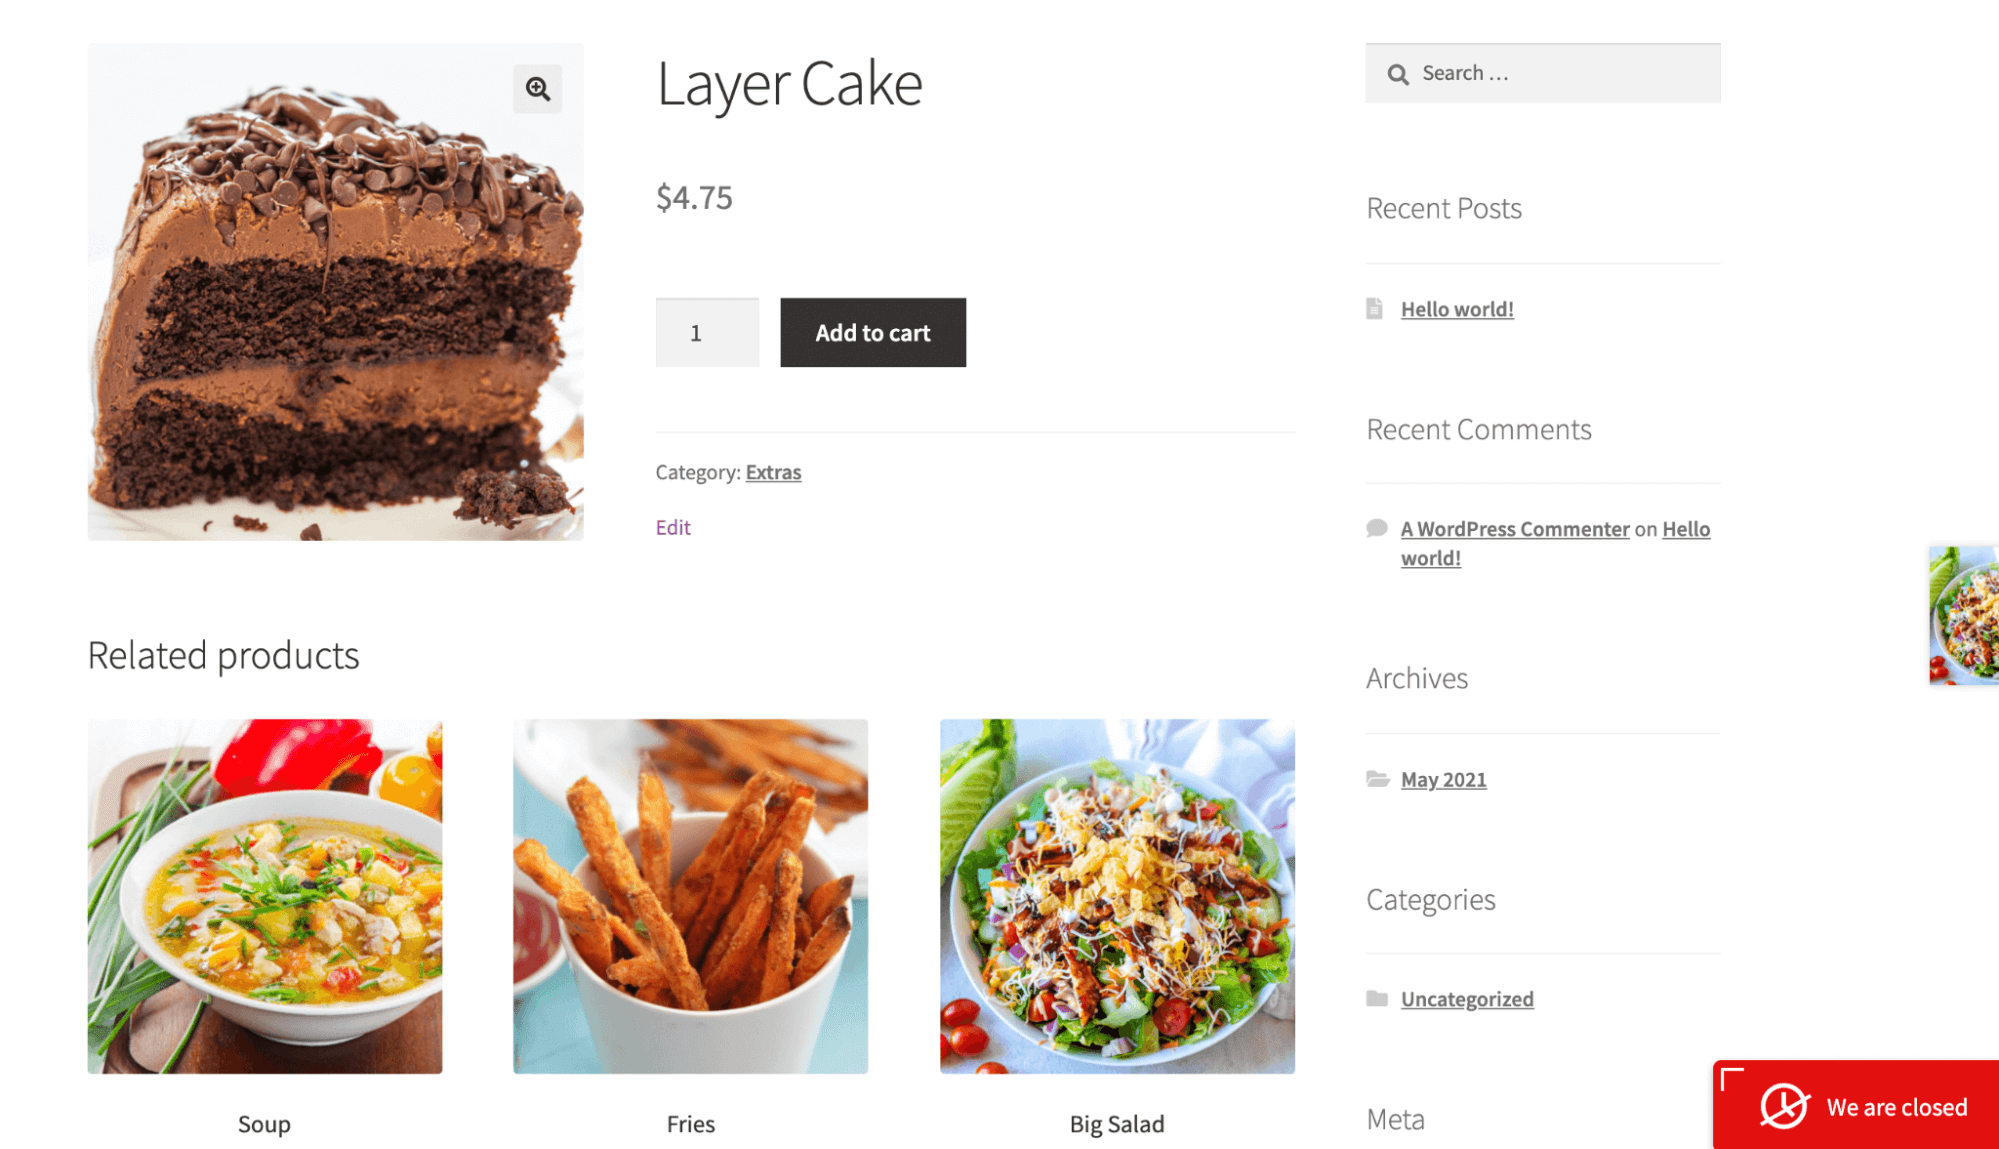
Alternatively, you might prefer to hide the Add To Cart button completely. For example, you might be concerned about customers wrongly assuming that you’re open for delivery:
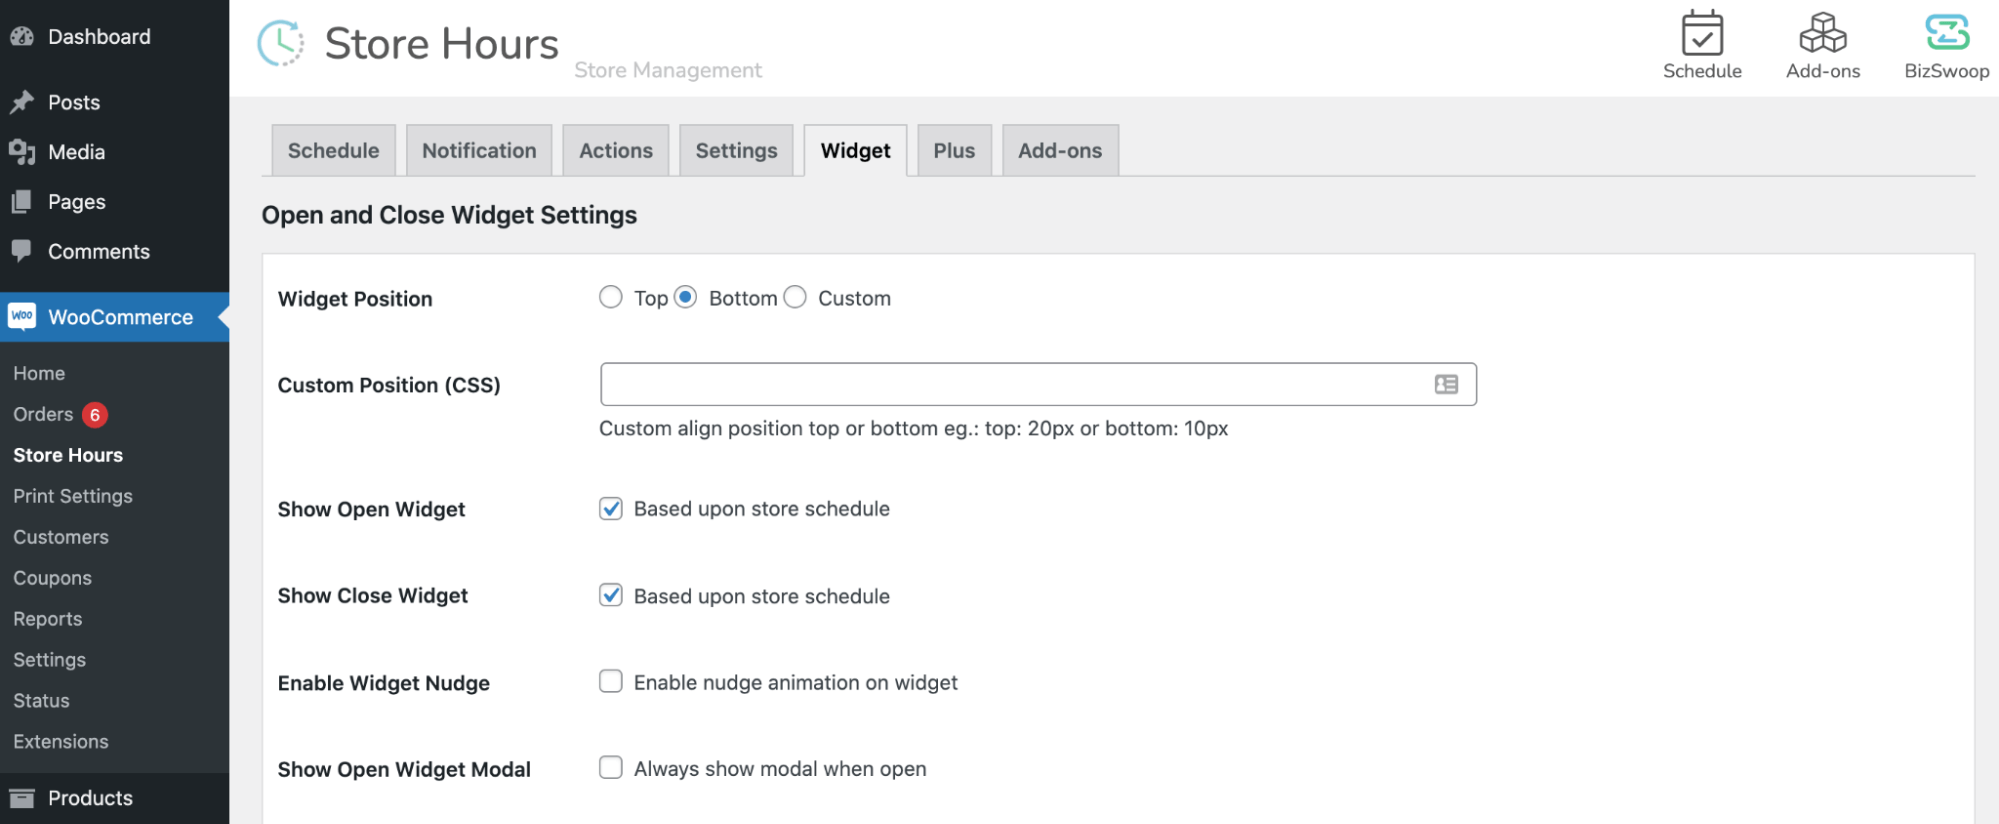
If you upgrade to Store Hours Manager Plus, you get access to some additional features that can help you avoid this confusion. For example, it has a widget that can appear throughout your site and notify customers that you’re currently closed:
You can configure this widget on the Widget tab. By default, the notification appears at the bottom right of the screen but you can change its position to make it more noticeable:
You can also edit the widget text using the Text for Hours Open Modal and Text for Hours Close Modal settings. You might even decide to create a sense of anticipation in your hungry customers by adding a countdown:
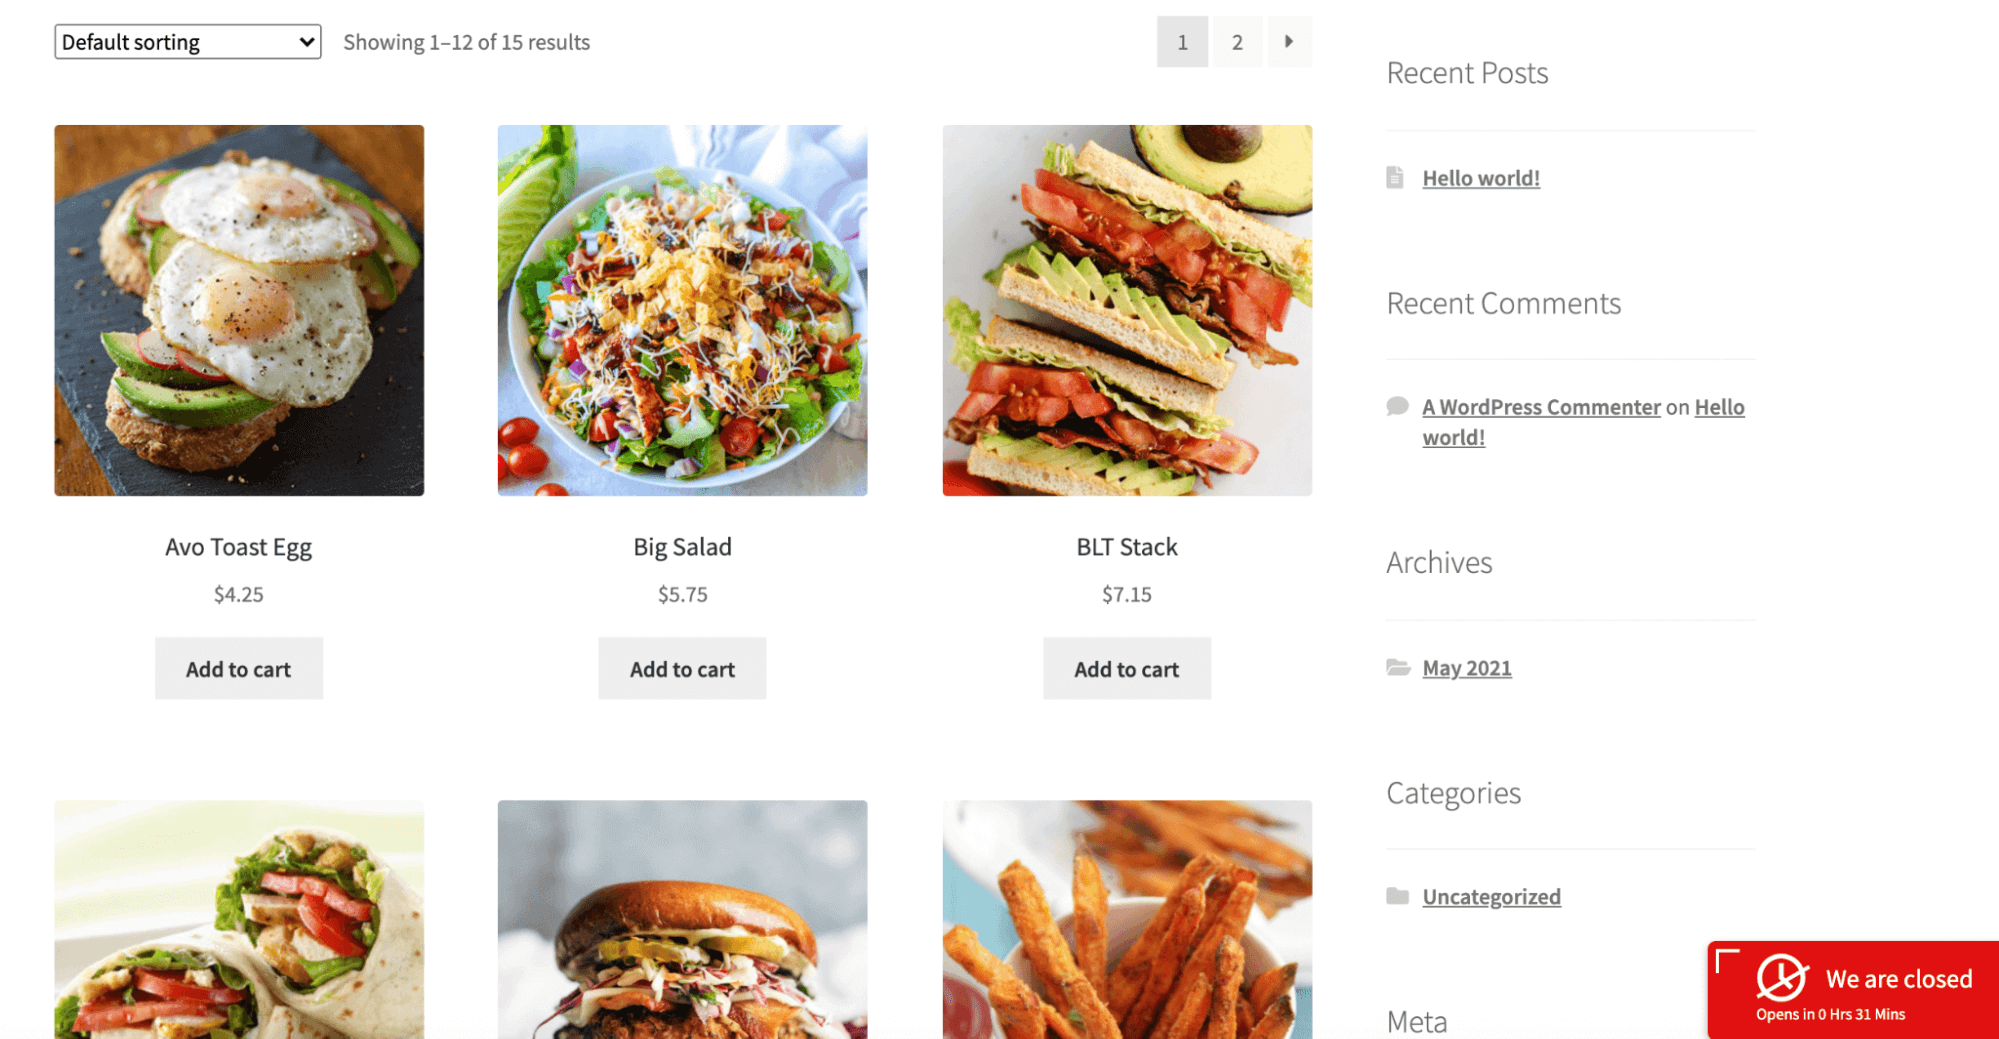
This timer appears as part of the collapsed modal. To count down the hours until you open your doors, select the following checkbox: Show Open/Close Countdown on Schedule Modal.
Step 3: Give Your Customers a Choice of Delivery or Pickup
When it comes to delivering delicious takeout, accepting the customer’s order is only the first step. You also need to handle the logistics of getting the meal to the buyer.
Although the core WooCommerce plugin has delivery settings, it isn’t designed to meet the specific needs of the food industry. For this reason, we suggest using the Takeout and Delivery plugin that’s designed with features specifically for restaurants. With this plugin configured, your customers can seamlessly choose between in-person pickup or delivery, and you can optimize your back end with restaurant-appropriate settings.
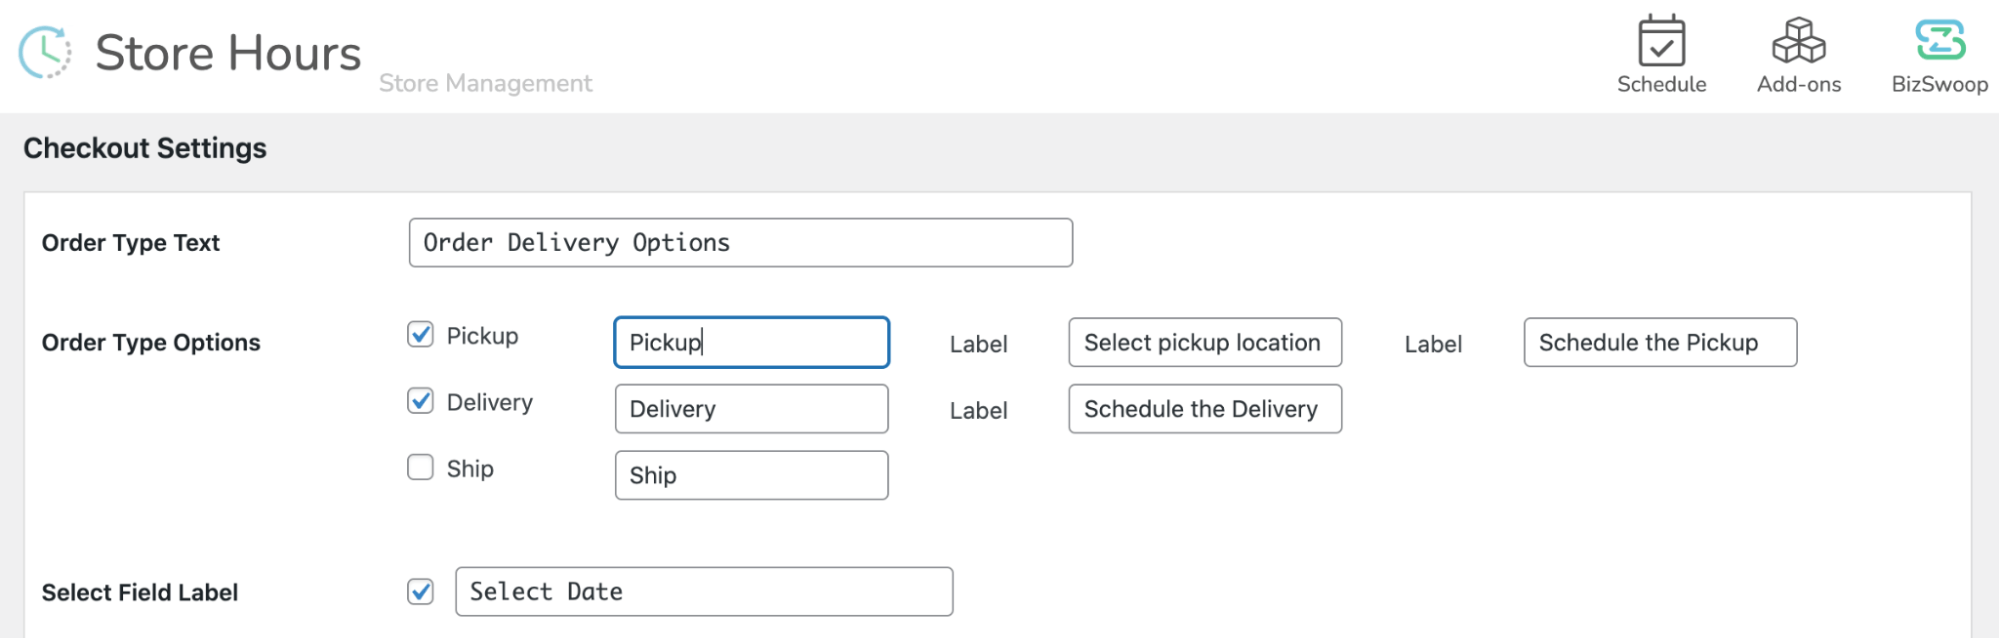
After activating the Takeout and Delivery plugin, you get access to some new tabs in the WooCommerce > Store Hours dashboard. To start, select Order Type.
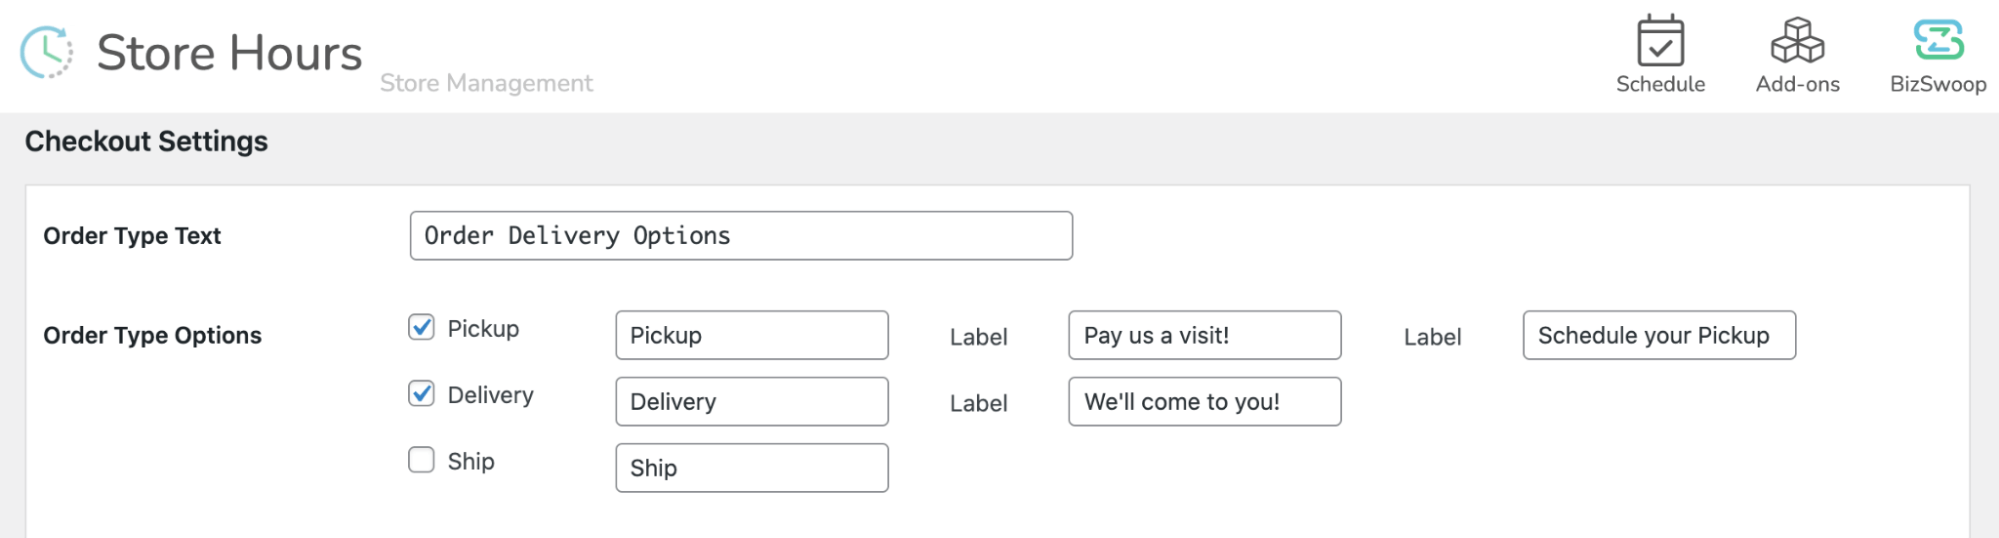
Next, scroll to the Checkout Settings section and specify whether you offer pickup or delivery, or both:
These options now appear on your checkout page. After making their selection, your customers get access to some additional choices:

You can customize the text that appears in this section using the Label fields. For example, you might change the prompt that appears alongside the delivery scheduling calendar:
To maximize your sales, you could accept pre-orders. To offer advanced ordering, select the Closed Hours & Holidays checkbox:
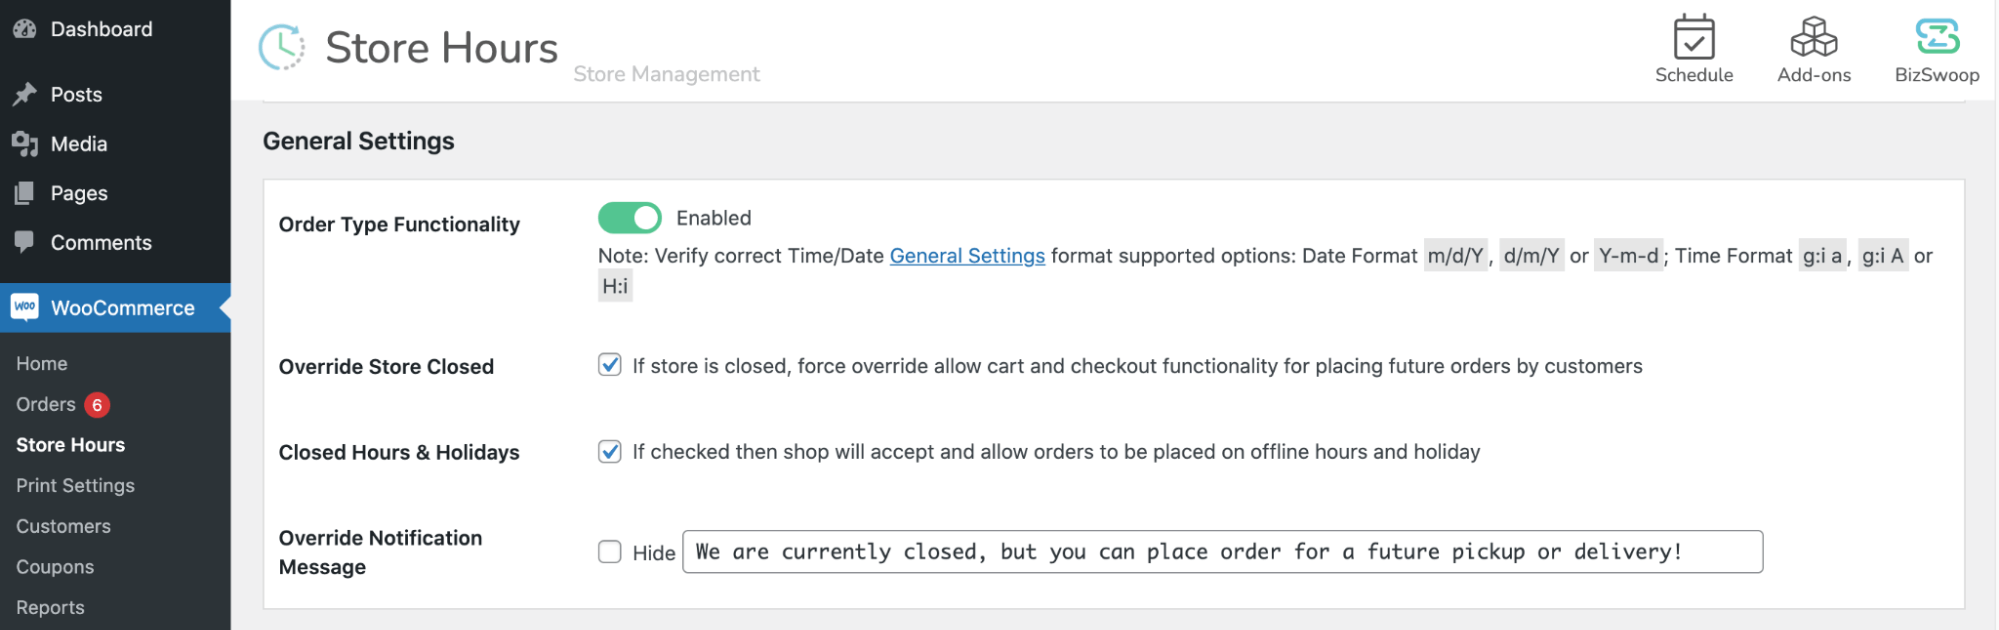
If you enable this setting, it’s vital to communicate that your restaurant is closed and that you’re only accepting pre-orders. You can add a warning to your modal widget or some extra text to your checkout page.
The Takeout & Delivery plugin offers advanced features, such as order volume management:
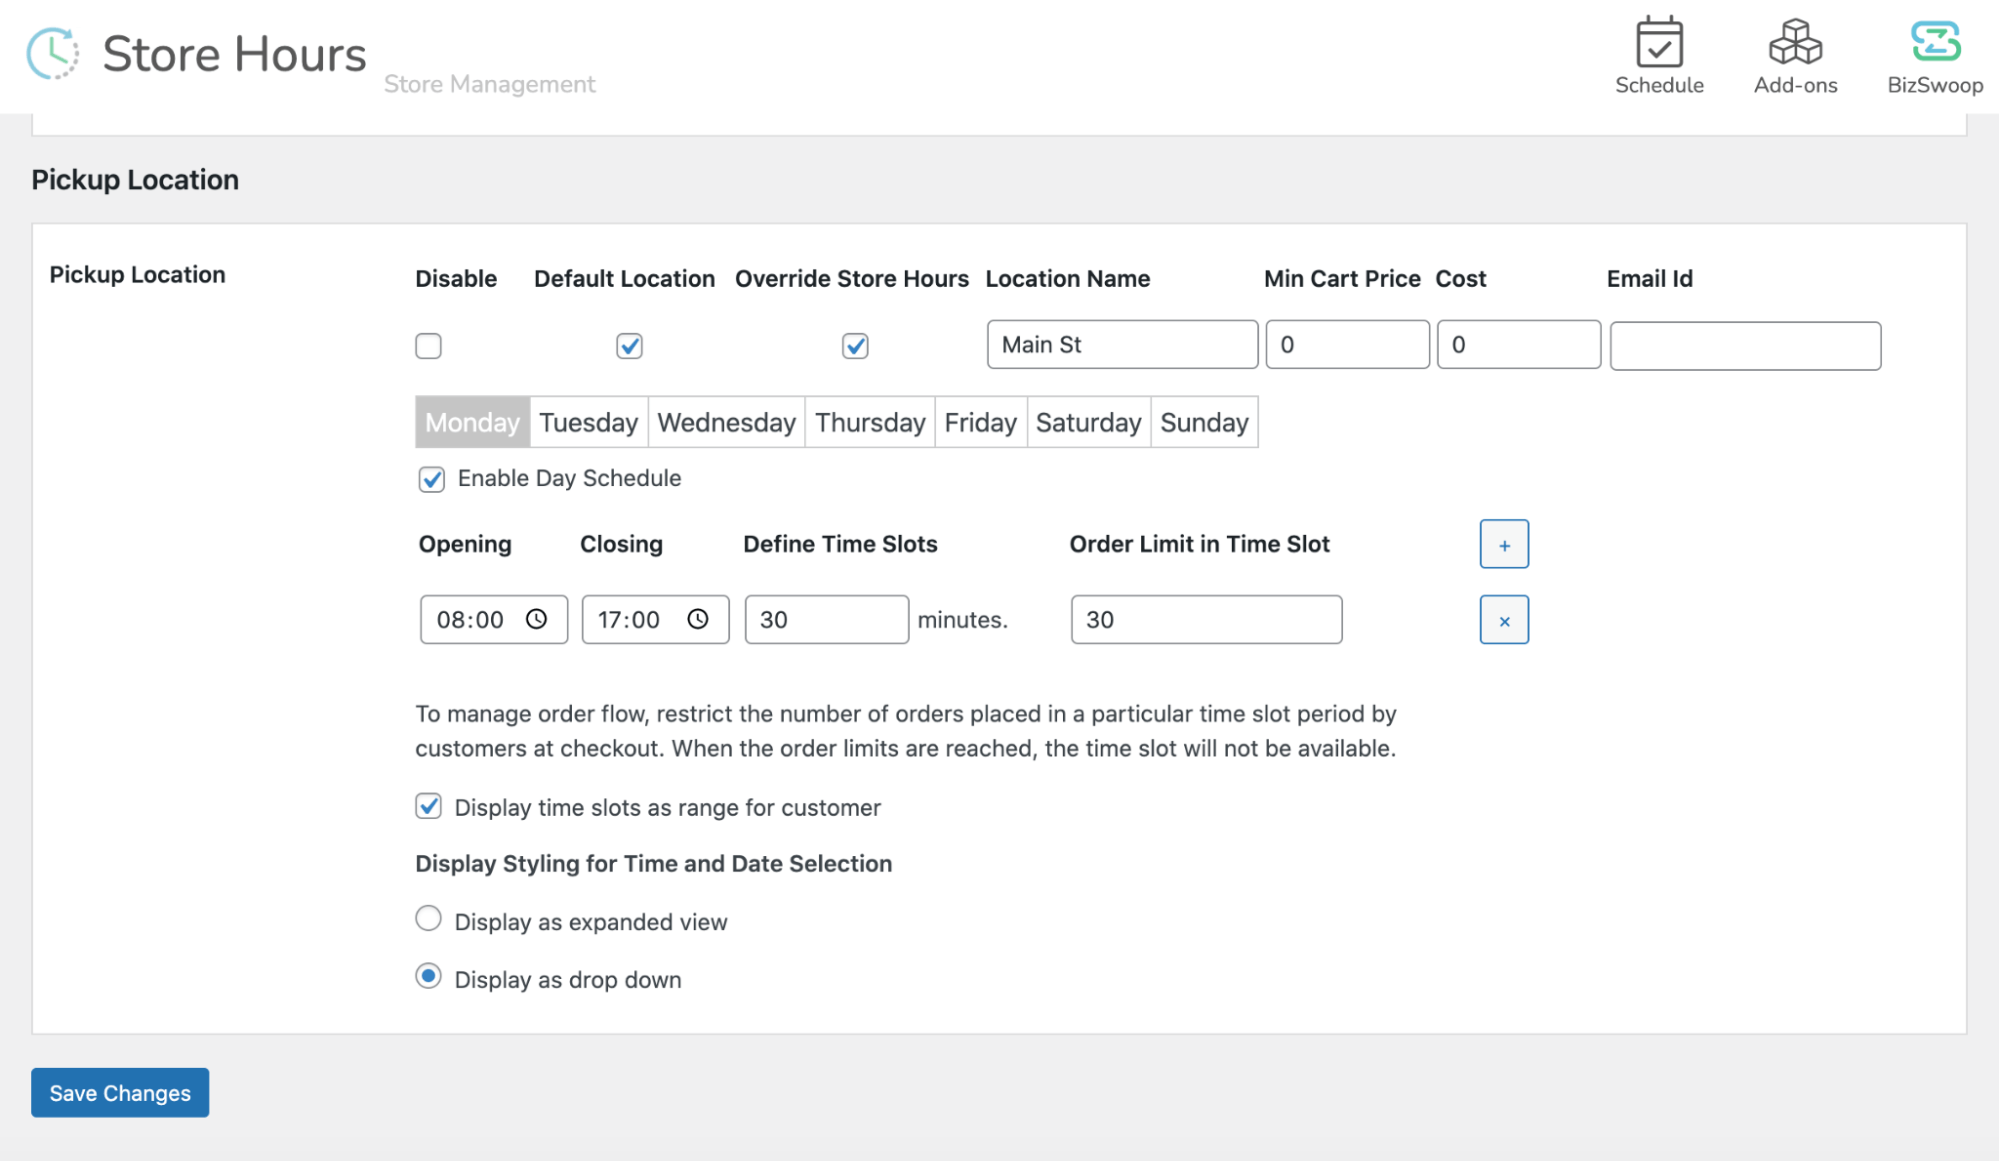
To ensure that your kitchen has enough time to prepare the food, use the order volume management feature to define how many online orders you want to accept in a specific time slot. We recommend using this feature to avoid keeping your hungry customers waiting.
Step 4: Print Your Orders and Receipts Automatically
The last step is providing your customers with physical receipts and your kitchen with food fulfillment tickets. Out of the box, WooCommerce cannot configure your orders into a readable receipt format or print them out automatically but there are other solutions.
Automated printing saves time and errors while benefiting your staff and creating a better experience for customers by getting food in their hands quickly. To put this strategy into action, use the Print Manager Plugin powered by BizPrint Cloud Service:

BizPrint enables many advanced features that aren’t typically accessible from a standard WordPress plugin. The cloud enables you to automatically send your orders to multiple printers. You can even assign the printers based on product category.
For example, you might send all products under a “beverage” category to a thermal printer at your bar, and only send orders that contain a “hamburger” category to the printer that’s located near your chef’s grill:
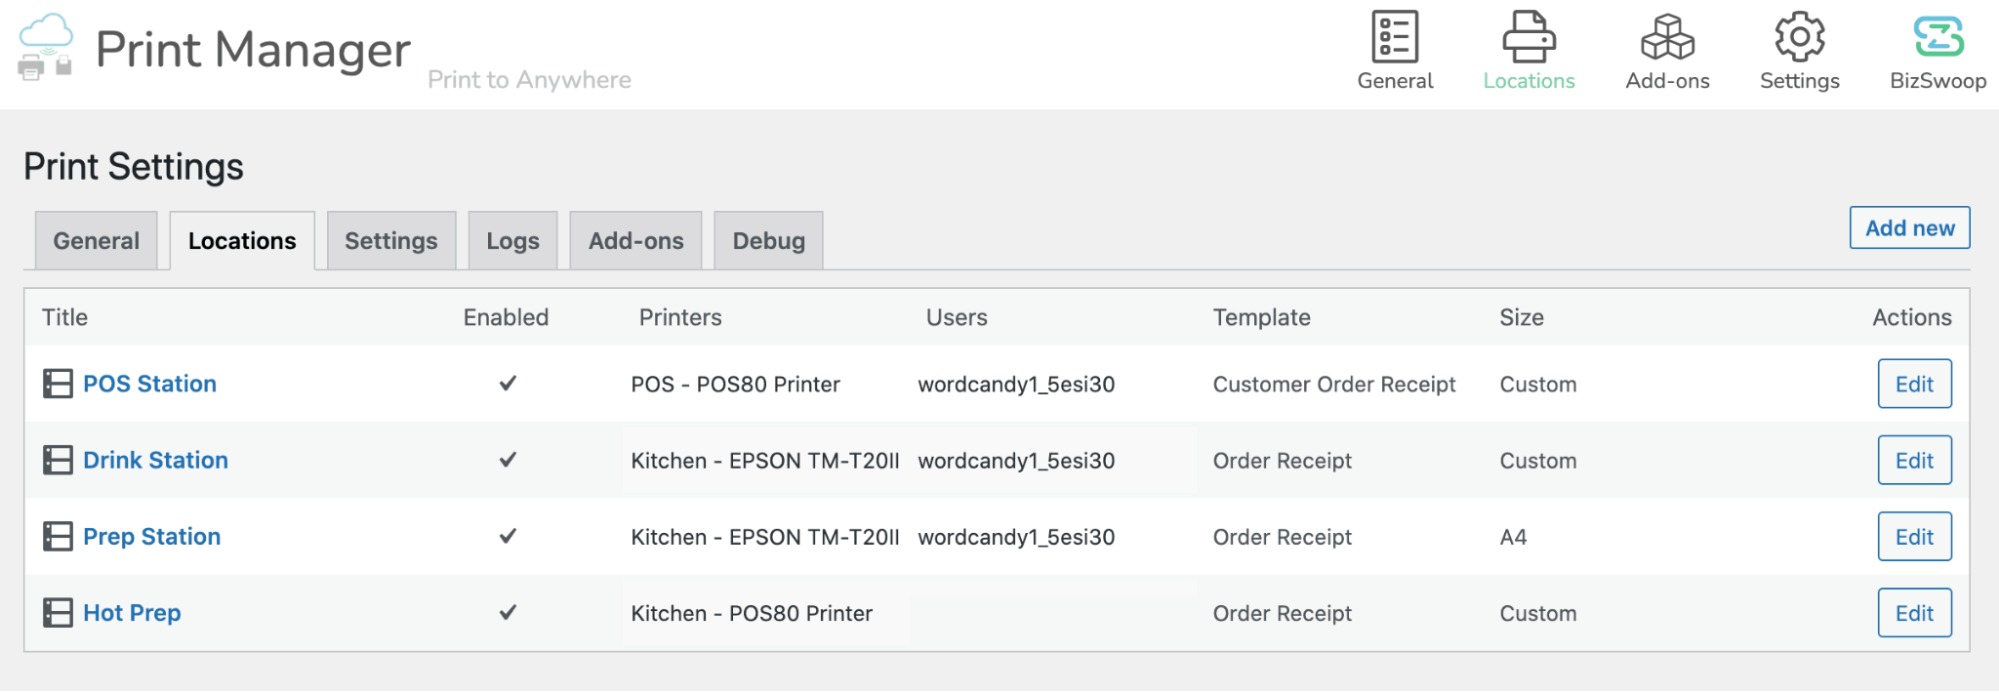
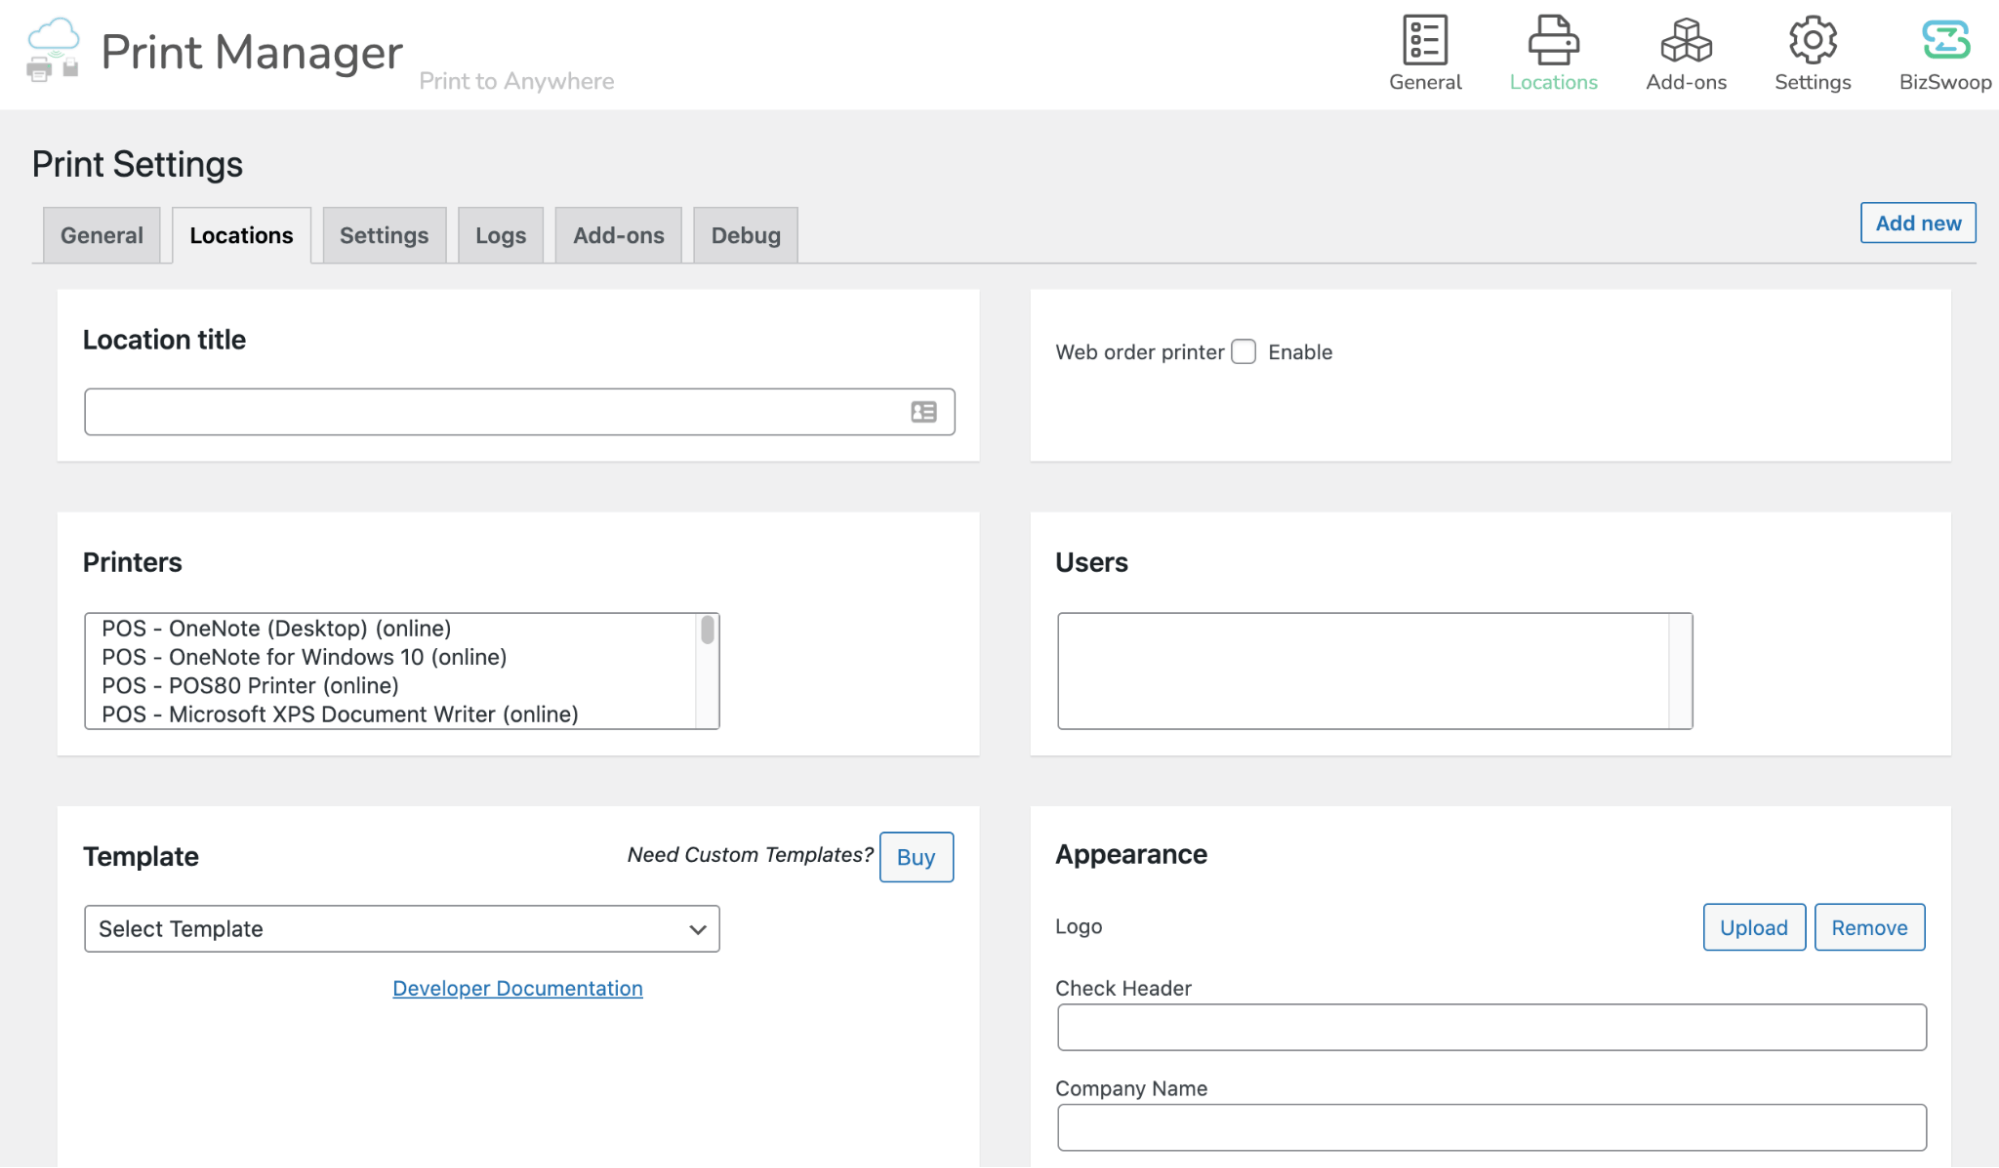
After activating this plugin, configure all the different printers that you want to use for your WooCommerce orders. To add these locations, navigate to WooCommerce > Print Settings > Locations. Then select Add New, and complete the following form:
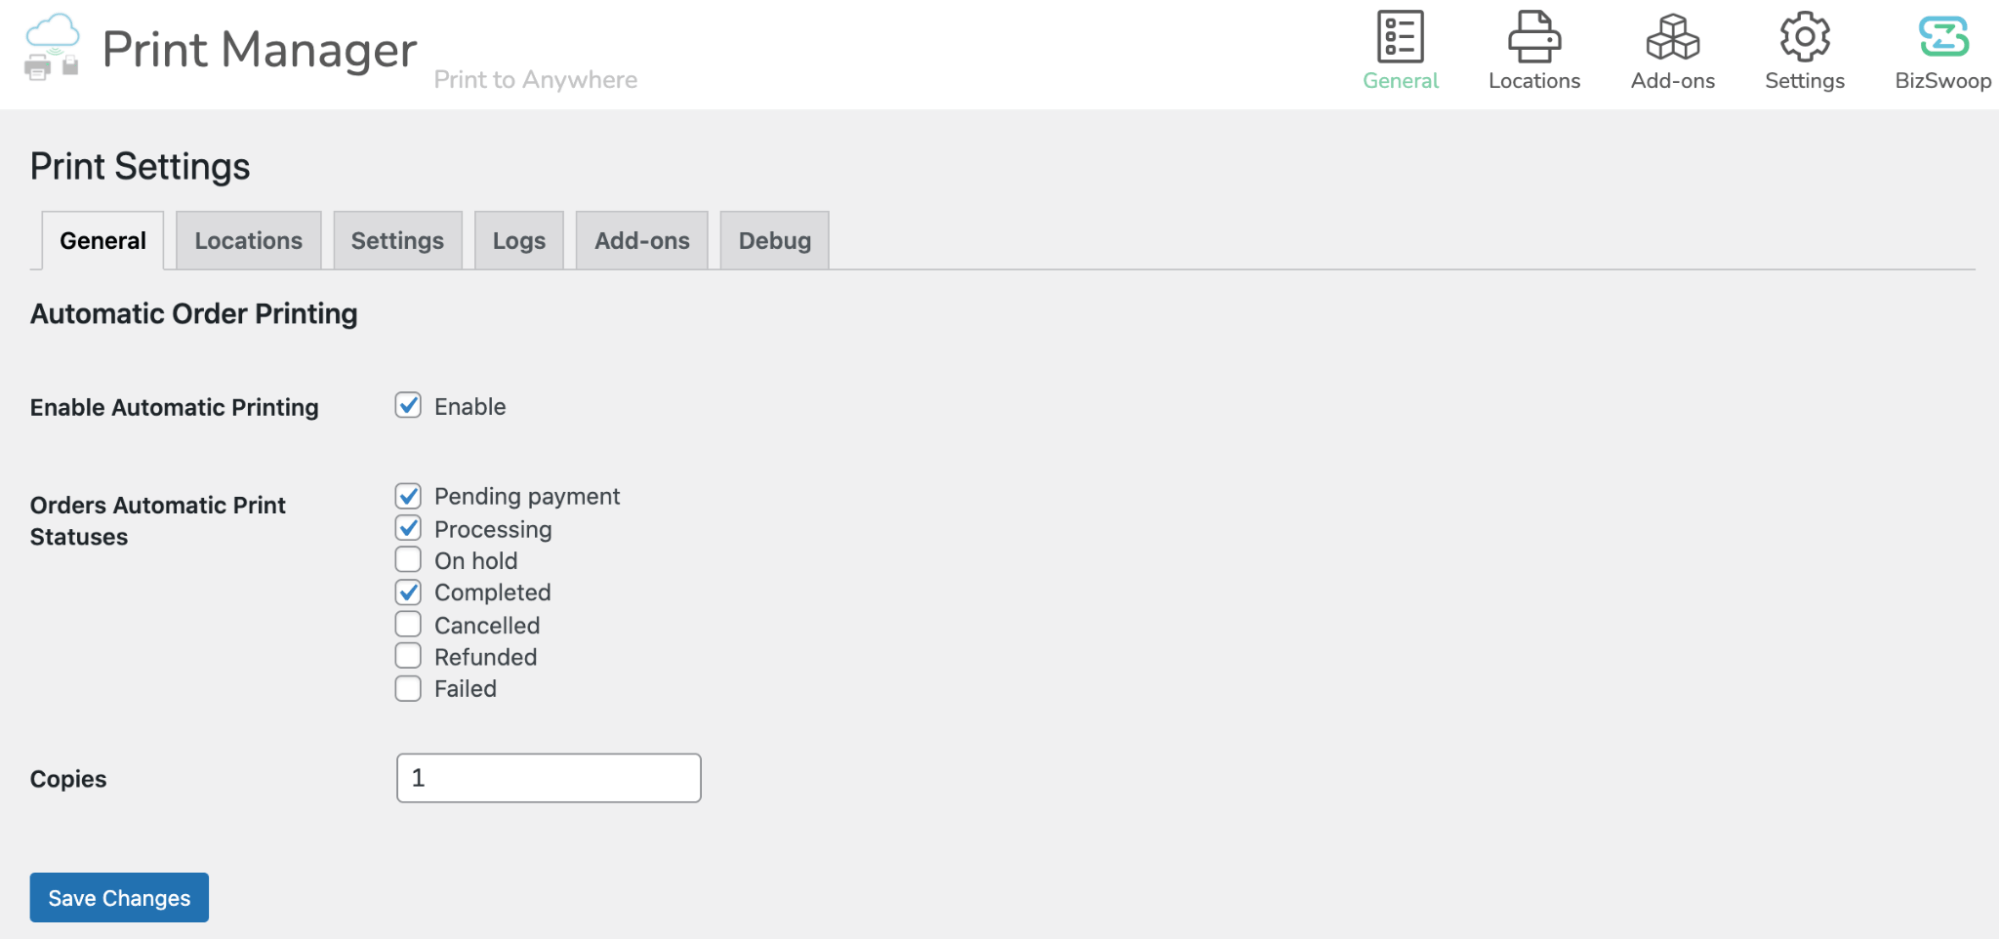
Once you’ve added all your printers, click the General tab, then Enable Automatic Printing. You can now specify the information that Print Manager for WooCommerce should include in your printouts:
You can use this free plugin to print up to 50 orders. However, as your new takeout business attracts more customers, you may need to upgrade. To help support your growing business, BizSwoop offers various plans, starting at $10 per month.
Conclusion
There are more people ordering takeout than ever before. If you’re not online, then you could be missing out. By setting up online ordering for your restaurant, you can appeal to customers who may be unable (or unwilling) to visit you in person.
Let’s quickly recap how to transform WooCommerce into a food-focused online ordering platform:
- Specify your opening and closing times with the Store Hours Manager for WooCommerce plugin.
- Add a ‘Store Closed’ notification and countdown.
- Give your customers a choice of delivery or pickup with the Takeout and Delivery plugin.
- Print your orders and receipts automatically using the BizPrint Cloud & Print Manager for WooCommerce plugin.
Do you have questions about any of the WooCommerce plugins mentioned in this tutorial? Let us know in the comments section below!
Our Newsletter
Our newsletter is personally written and sent out about once a month. It's not the least bit annoying or spammy.
We promise.
Try Beaver Builder Today

Related articles

How to Create a Mobile-First WooCommerce Store Using Beaver Builder
In today’s digital age, mobile shopping dominates online behavior. Recent studies show that over 70% of ecommerce traffic comes from…

How to Speed Up Your WooCommerce Store Built with Beaver Builder
Imagine a customer landing on your store, ready to buy, only to hit the back button because the page takes…
North Commerce Module for Beaver Builder
With all the excitement surrounding Beaver Builder 2.8 and our new Box Module, you might have missed the announcement of…
Join the community
We're here for you
There's a thriving community of builders and we'd love for you to join us. Come by and show off a project, network, or ask a question.
Since 2014
Build Your Website in Minutes, Not Months
Join Over 1 Million+ Websites Powered By Beaver Builder.