How to Add Off-Canvas Menu in WordPress
Are you wondering how to add an off-canvas menu to your WordPress site? When designing your site, you may wish to display additional links or content while keeping your site’s primary navigation minimal and uncluttered.
Adding an off-canvas menu can help to improve user experience and make your site easier to navigate. In this post, we’ll discuss the benefits of adding an off-canvas menu in WordPress. Then we’ll give you a step-by-step guide on how to create one on your site – no coding required!
Table of Contents
- What is an Off-Canvas Menu in WordPress?
- Why You Might Need An Off-Canvas Menu
- How to Design An Off-Canvas Menu
- Step 1: Create Flyout Panel Layout Using Beaver Builder
- Step 2: Add Saved Row to UABB Off-Canvas Module
- Step 3: Set a Trigger to Display the Off-Canvas Panel
- Conclusion
What is an Off-Canvas Menu in WordPress?
An off-canvas menu, also called a flyout or side panel, is a section of your website that appears from the side of the screen when it is triggered by an action on the page. Typically, the trigger is the click of a button. However, it can also be activated by an icon, image, or text.
For example, this page has a button trigger set so that when you click on it the off-canvas menu opens up:
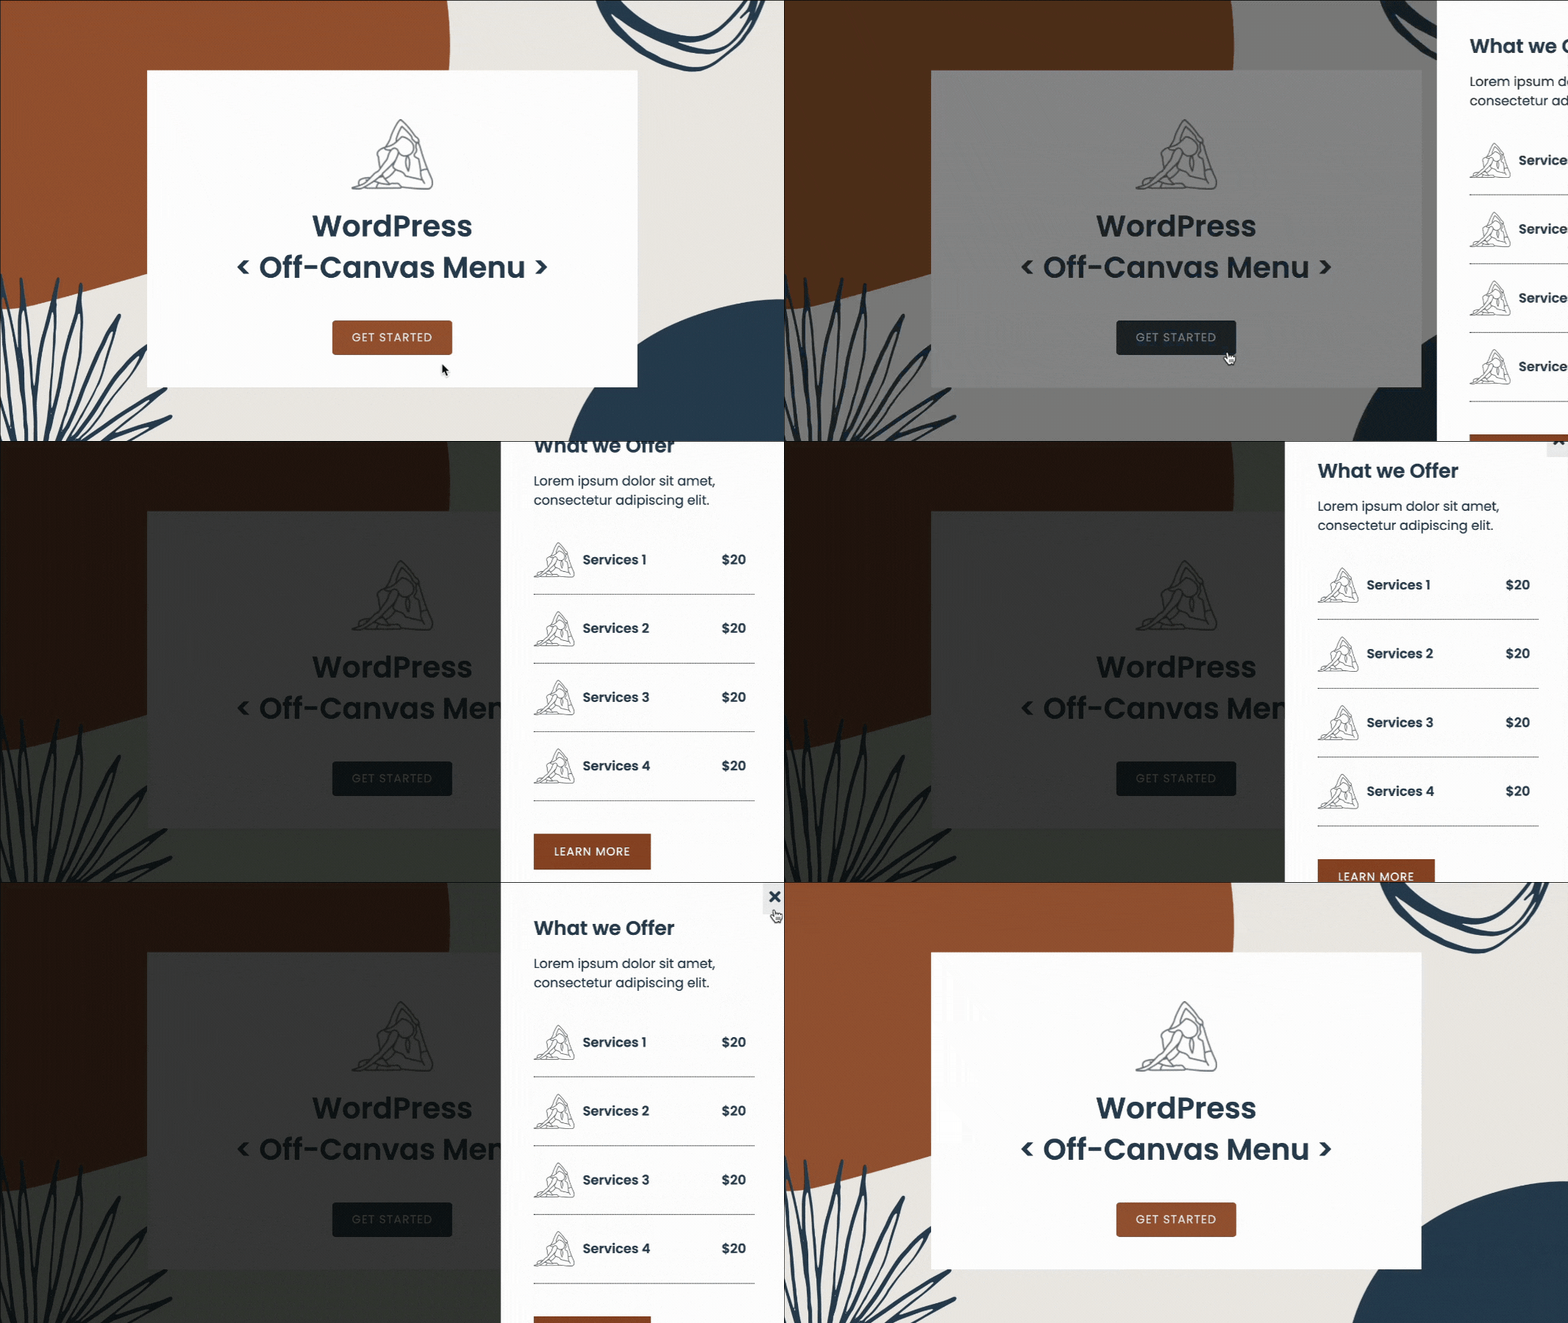
Ultimate Add-Ons provides an Off-Canvas module for Beaver Builder to help users create a multi-purpose flyout that can hold large lists and still look good across devices. This module eliminates the need for an external plugin and allows you to build it right in the page builder.
Why You Might Need An Off-Canvas Menu
There are several reasons why you might want to use an off-canvas menu. You can display a secondary menu that sits to the side of your page. It can even act as the sole navigation panel for your website.
Off-canvas navigation also allows you to display quick links to specific areas of your site. Thanks to the off-canvas menu’s appealing structure, this may help your visitors more easily find what they are looking for and keep them on your site longer.
It’s also great for special offers or announcements. For example, an off-canvas menu allows you to showcase promotions without being overly disruptive or distracting. You can also highlight a featured product or service.
In addition, there are many benefits of using an off-canvas panel:
- Display an attractive vertical menu instead of the typical layout
- Add extra content without resorting to a lengthy navigation bar
- Highlight details and reference links easily
- Place pop-up registration or subscription forms in a flyout
- Showcase special offers and ongoing discounts
As you can see, there are a number of ways you can take advantage of this feature and improve user experience on your website.
Let’s get started!
How to Design An Off-Canvas Menu
Before you begin, be sure you have both the Beaver Builder and Ultimate Addons (UABB) plugins installed and activated on your WordPress site.
Developers created the UABB plugin as an add-on that enhances your experience when using Beaver Builder. With over 60 additional modules and 200+ page and section templates, UABB allows you to easily add advanced customization to your website.
Note that UABB works with either the Lite or Pro versions of Beaver Builder:

The Off-Canvas module found in the premium version of UABB allows you to design a flyout panel that can be triggered with either a button, text, image, icon, or through any other module. In addition to menus, you can use them to display content, saved rows, saved modules, or saved page templates.
When you want to add an off-canvas menu to your WordPress site, following these easy steps will help you create an impressive flyout panel without any coding required.
Step 1: Create Flyout Panel Layout Using Beaver Builder
The first step is to create your flyout panel layout using Beaver Builder’s saved rows feature.
From your WordPress dashboard, navigate to Beaver Builder > Add New. Give your builder content a unique Title. In this example, we name it Off-Canvas Content.
From the Type drop-down, choose Saved Row from the list:
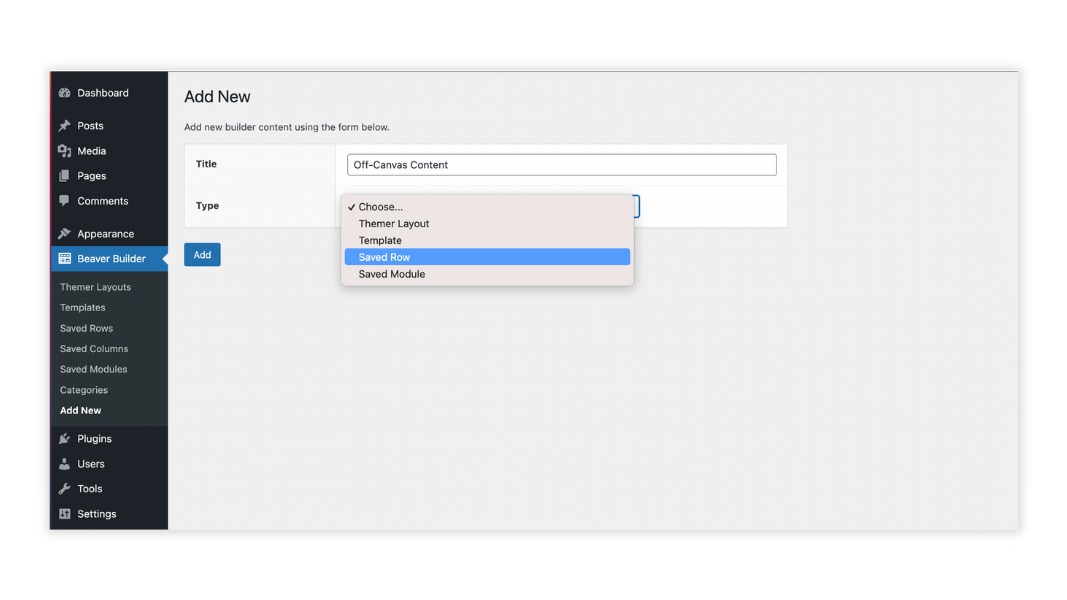
Next, click on Add Saved Row. In the next window, click on the Launch Beaver Builder button to open up the editor.
Then, drag and drop the desired Beaver Builder modules onto the page to design your layout:
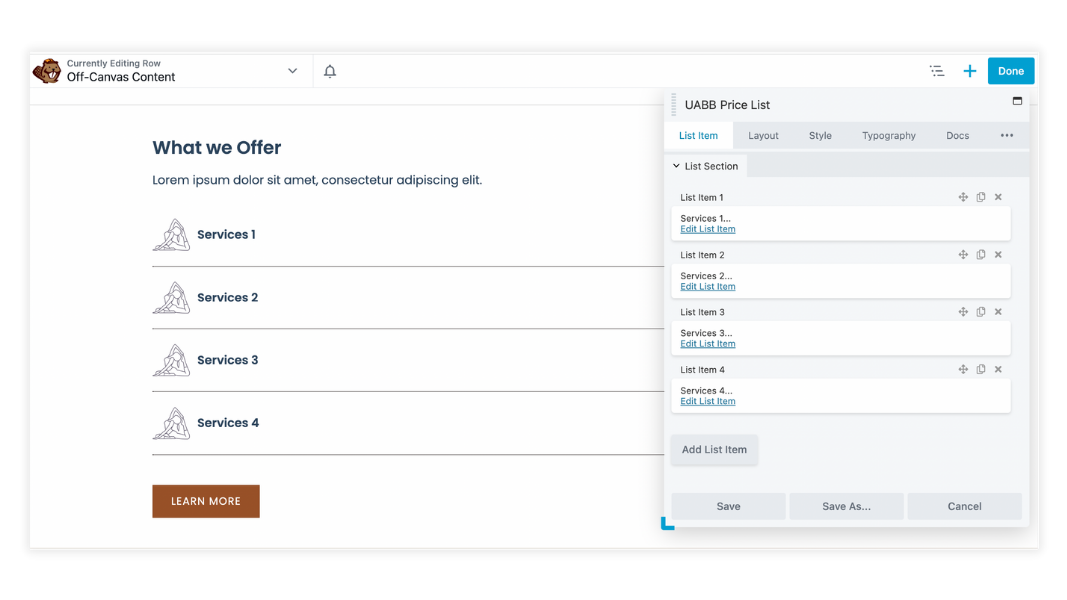
When you are happy with your layout, you are ready to move on to the next step. In the upper right-hand corner of the page, click Done and Publish to save your changes.
Step 2: Add Saved Row to UABB Off-Canvas Module
Once you have created your Beaver Builder saved row layout, it’s time to add it to the UABB off-canvas module on your WordPress page.
Either create a new page or open up an existing page in the Beaver Builder editor.
Next, click on the Modules tab found in the content panel and type off-canvas into the search field. Drag and drop the Off-Canvas module onto the page:
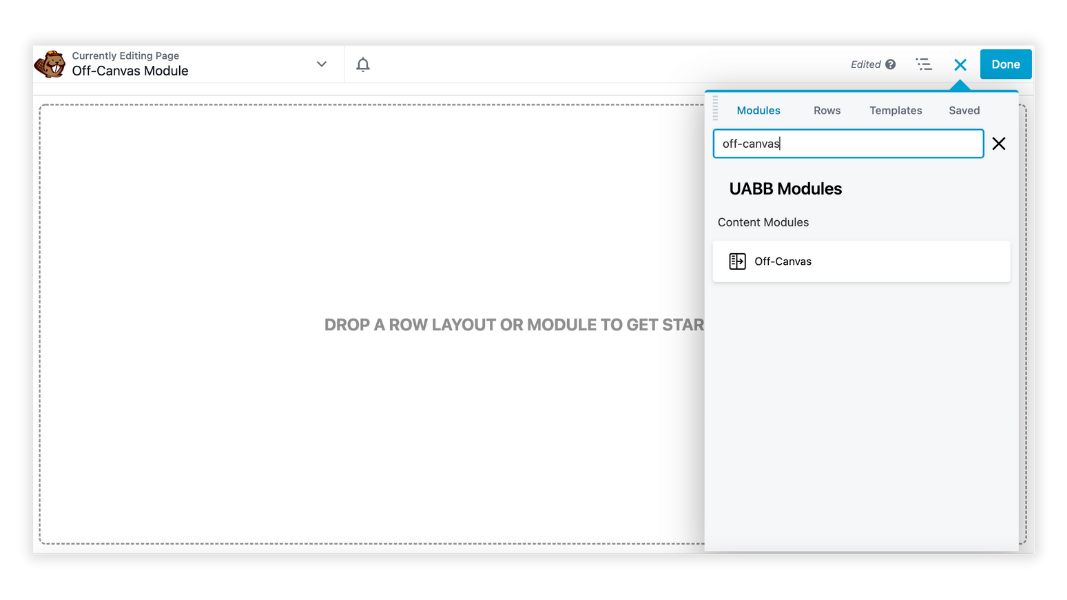
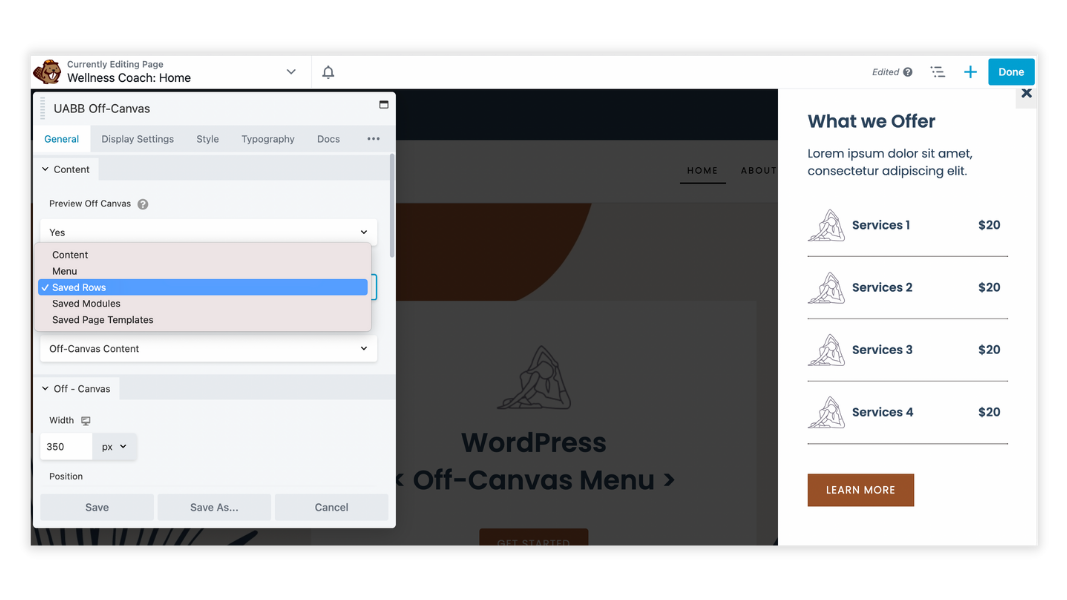
The Off-Canvas module settings panel will open up in a pop-up. Go to General > Content > Content Type and select the type of content you would like to display.
Here you can choose from the following content types: Content, Menu, Saved Rows, Saved Modules, or Saved Page Templates.
In this example, we are going to choose Saved Rows. This will allow you to choose the Off-Canvas Content saved row that you designed in the first step from the Select Row drop-down:
Step 3: Set a Trigger to Display the Off-Canvas Panel
The next step is to set a trigger within the UABB Off-Canvas module that when activated will display the off-canvas panel.
Navigate to the Display Settings tab to choose a trigger for the canvas. You can choose to display it with the click of a text, icon, image, button, or any other element (with CSS class/ID).
In this example, we are going to choose a Button from the list:
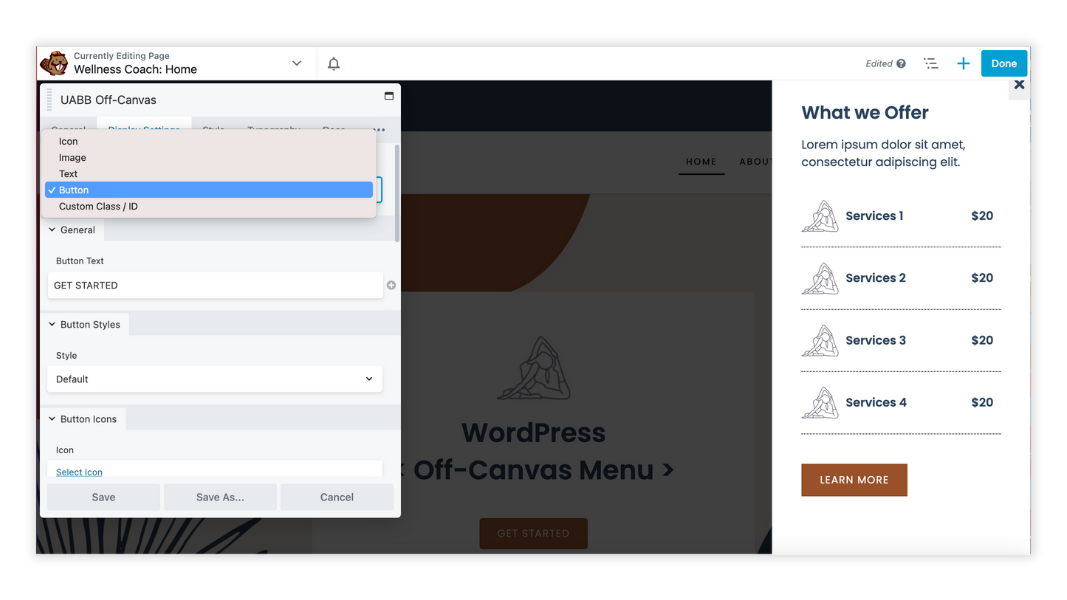
From here, you can further customize the UABB off-canvas module to fit your needs. Once you finish up, click Save.
In the upper right-hand corner of the page, click Done and Publish to save your changes.
Finally, check to see that your off-canvas menu is working as expected. From the front end of your site, click to activate the trigger that you set. In this case, a button, and should open up the flyout panel over the side of your page.
Conclusion
Although there are many ways to create menus for your website, adding an off-canvas menu is a quick and easy way to grab your visitor’s attention and make your site easier to navigate. Off-canvas menus also offer an interactive element that can keep people on your website for a longer period of time.
You can easily add an off-canvas menu by following these steps:
- Create a Beaver Builder Saved Row
- Set your Saved Row in the UABB Off-Canvas module
- Choose a Trigger to display your flyout panel
Do you have any questions about adding an off-canvas menu in WordPress? Let us know in the comments section below!
2 Comments
Related articles
Dev-Focused Page Builder for Modern WordPress Development
Looking for a dev-focused page builder that works with you, not against you? The problem is that many visual editors…
Visual Development with Beaver Builder: Building WordPress Sites That Scale
What’s the secret to building flexible, scalable WordPress sites that adapt to any project? Visual development is changing the way…
Case Study: How One Freelancer Built a Web Design Business with Beaver Builder
Wondering about Beaver Builder for freelancers? Cami MacNamara operates WebCami Site Design, a successful solo web design business in West…
Join the community
We're here for you
There's a thriving community of builders and we'd love for you to join us. Come by and show off a project, network, or ask a question.
Since 2014
Build Your Website in Minutes, Not Months
Join Over 1 Million+ Websites Powered By Beaver Builder.
 Beaver Builder


Great step-by-step guide. Off-canvas menu is a great option for responsive WordPress websites that need to display a lot of links or categories that wouldn’t otherwise fit in a traditional horizontal navigation bar in header. Thanks for sharing!
Wow! I had no idea I could do this. Fantastic!