
Wondering how to add image hover effects in WordPress? When designing your website, you’ll want it to stand out as much as possible. This can be difficult because every other web developer is thinking the same thing. However, many innovative tools enable you to create eye-catching web designs with ease.
For example, adding hover effects to images can be a creative, interactive way to improve static images on your site. In this post, we’ll discuss the benefits of adding hover effects to an image in WordPress. Then we’ll give you a step-by-step guide on how to implement them on your website. Let’s get started!
What Are Image Hover Effects in WordPress?
Since WordPress is very customizable, you can design a website with a lot of visual appeals. It may take time and planning to create a unique site, but it’s very possible when you’re using the right techniques.
One way to be innovative with your web design is by adding a hover effect to an image. Hover effects can be a perfect way to build an aesthetic, memorable website. They can help simple static images stand out and feel more interactive:

A hover effect is an animation that triggers when a user hovers over an element on the page. Some hover effects are as simple as enlarging an image. Others might change the color or make the image shrink or rotate. Hover effects can also be added to many other elements, such as links on your landing pages, but in this post, we’ll focus exclusively on images.
Why You Might Want to Add Hover Effects to Images in WordPress
If you want to grow your business, it’s crucial to have a well-designed website. Adding images is a smart technique for breaking up long passages of text and making your site feel personal. Designing the templates of the images first, then adding the hover effects later, or doing it the other way around can both be effective strategies.
There are many benefits to using hover effects. They can:
- Add an interactive element to the image
- Be more attention-grabbing than a static image
- Require fewer resources than GIFs or videos
- Let users know that an image is clickable
Best of all, with our Beaver Builder plugin, hover effects are easy to use. You’ll find that Beaver Builder offers many different animation options for hover effects. By using a custom class and custom CSS, you can instantly improve the images on your website.
How to Add Hover Effects to Images in WordPress (In 4 Steps)
Now that we’ve explored the benefits of hover effects, you might be wondering how to use them. Fortunately, we’ve compiled a step-by-step tutorial on this process:
You can add hover effects via manual coding. However, this can be both risky and time-consuming, especially if you’re not an experienced developer. The good news is that this task becomes much simpler when you’re using a plugin.
The free Beaver Builder WordPress plugin helps you build functional and visually-appealing WordPress websites with ease. Every element is developer-friendly, from the drag-and-drop page builder to the customizable CSS. Plus, this tool allows anyone to easily use image hover effects. For any photo that needs a more interactive feature, you can’t go wrong with Beaver Builder.
We also recommend installing our Beaver Builder Theme. When designing posts and pages in WordPress, it’s best to use time-saving WordPress post templates. That way, you can focus on creating interesting features such as hover effects, rather than designing layouts. However, you’re free to use Beaver Builder alongside any WordPress theme you prefer.
Step 1: Add a Photo Module to Your Page
Before you begin, be sure to install and activate the Beaver Builder plugin. After that, on the back end of your WordPress website, go to the Pages tab. Either create a new page or select the page you want to edit and click Launch Beaver Builder to open up the editor.
Then click on the + icon in the upper right-hand corner. There, you’ll add a Photo module to your page:
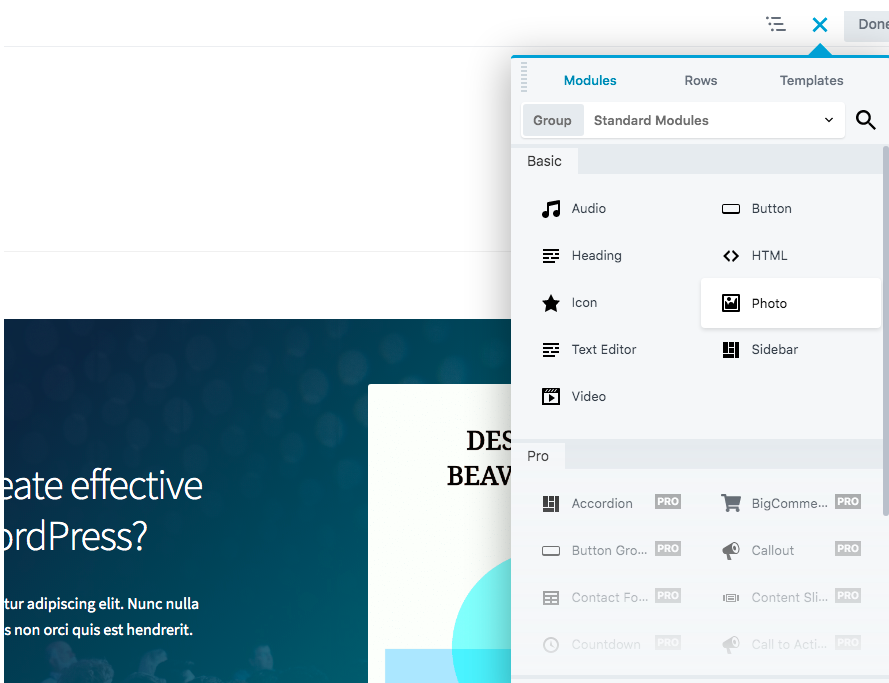
You can use the drag-and-drop feature to quickly and easily place this module wherever it’s needed.
Step 2: Configure the Photo Module
Next, configure the Photo module as you would for any image you add to your site. To begin, you can either select a photo from your Media Library or use a URL. When using the Media Library, select the photo size you want:

You can also crop the image into various geometric shapes. A hover effect will still be effective even if your image is shaped into a landscape, panorama, portrait, or circle.
At this point, you can add a link to the photo if needed. Because hover effects draw attention to an image, this may be an effective way to encourage visitors to visit certain URLs.
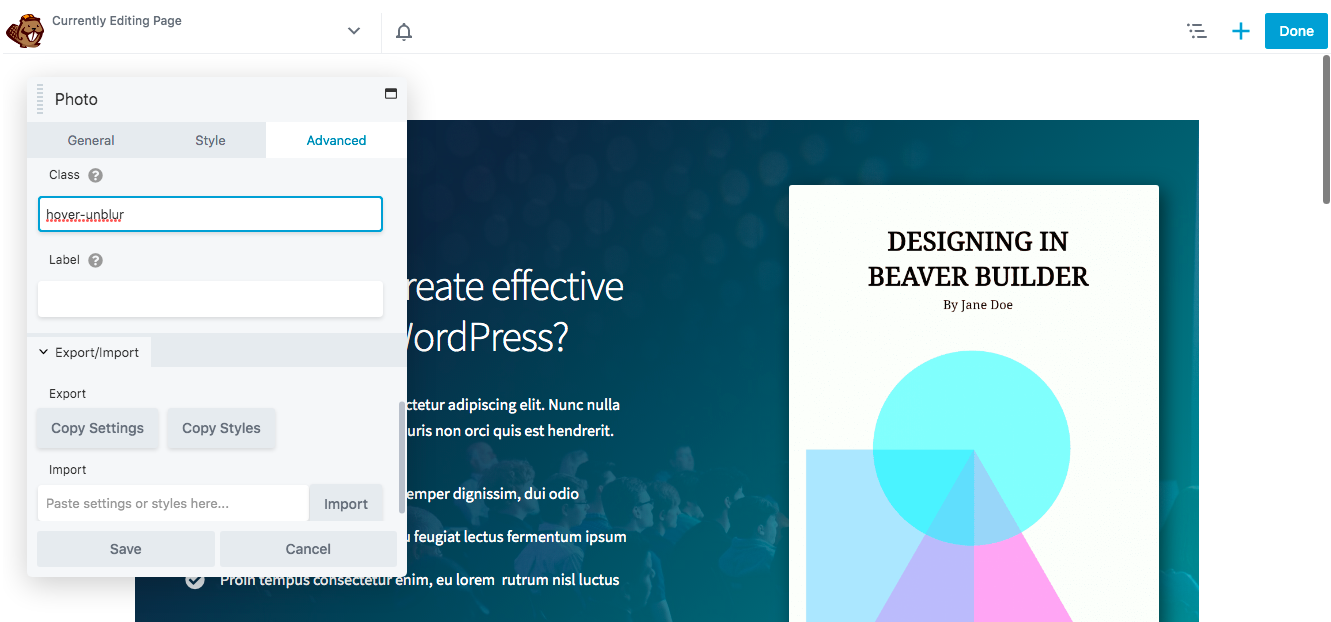
Step 3: Enter the Custom Class
Once you’ve configured the photo module to your liking, click on the Advanced tab. This is where you’ll find the HTML Element section.
Scroll to the bottom of that section, until you see the Class field. In this box, you’ll enter the custom class information for whichever effect you’re using. In this tutorial, we’re using the Hover Unblur effect, so we entered “hover-unblur” in the class section:
With hover effects, you can not only insert animations but also change the color of an image. Beaver Builder offers many different hover effects to choose from.
Depending on the effect you want to add, you’ll need to use a specific custom class. Here are the options you have available:
- Hover Zoom In: hover-zoom-in
- Hover Zoom Out: hover-zoom-out
- Hover Zoom Out and Rotate: hover-zoom-out-rotate
- Hover Unblur: hover-unblur
- Grayscale to Color: gray-scale-img
- Sepia to Color: sepia-img
You can always preview various effects before choosing one, to see which option is most effective.
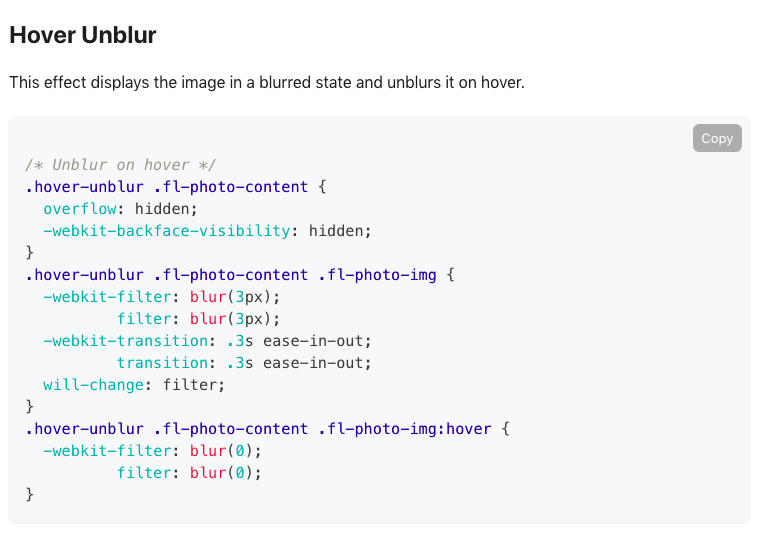
Step 4: Add the CSS for the Effect on Your Site
Finally, you’ll need to add the CSS for your chosen hover effect to your site. To do this, you can visit our knowledgebase to find and copy the CSS for that hover effect:
It’s important to note that the transition speeds for hover effects are fixed at 0.3 seconds. However, you can change this when you upload the CSS to your site. Simply increase or decrease the values to speed up or slow down the transition.
To add the CSS code to your website, click on the title bar in the upper-left corner and navigate to the Global Settings:
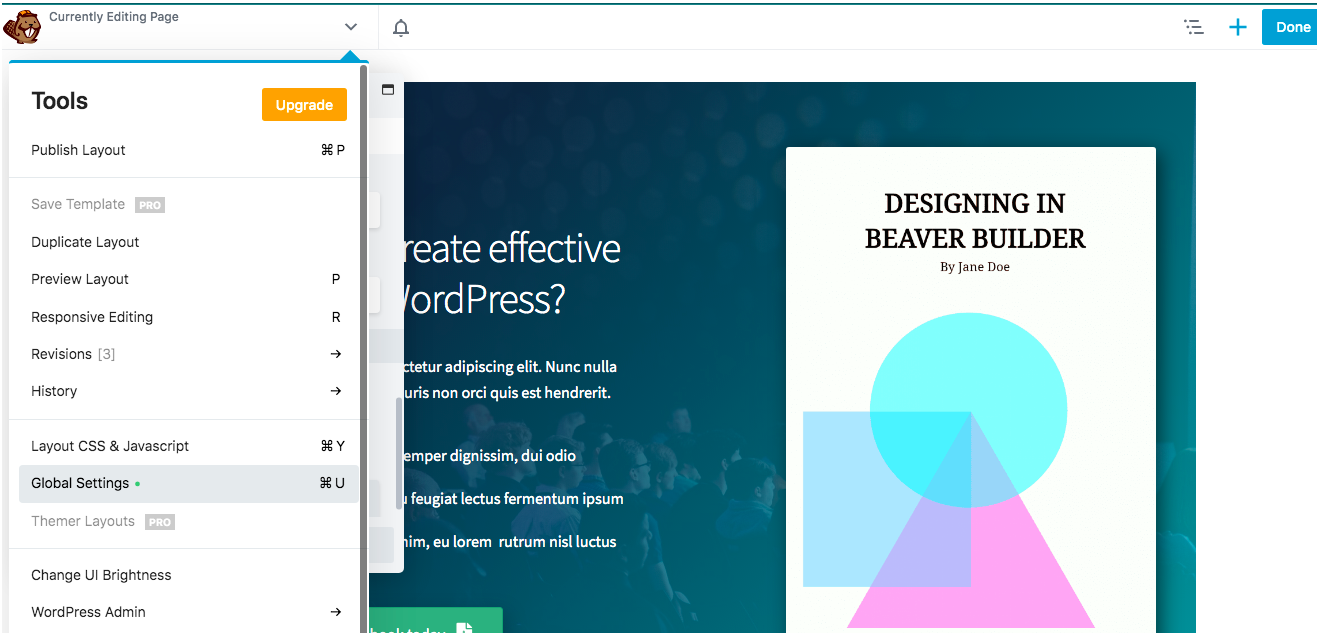
Then go to the CSS tag, and paste in the CSS code for your desired effect. Once you save your changes, this code will appear in Tools > Global Settings on every Beaver Builder page. What’s more, your CSS rules will apply to all of your site’s content, even the parts not built using Beaver Builder.
If you’d like to apply the CSS to just a specific page, go to Layout CSS & Javascript instead. Enter your code into the CSS tab, and save your changes.
Now you can view your first hover effect! Be sure to hover your mouse over the image to make sure it’s working correctly:
You can also add the same hover effect to multiple images in a row or column. For more details on that, check out our documentation on working with row and column settings.
Conclusion
Although there are many ways to customize your website, adding a hover effect is a quick and easy way to make any image look unique and eye-catching. Hover effects also offer an interactive element that can keep people on your website for a longer period of time.
As we’ve seen, you can easily add any hover effect using our Beaver Builder plugin, by following these steps:
- Add a photo module to your page.
- Configure the photo module.
- Enter the custom class.
- Add the CSS for the effect to your site.
What’s your favorite hover effect to use? Let us know in the comments section below!
1 Comment
Our Newsletter
Our newsletter is personally written and sent out about once a month. It's not the least bit annoying or spammy.
We promise.
Try Beaver Builder Today

Related articles
How to Build Card Layouts in Beaver Builder (Flexbox + Box Module Tutorial)
If you’re using the Beaver Builder Box Module to build responsive layouts, you’ve likely noticed two things: it’s incredibly powerful…
How to Center Content in Beaver Builder (Flexbox, Rows & Modules Guide)
Wondering how to center content in Beaver Builder? The most reliable way is to use the Box Module with Flexbox:…
Struggling with CSS Grid? Turn This On in Beaver Builder
CSS Grid is powerful, but it can be hard to work with when you can’t clearly see your layout. Beaver…
Join the community
We're here for you
There's a thriving community of builders and we'd love for you to join us. Come by and show off a project, network, or ask a question.
Since 2014
Build Your Website in Minutes, Not Months
Join Over 1 Million+ Websites Powered By Beaver Builder.
Thanks for sharing these hover effects.