
In this article, you will learn how to add color presets to the WordPress customizer. Choosing a solid color scheme for your website can help strengthen your branding and demonstrate professionalism. However, manually adding specific colors every time you customize your theme can be rather tedious. One way to simplify the process is to add color presets to the WordPress Customizer.
In this post, we’ll explain what color presets are, and why you might want to use them when designing your site. Then, we’ll show you how to add them to the WordPress Customizer in five simple steps. Let’s get started!
The Benefits of Using Color Presets When Building WordPress Pages
The colors you use on your website play an essential role in your branding. Creating a consistent and cohesive look across your site demonstrates professionalism and credibility.
After you select your branding color palette, the next step is to use it across your posts and pages. Thanks to the WordPress Customizer, modifying the colors that appear in your content can be a simple process.
The default palette in the WordPress Customizer can be found below the color picker square:
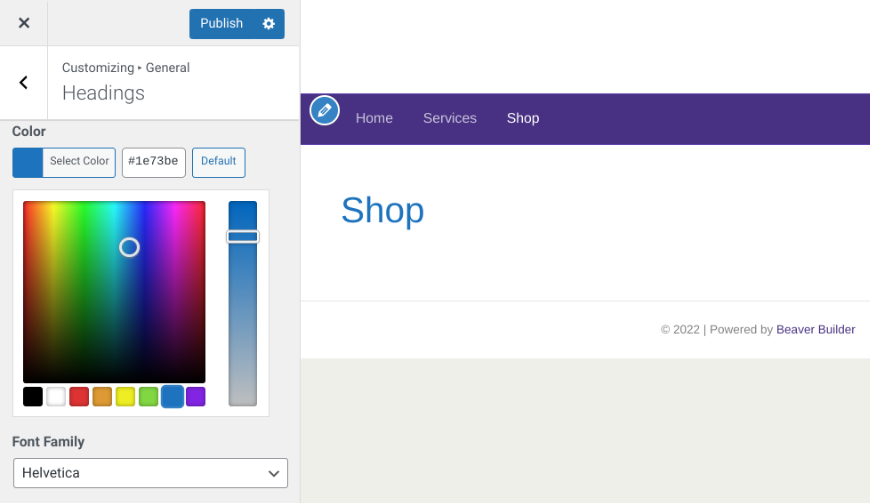
The colored squares are your color presets. However, as you’ve likely noticed, the default colors don’t match your branding’s unique palette.
Furthermore, re-entering your branding’s hex color values every time you want to use them can be time-consuming. Fortunately, you can replace these boxes with your custom colors by inserting a few snippets of code in your theme’s file.
Adding your own color presets to the Customizer saves you time because it eliminates the need to search for and add the specific hex value each time you want to use it. Instead, your colors are readily available below the Customizer’s selector.
Creating color presets for your website also helps ensure that you are consistent across your website. This is especially helpful if you have multiple people contributing to your site. It minimizes the chances of users selecting the wrong hue.
How to Add Color Presets to the WordPress Customizer (In 5 Steps)
Now that we understand the benefits of using color presets on your site, let’s look at how to create them. In this tutorial, we’ll show you how to add color presets to the WordPress Customizer in five steps.
Step 1: Create a Backup of Your Site
Adding color presets requires you to edit your theme’s functions.php file. Before getting started, we recommend backing up your website. That way, if anything goes wrong, you’ll have the previous version of your site files to restore.
There are a handful of methods you can use to back up your website. One of the easiest is to use a plugin such as UpdraftPlus:

This freemium tool lets you backup your site in just a few clicks. You can also choose from multiple off-site locations to store the files, including Google Drive and Dropbox.
Step 2: Create a Child Theme
If you make changes directly to your theme’s files, there’s a good chance they will get overwritten the next time the theme has an update. To prevent this, you should always create and use a child theme when adding custom code.
There are various ways you can go about this. For example, Beaver Builder comes with a child theme that you can install. If you’re using a different theme, you can also create a blank child theme. There are free WordPress plugins that can create a child theme for you. After you add a child theme, be sure to activate it at Appearance > Themes.
Step 3: Add Code to Your Child Theme’s functions.php File
Once you’ve created your child theme, navigate to Appearance > Theme Editor in your WordPress dashboard. Make sure that the child theme is selected from the drop-down menu at the top of the screen. Note that if you don’t see Theme Editor in the admin menu, it might be that a security plugin has hidden it.
In the right-hand panel, locate the functions.php file under Theme Functions:
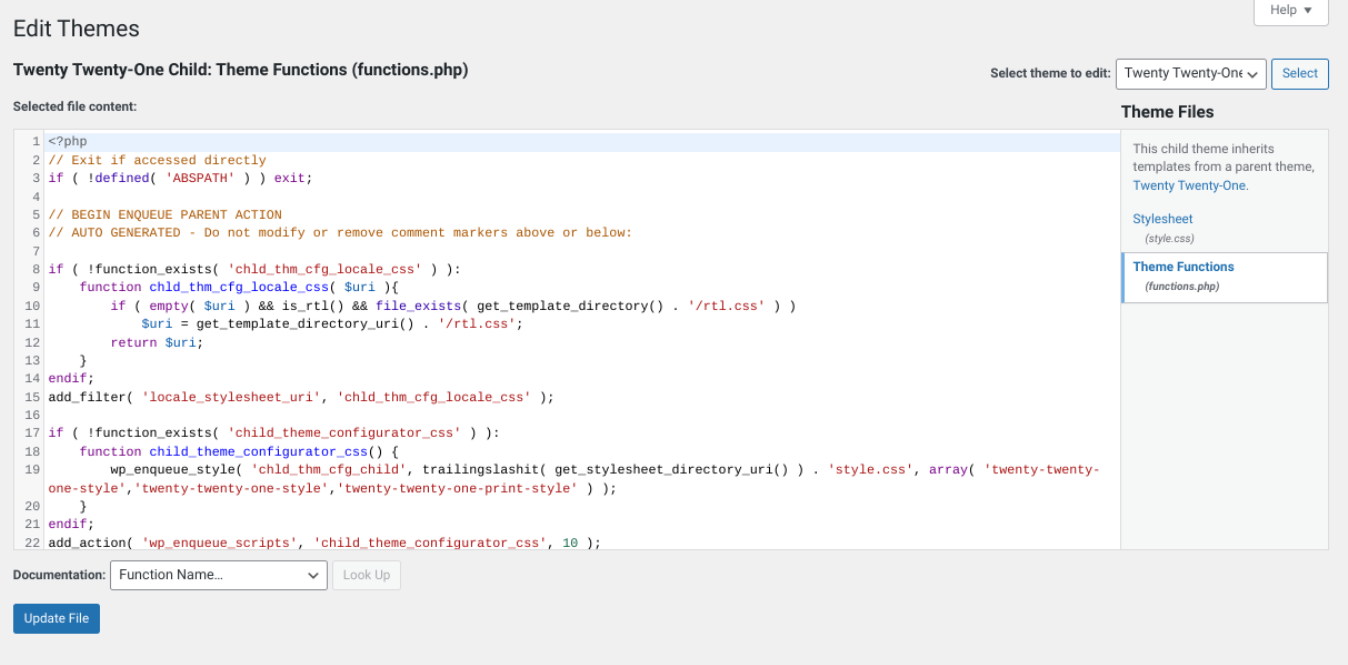
Next, add the following code to the file:
//Change the Customizer color palette presets
add_action('customize_controls_print_footer_scripts', function () {
?>
<script>
jQuery(document).ready(function($){
$('.wp-picker-container').iris({
mode: 'hsl',
controls: {
horiz: 'h', // square horizontal displays hue
vert: 's', // square vertical displays saturdation
strip: 'l' // slider displays lightness
},
palettes: ['#91472c', '#6d775f', '#f9fffb', '#546a76']
})
});
</script>
<?php
});
With this code, you’ll be able to replace the boxes that appear below the color picker square with the preset colors you want to use.
Step 4: Change the Color Presets in the Customizer
Next, you can change, add, or delete hex colors in the palettes parameter. The number of boxes shown in the Customizer will reflect the number of colors you specify within this code.
Insert as many hex colors as you would like to include in your palette. When you’re done, click the Update File button at the bottom of the Theme Editor to save your changes.
Step 5: Preview Your Changes to Confirm That Your Color Presets Work
After you update your changes, the only thing left to do is to confirm that the color presets are visible in the WordPress Customizer.
To do this, reload your website page in the browser, then navigate to the Customizer. Under the color selector, you should see the hex colors that you’ve just added:
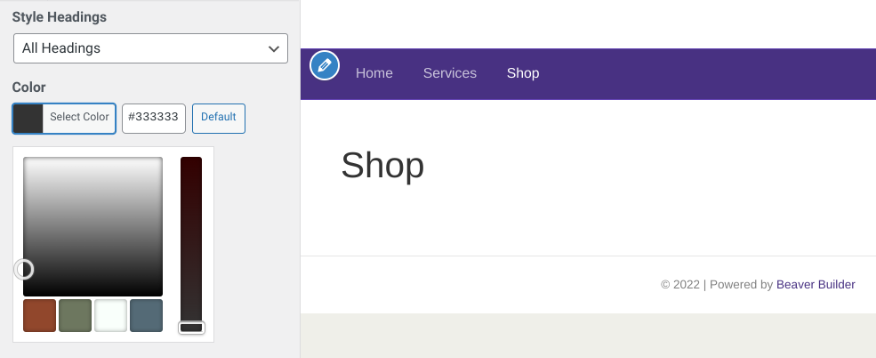
If the color picker squares and sliders aren’t behaving the way you want them to, you can vary the HSL parameters to adjust the hue, saturation, and lightness. If everything is as it should be, you’re all set!
You’ve now added your own color presets to the WordPress Customizer. You can return to your theme’s functions.php file to modify, add, or delete these colors.
Conclusion
When designing your WordPress website, you’ll likely want to use your brand colors throughout your pages and posts. However, manually adding them to your content can be time-consuming. Fortunately, you can create color presets to replace the default palette.
In this post, we showed you how to add color presets to the WordPress Customizer in five simple steps:
- Back up your site.
- Create a child theme.
- Add code to your child theme’s functions.php file.
- Change, delete, and add the color palette presets in the Customizer via the
paletteparameter. - Preview your changes in the Customizer to confirm that everything is working properly.
Do you have any questions about adding color presets to the WordPress Customizer? Let us know in the comments section below!
6 Comments
Our Newsletter
Our newsletter is personally written and sent out about once a month. It's not the least bit annoying or spammy.
We promise.
Try Beaver Builder Today

Related articles

How Beaver Builder Products Work Together to Build Flexible WordPress Websites
Building a WordPress website often means stitching together a theme from one developer, a page builder from another, and a…

Growing a Facebook Group to 14,000 Members: Community Management Tips with David McCan
David McCan grew the Dynamic WordPress Facebook group to over 14,000 members. We sat down to talk about his moderation...

Why Agencies Are Switching to Beaver Builder: Performance Testing Results
By Chris Smith – HYPEsites.com For WordPress agencies, page builder choice directly impacts the metrics that matter most: project margins,…
Join the community
We're here for you
There's a thriving community of builders and we'd love for you to join us. Come by and show off a project, network, or ask a question.
Since 2014
Build Your Website in Minutes, Not Months
Join Over 1 Million+ Websites Powered By Beaver Builder.
Great post, you made it really easy for beginners to understand this pretty tough topic. You have helped me a lot so I want to thank you.
After it threw an error on my site I checked the code from the original page in the docs and saw that you left out the last line of code here:
});
Once I added that in, everything was fine.
Awesome! We’ve wished for customizer color presets for a long time. Not quite as easy as BB’s picker functionality, but this is an improvement.
Piggybacking on what Fran said above, there is also a closure bracket at the end of the snippet, which will throw an error.
Simply replace “ with `<?php });`
With the tutorial code, the picker does not show the currently selected color when activated. To work fully, replace
`$(‘.wp-picker-container’).iris({`
with
`$(‘.wp-picker-container’).each(function(){
var input_el = $(this).find(‘.color-picker-hex’).val();
$(this).iris({
color: input_el,`
and another set of closing `});` at the end.
Awesome, that worked great, Seth!
Awesome! We’ve wished for customizer color presets for a long time.