
Creating a top-tier website begins with basic page design. However, getting started can be a little tricky. Fortunately, there’s Beaver Builder. With our easy-to-use visual interface, you can start crafting professional pages in no time.
In this article, we introduce you to our Beaver Builder plugin. Then, we show you how to create your pages with it in just five simple steps. Let’s dive right in!
An Introduction to Beaver Builder
Page builders are an essential tool for any website owner or designer. This is because they make it easier to create and manage the content on your pages.
Page builders are essential tools for website owners and designers alike, simplifying the process of creating and managing page content. With so much to cover in site design, it’s crucial to choose a high-quality plugin that helps you create page layouts effortlessly. That’s where Beaver Builder shines:

Beaver Builder is a leading page builder known for its drag-and-drop functionality. This powerful tool makes it easy to design professional websites without writing a single line of code. With its live front-end editing feature, you can see your changes in real-time, eliminating the hassle of toggling between front-end and back-end previews.
Another key advantage of Beaver Builder is its intuitive design. By seeing your changes in real-time as you build your pages, you can better visualize what your audience will experience.
Beaver Builder offers over 30 content modules, including options tailored for popular plugins like WooCommerce and custom post types. You can even place WordPress widgets anywhere within your layout, giving you nearly limitless creative possibilities. This flexibility empowers you to build dynamic and unique pages with ease.
For an even more cohesive experience, Beaver Builder works seamlessly with the Beaver Builder Theme. While optimized for the builder, you’re free to use any compatible theme with Beaver Builder.
Take Your Designs Further with Beaver Themer
While Beaver Builder excels at building content areas, you can extend its capabilities with Beaver Themer.
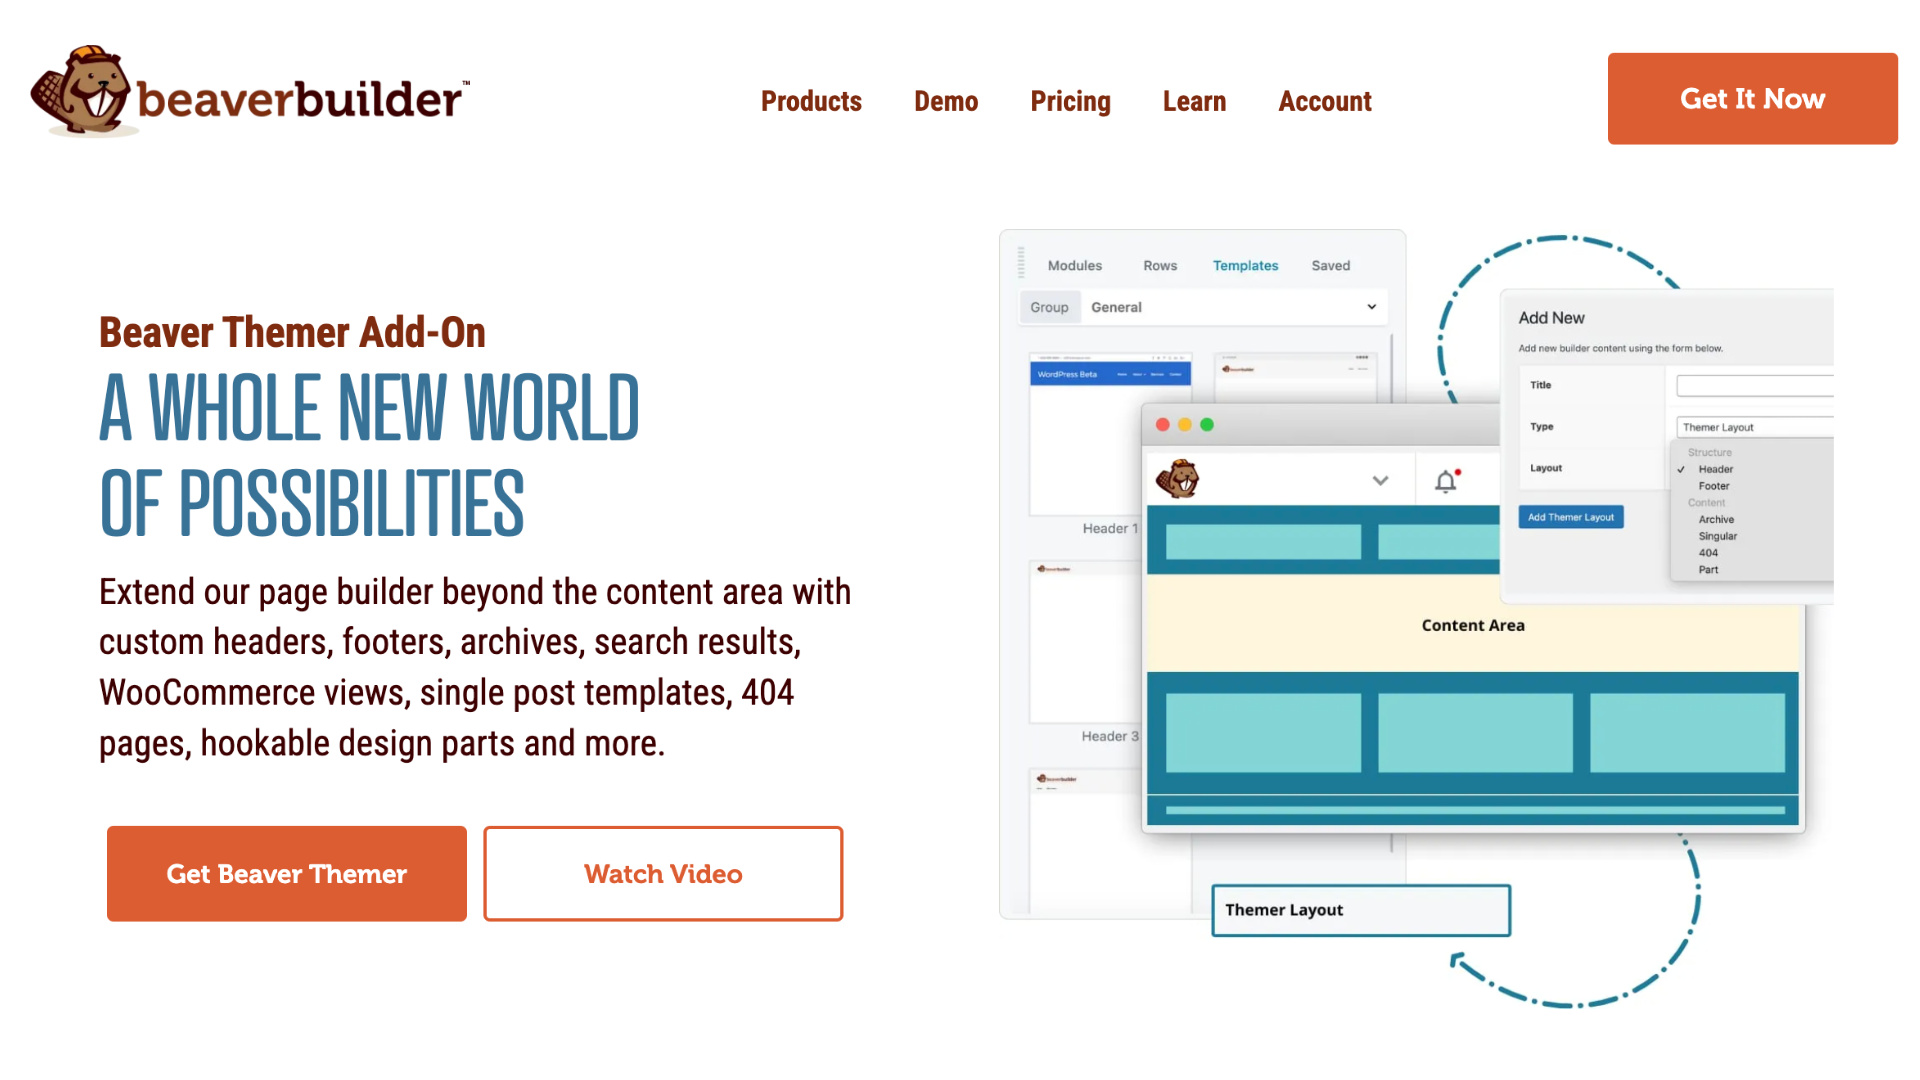
This theme builder plugin allows you to design custom layouts for areas outside the standard content zone, such as:
By combining Beaver Builder and Beaver Themer, you can customize every inch of your WordPress site, ensuring consistency and creativity across all pages.
Unlock the Full Suite of Beaver Builder Products
Any premium Beaver Builder plan grants you access to the entire suite of products, including the Beaver Builder Page Builder, Beaver Builder Theme, and Beaver Themer.
If you’re curious about how this powerful suite can work for you, head over to our demo site to explore its features in action before making a commitment. This way, you can experience firsthand how the Beaver Builder suite transforms the way you design and manage WordPress sites.
How to Create Your Pages With Beaver Builder (In 5 Steps)
Whether you want to create simple or complex pages, Beaver Builder can help. Here’s how to get started in just five easy steps.
Step 1: Add Your New Page
Let’s start with the basics. First, get Beaver Builder up and running on your site. While we do offer a lite version, the premium option offers more advanced features. It also comes with a 30-day money-back guarantee.
After you’ve made your choice, install and activate the plugin. Make sure you’ve done the same for your chosen theme.
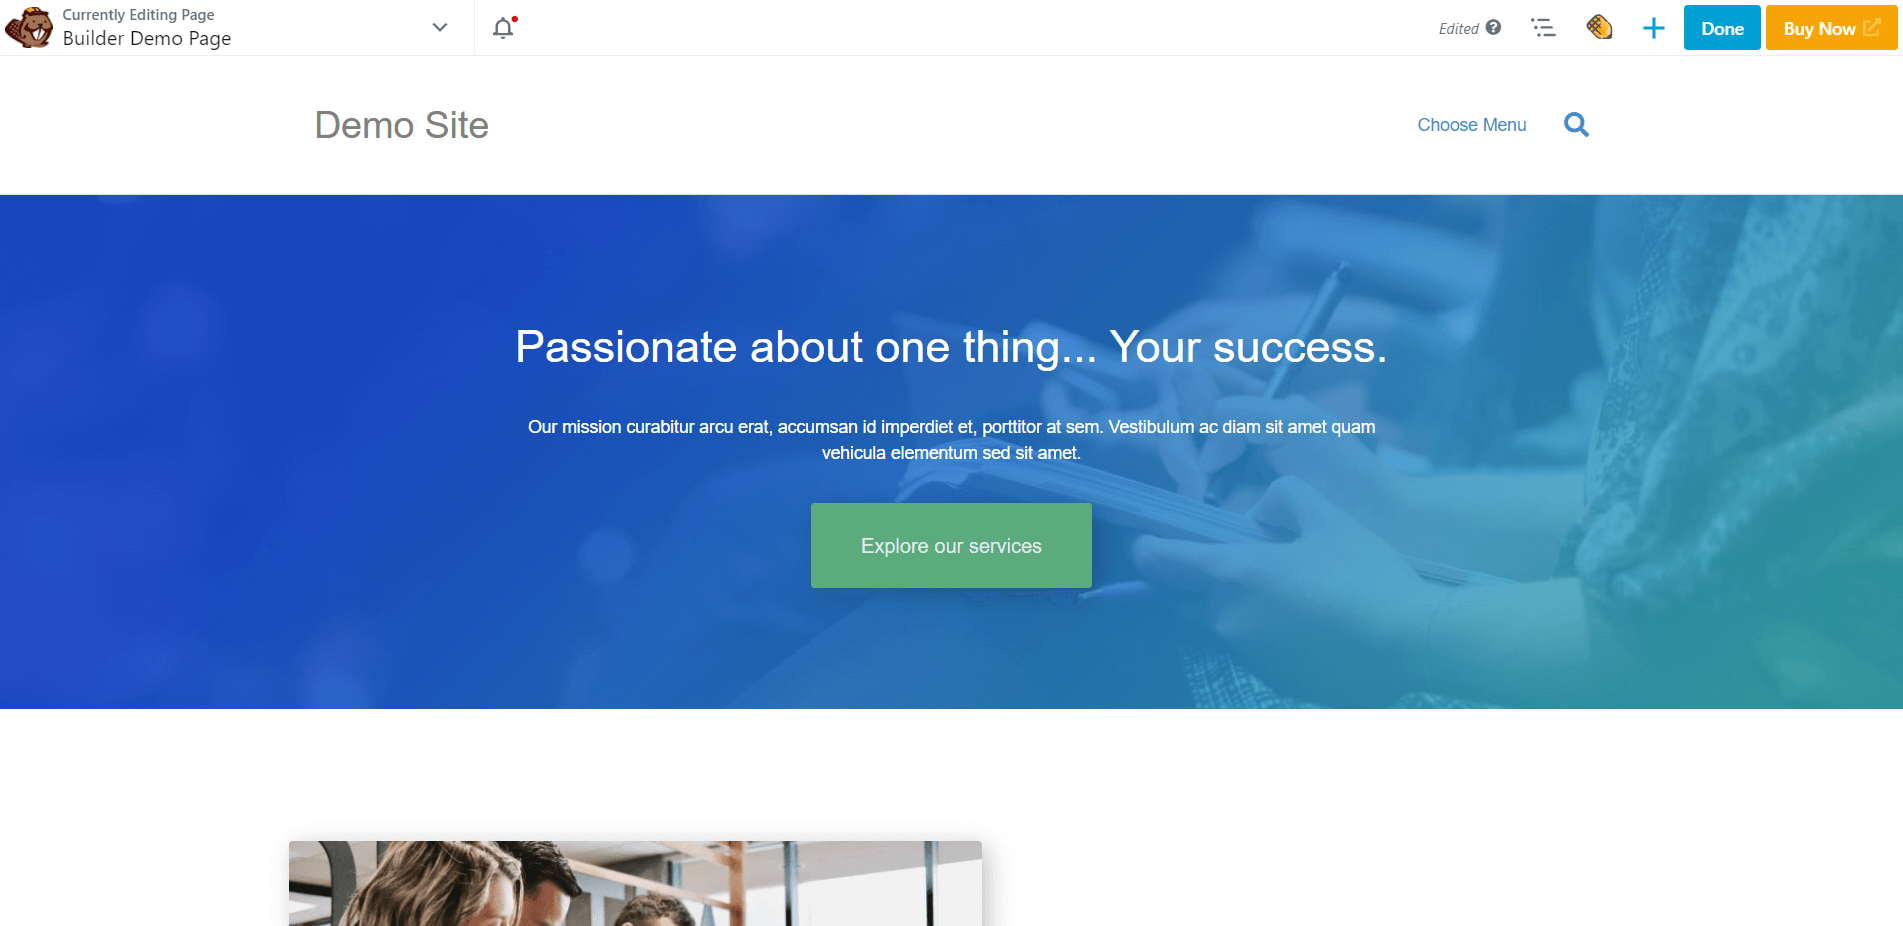
Next, create a basic WordPress page. You can start by going to Pages > Add New in the WordPress admin sidebar menu. If you’ve installed Beaver Builder, you should see a page that looks like this:
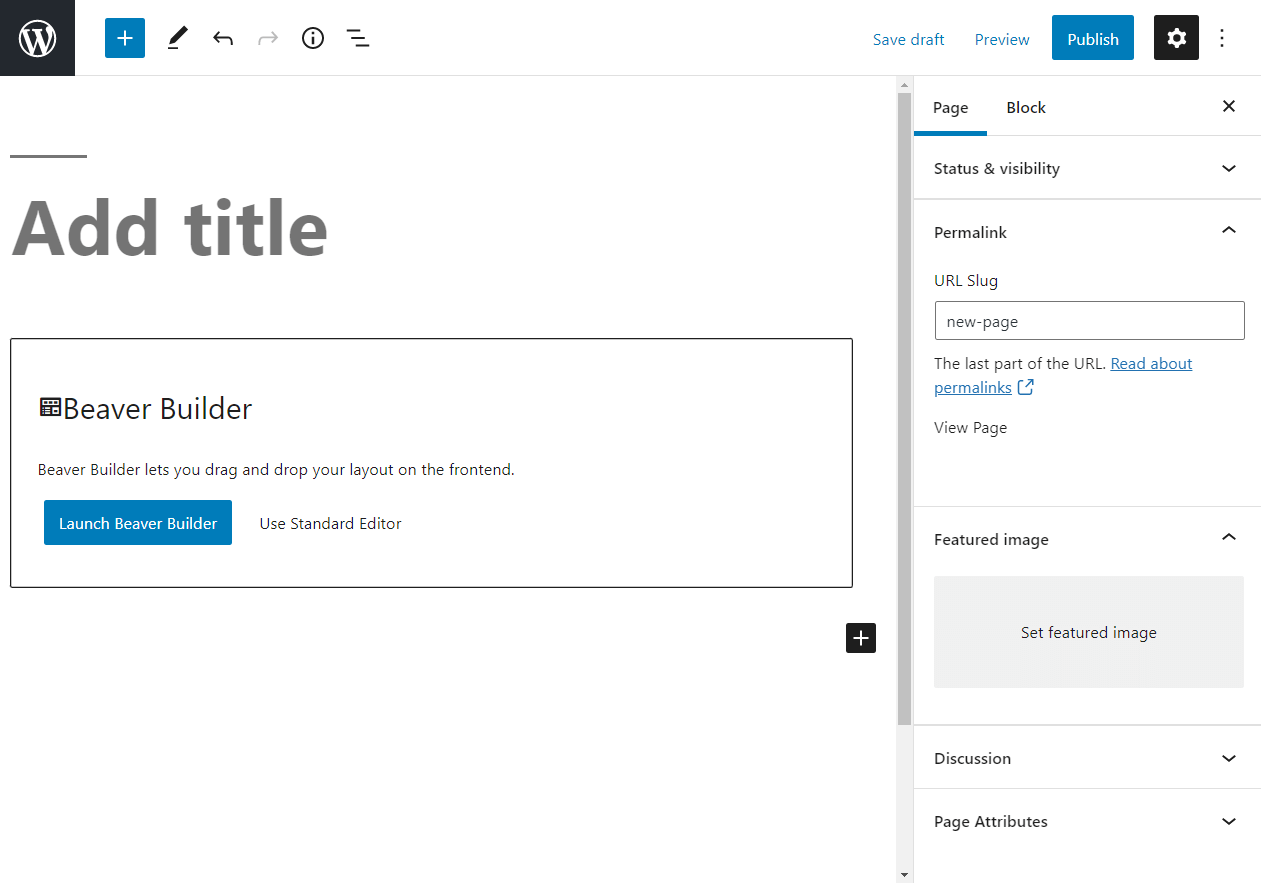
Before you launch Beaver Builder, let’s get a few basics out of the way. These steps may seem overly simple, but small actions like these can be crucial for Search Engine Optimization (SEO).
Start by adding a title. If you’re building multiple pages, labeling them is important to the process. You can always change the page titles later on.
Next, check the page’s permalink in the right sidebar and adjust if necessary to accurately reflect the content. Try to keep the slug as simple as possible.
Finally, add a featured image if you have one ready. Then click Save.
Now, it’s time to work on your content. In the middle of the screen, click the button labeled Launch Beaver Builder. This takes you to the default interface, which should look something like this:
It’ll be pretty blank at the start. Feel free to take some time here to click around to explore the Beaver Builder editor’s user interface.
Step 2: Choose a Template
Since we’re working with a blank slate, you might not be sure where to start. That’s where our layout templates can help.
Layout templates are basically starter pages. You can use them to guide your own creative process. You can change as much or as little about them as you like – it’s up to you.
Start by finding the plus icon in the upper right corner. Click on it to open the Content panel, then click the Template tab. You should then see this menu:

You can pick what type of content you want to work with from the dropdown menu. One option is Landing Pages. These are stand-alone areas where you can send users to collect more leads. The Landing Page templates also work well as starters for your home page.
For any other type of template, select the Content group. You’ll also see an option labeled Saved Templates. This will be empty if it’s your first time using Beaver Builder. We’ll cover this feature later on.
Now you can browse through the template options. There are a lot of possibilities, so we recommend that you take your time to find the right template for you. Once you’ve found a template you’d like to use, click on it. You then see this message:
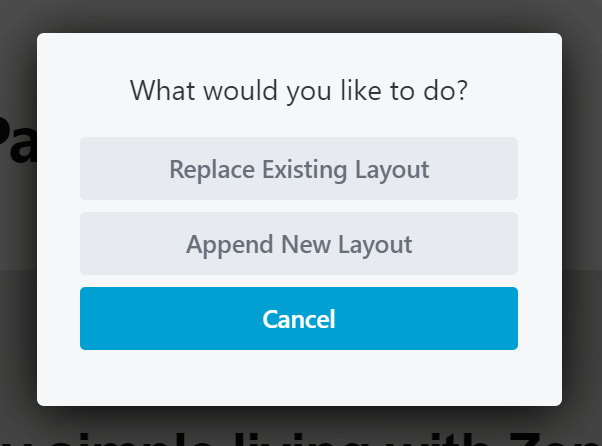
If you click on Append New Layout, you’ll add this template to whatever area you’re working on. However, we want to start fresh, so we’ll select Replace Existing Layout. After you confirm your choice, you should see your new layout template:
Each layout template comes with premade rows, columns, and modules. Simply click on any area to adjust these elements. You can duplicate, delete, or change settings as you like.
You can customize further by adding your own features. For more information on that, move on to step three.
Step 3: Rearrange the Layout with Columns and Prebuilt Rows
Now that we’ve moved on to customization, let’s start with spacing. Columns are a simple way to do this. They’re also helpful for standardizing the layout of your pages.
Click the plus icon once more. In the Content panel, click the Rows tab and select the group Columns:
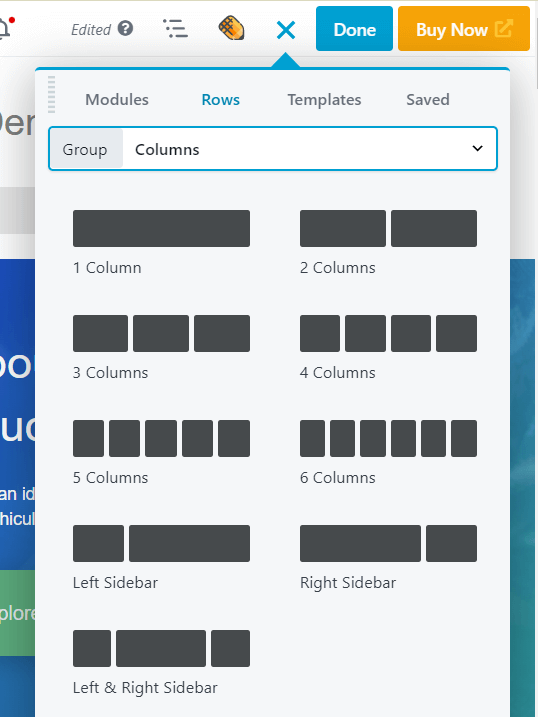
Simply drag and drop the columns wherever you want them. Consider using columns to guide your visitor’s eye.
Don’t be afraid to experiment with the spacing here. You can change column widths by clicking and dragging the drag handles as you mouse over a column.
You can also use rows to create new structures. You’ve seen how to add rows with blank columns, but you can also choose from 100 prebuilt row templates. Back on the Rows tab in the Content panel, choose the Prebuilt Rows group. You’ll then see a number of prebuilt row content types to choose from:
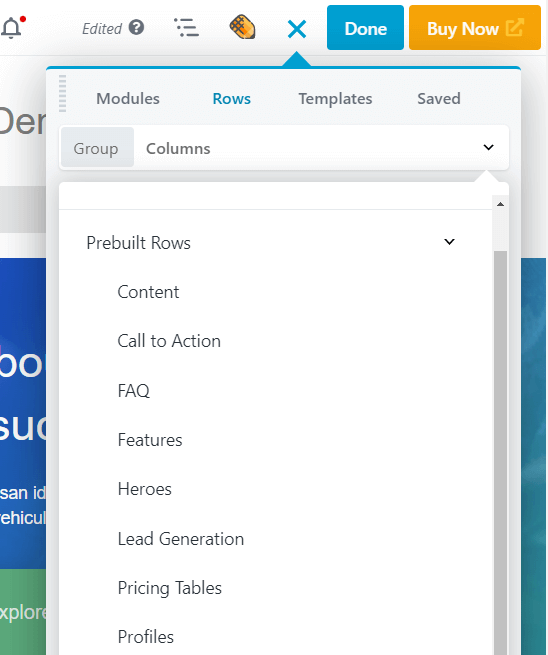
Choose a type, then select a row you like and add it to your page. Just like layout templates, prebuilt rows can be particularly useful if you’re strapped for time.
Keep your final page design in mind as you add these elements. For example, let’s say you’re building an excellent sales page. If you already have an idea of the design, you can start with similar layout templates and rows and tweak them, rather than building from scratch.
When you’re ready to add more functionality, move on to the next step.
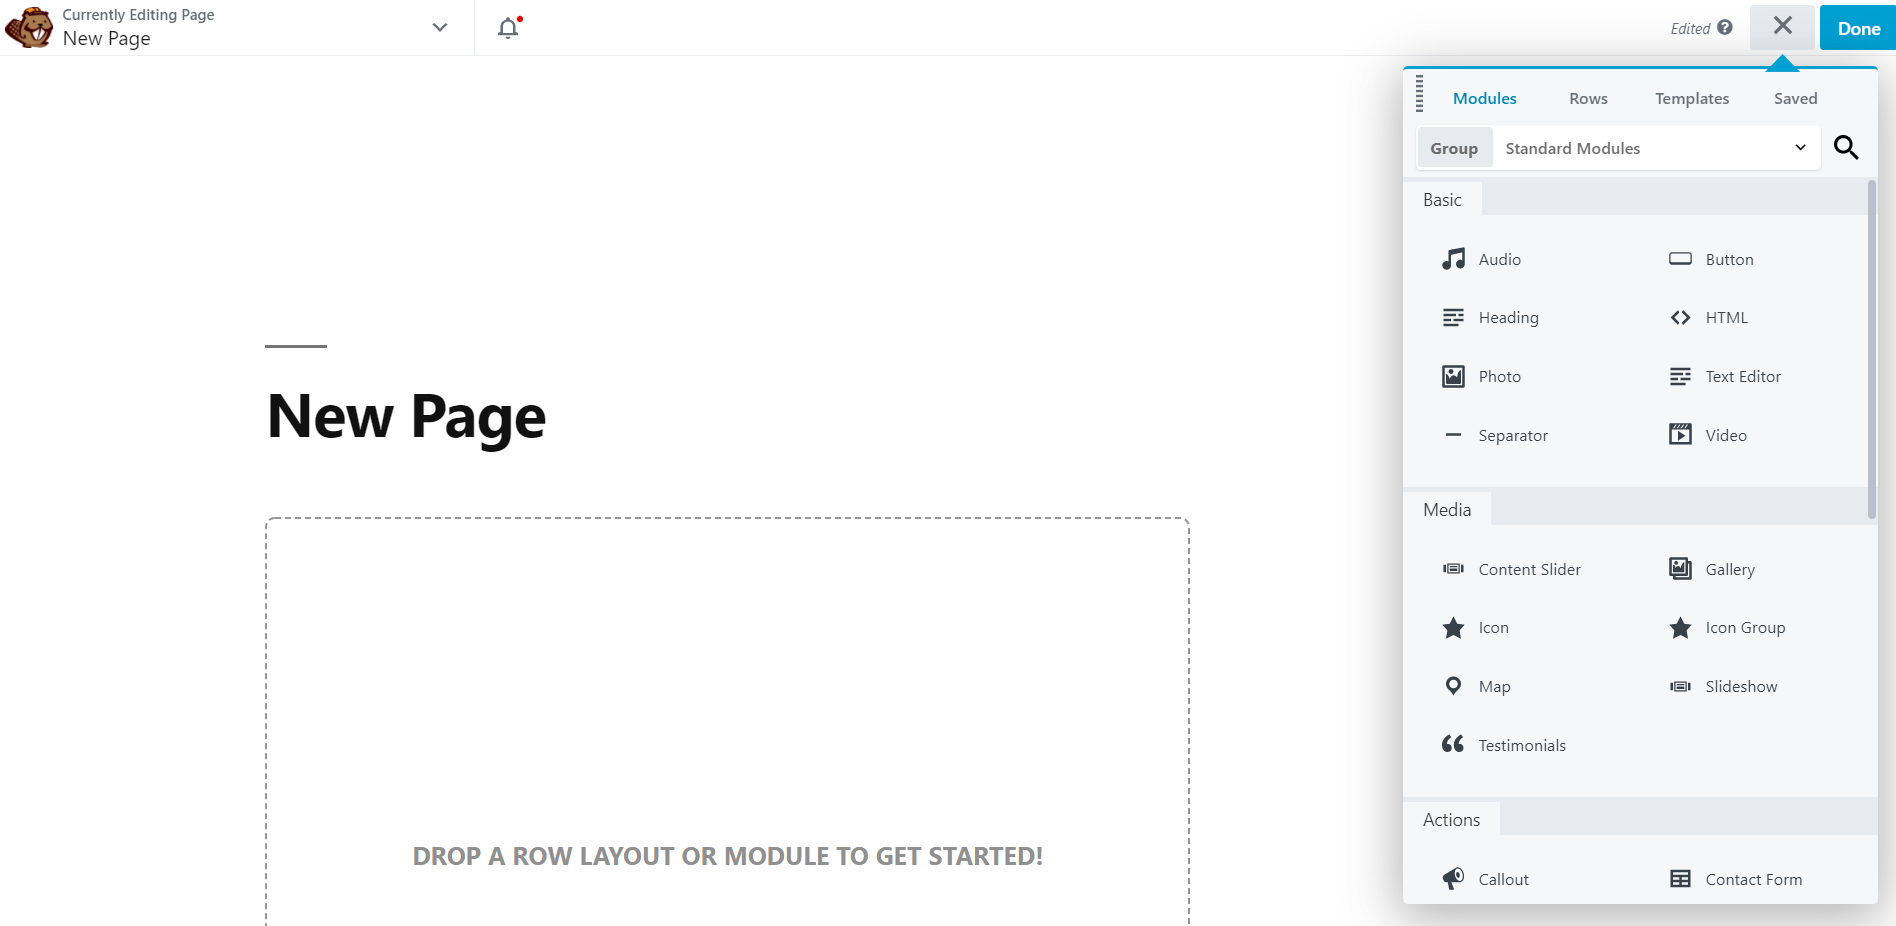
Step 4: Add Additional Modules
At this point, you should have a few columns set up. Now, you can start filling them in with content modules. Beaver Builder provides a large selection of modules that you can choose from. In the Content panel, click the Modules tab to see them:
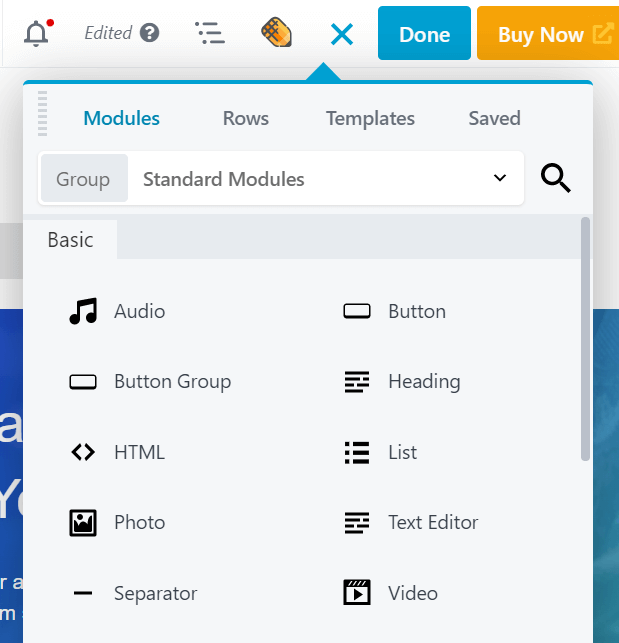
At the top, you’ll see a few group options. The Standard Modules contains all the modules unique to Beaver Builder.The Saved Modules section will be empty if this is your first time. You can also switch to WordPress Widgets if you want to add WordPress widgets into your layout. If you have any third-party integrations into Beaver Builder that come with their own custom modules, you’ll see those as separate groups.
Scroll down through the standard modules to see your options. For example, you can visit the Media section to see modules such as Slideshow. This will display photos of your choice on a rotating schedule, with many options for navigation, speed, and transition type.
Alternatively, you can use modules for slightly more practical actions. For example, the Subscribe Form module provides a form on the front end for name and email address and on the back end you can connect it to one of a large number of mail subscription services to register new subscribers automatically. If you save this as a global module, as described in the next section, you can use it in multiple locations on your site, and if you make changes to one location, the module is updated everywhere.
To get a sense of what you can do with the various modules, we recommend that you check out our ultimate module guide and use it as a reference while you build your site.
To add a module to your page, simply drag and drop it into your layout. Then click on a module to open its settings. For example, this is what the editing screen looks like for a Photo module:
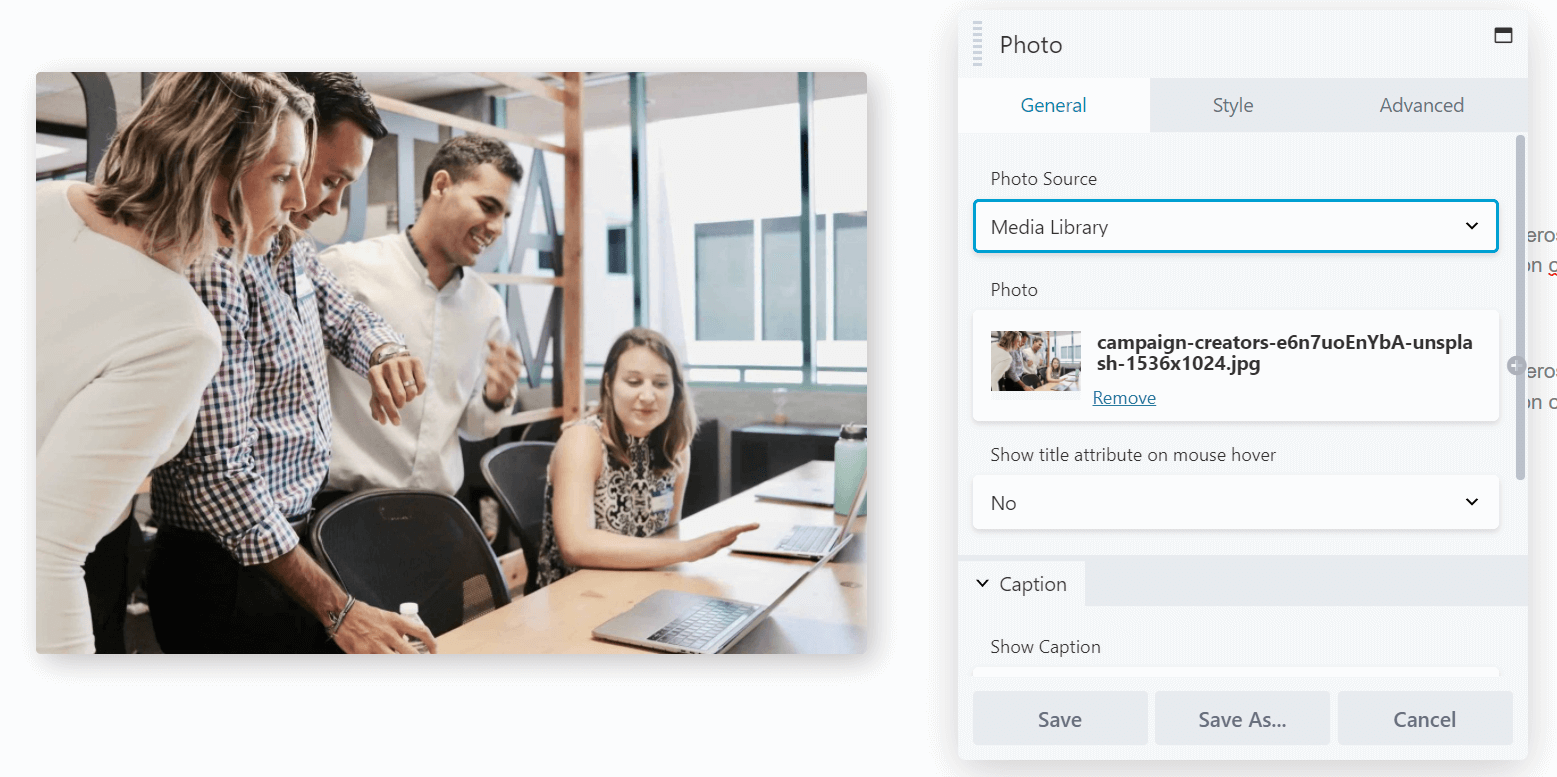
The General tab includes basic options such as choosing the photo, adding links, and including text. Style includes design options such as cropping, alignment, and colors. Advanced lets you change margins, add animation, choose the device sizes on which to display the module, and include custom HTML.
Make your edits. Then repeat the process for each module you want to edit.
Step 5: Save Rows, Columns, and Modules for Future Use
At this point, you probably have a page that’s almost complete. However, you can save yourself some time in the future by using our save options. These enable you to save certain templates, rows, and columns so you can return to them later.
All you have to do is click the wrench tool for the element you want to save to open it for editing, then click Save As underneath the settings. This brings you to the following screen:
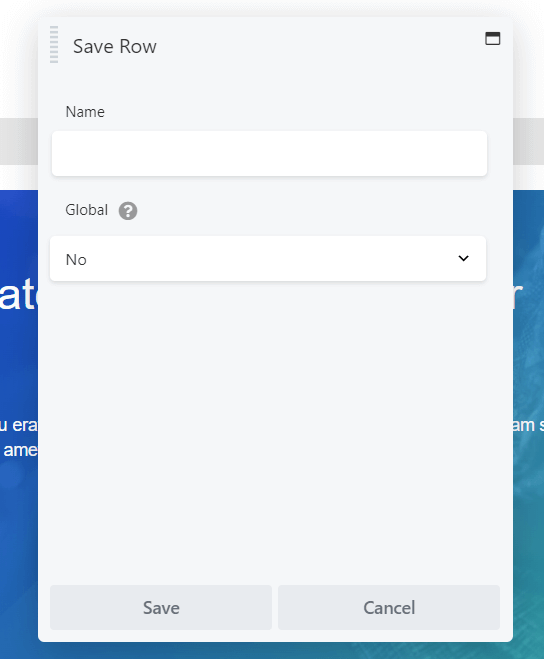
Enter the name you want to use, then click on Save.
If you choose the Global option, every instance of this saved element is linked. This means that every edit that you make in future applies to all instances where that module is used throughout your site and we used the example of the Subscribe Form module in the last section.
The drawback is that you can’t tweak settings in individual global elements, but if you do want to separate your instances of a global module in the future, you can just duplicate the module in your layout and then delete the global version, then make custom changes to the new module.
After you save your work, these elements appear in their respective Saved areas in the Content panel, or you can access saved rows, columns, and modules by clicking Beaver Builder in the WordPress admin sidebar.
Conclusion
All the best website design portfolios start with beautiful pages. However, building your own can be tricky with the default WordPress interface. Fortunately, Beaver Builder can help you create a world-class website in record time.
In this article, we showed you how to create your pages with Beaver Builder in five steps:
- Install Beaver Builder on your website and add a new page.
- Start with a layout template to give you design ideas or save time.
- Customize your layout arrangement with columns and rows.
- Add content with modules.
- Save your elements with their content and settings for future use.
Do you have any questions about crafting pages with Beaver Builder? Let us know in the comments section below!
Our Newsletter
Our newsletter is personally written and sent out about once a month. It's not the least bit annoying or spammy.
We promise.
Try Beaver Builder Today

Related articles
Beaver Builder Maintenance Mode: How to Set It Up
Beaver Builder Maintenance Mode helps you keep your website looking professional while you work behind the scenes. Whether you’re redesigning…
Beaver Builder 2.11: Popup Module, Maintenance Mode, and Settings Snapshots
Beaver Builder 2.11, also known as Kariba, is now available and delivers some exciting updates: a new Popup Module for…

Beaver Builder AI: Build WordPress Layouts with AI (Now in Alpha)
Hey everyone! Big news. After a long time of building behind the scenes, Beaver Builder AI is here. The alpha…
Join the community
We're here for you
There's a thriving community of builders and we'd love for you to join us. Come by and show off a project, network, or ask a question.
Since 2014
Build Your Website in Minutes, Not Months
Join Over 1 Million+ Websites Powered By Beaver Builder.