
How to Build an Animated WordPress Website with AI Using Beaver Builder
 -
July 23, 2026
-
July 23, 2026
What if you could take an advanced, interactive website design and use AI to build a working WordPress page with Beaver Builder native modules? That’s exactly what Anthony Tran, Beaver Builder’s Marketing Director, tested in this workflow.
In this tutorial, you will learn how to use Beaver Builder AI, Claude, and an MCP connection to build an animated landing page with scroll-driven animations, interactive motion effects, marquee sections, image interactions, and stacked project cards.
Anthony wanted to see how far AI can take us while still building a website with real Beaver Builder rows, columns, and modules that can be edited inside WordPress.
“The goal isn’t just to generate a visual page. The goal is to create a WordPress page that you can continue editing inside Beaver Builder.” — Anthony Tran
Follow along as he builds an animated WordPress website using AI in this video:
Table of Contents
- What You'll Need
- Step 1: Find a Design to Use as Inspiration
- Step 2: Connect Claude to Beaver Builder AI With MCP
- Step 3: Tell AI to Use Beaver Builder Native Modules
- Step 4: Let AI Build the First Draft
- Step 5: Verify the Page Uses Beaver Builder Modules
- Step 6: Refine the AI-Generated Design
- Step 7: Work With Images and the WordPress Media Library
- The Biggest Advantage: AI Speed + Beaver Builder Flexibility
- Final Thoughts
What You’ll Need
To follow along with this workflow, you’ll need:
- Beaver Builder 2.11+
- Beaver Builder Theme
- Beaver Builder AI
- The MCP Adapter
- Claude Desktop
- Beaver Themer (optional)
If you’re using a brand-new WordPress installation, it’s also worth checking your permalink settings. In this example, setting permalinks to “Post name” helped ensure the MCP connection worked correctly.
Step 1: Find a Design to Use as Inspiration
For this example, we used Motion Sites to find an interactive portfolio design that could serve as a starting point:
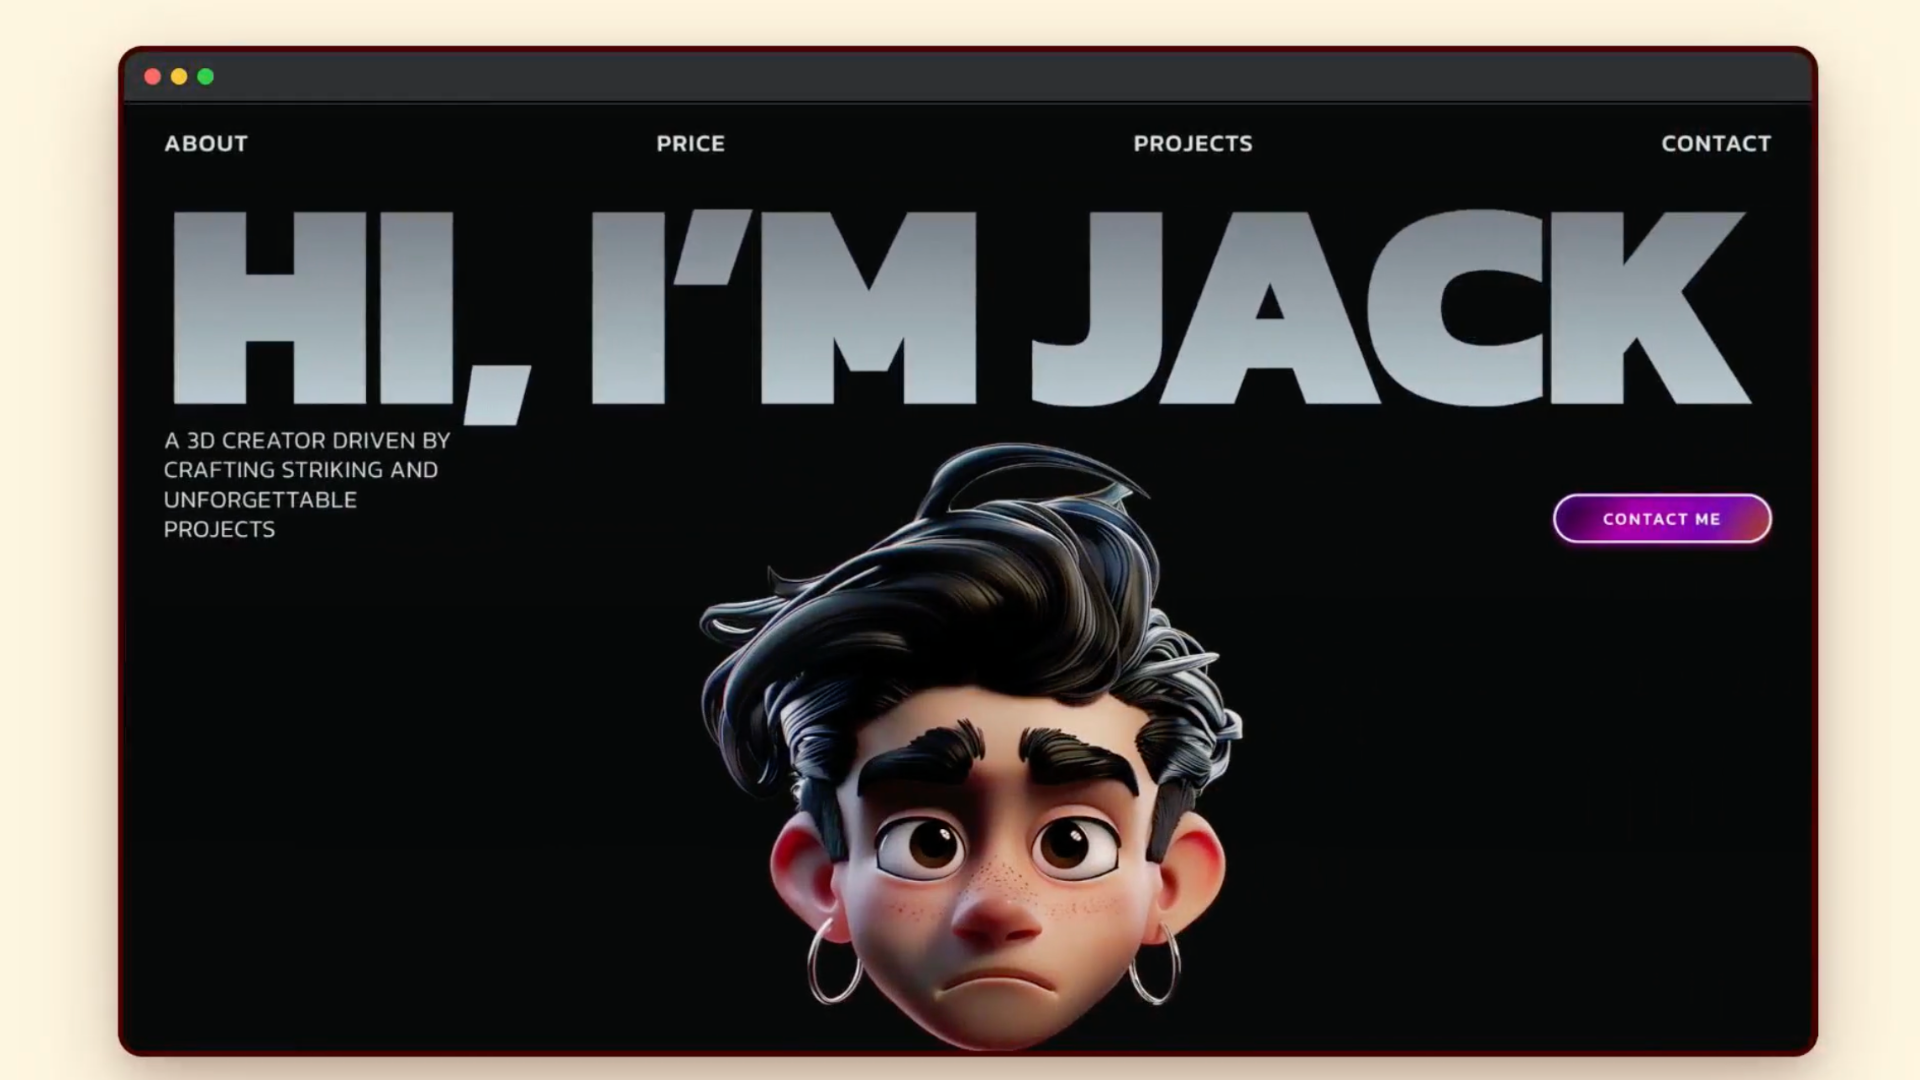
The design included features like:
- A loading animation
- Scroll-driven animations
- Marquee rows moving in opposite directions
- Interactive hover effects
- Character reveals
- Project cards that stack as you scroll
We then copied the full prompt for the design and used it as the starting point for the AI workflow. The design prompt alone isn’t enough. We also gave Claude specific instructions about how we wanted the website built.
Step 2: Connect Claude to Beaver Builder AI With MCP
The next step is connecting Claude Desktop to the WordPress website through MCP. Beaver Builder AI includes instructions for setting up the MCP connection, including a dedicated MCP connection guide:
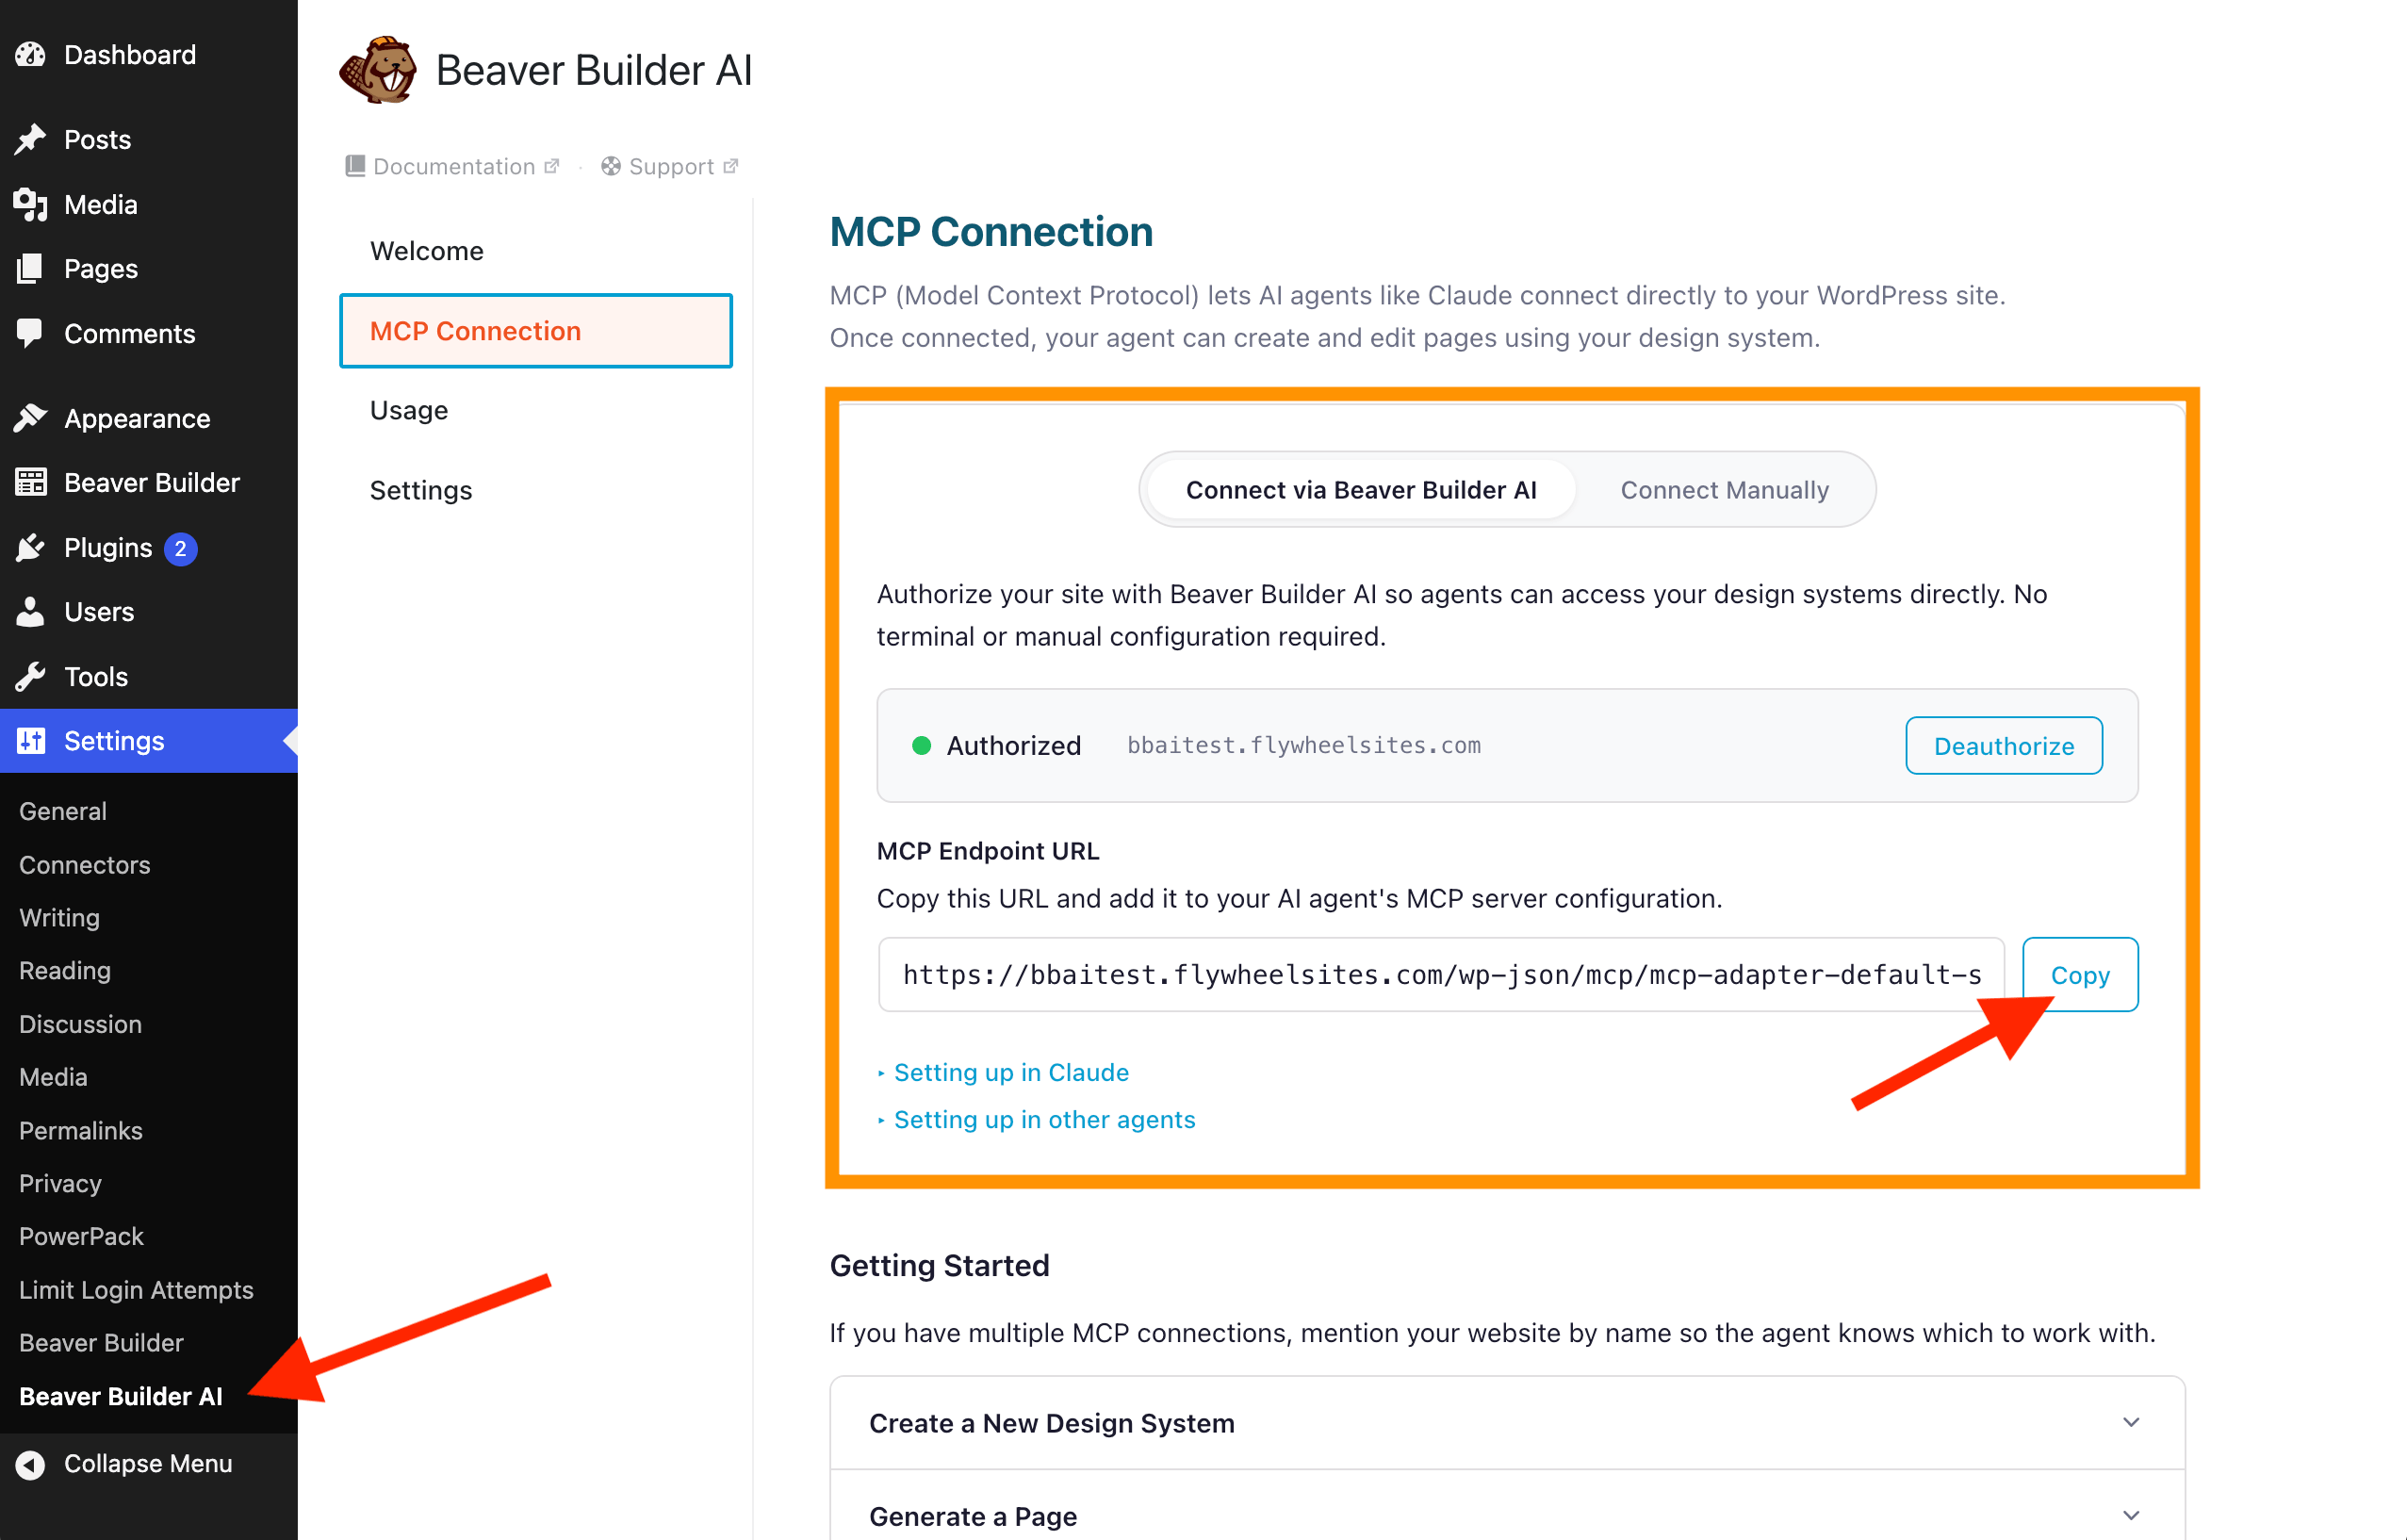
Once the connector is configured in Claude, you can authorize the connection and confirm that it is working with your WordPress website. This allows Claude to interact with the Beaver Builder AI capabilities and work with the connected WordPress site.
Step 3: Tell AI to Use Beaver Builder Native Modules
This is one of the most important parts of the workflow. Instead of simply asking AI to recreate the design, we specifically instructed it to build the page using Beaver Builder native modules.
That means using:
- Rows
- Columns
- Box modules
- Heading modules
- Button modules
- Photo modules
- Other native Beaver Builder components
The prompt included instructions to recreate the visual design using motion-first, scroll-driven animations and micro-interactions while still using Beaver Builder’s native structure.
This distinction is important because the goal isn’t just to generate a visual page; rather, the goal is to create a WordPress page that you can continue editing inside Beaver Builder.
Step 4: Let AI Build the First Draft
After sending the prompt, Claude began building the page. Once the process was complete, the page was created in draft mode and ready to preview.
The first result included the major visual elements from the original design, including:
- A loading animation
- A scrolling portfolio section
- Interactive project sections
- Scroll-based movement
The first draft wasn’t perfect, but it created a strong foundation. In our experience, this type of AI workflow can get you surprisingly close (80 – 90%to the starting design before you begin the refinement process.
Step 5: Verify the Page Uses Beaver Builder Modules
One of the most important steps is checking to see how the page was built. Using Beaver Builder’s outline panel, you can inspect the structure of the page:
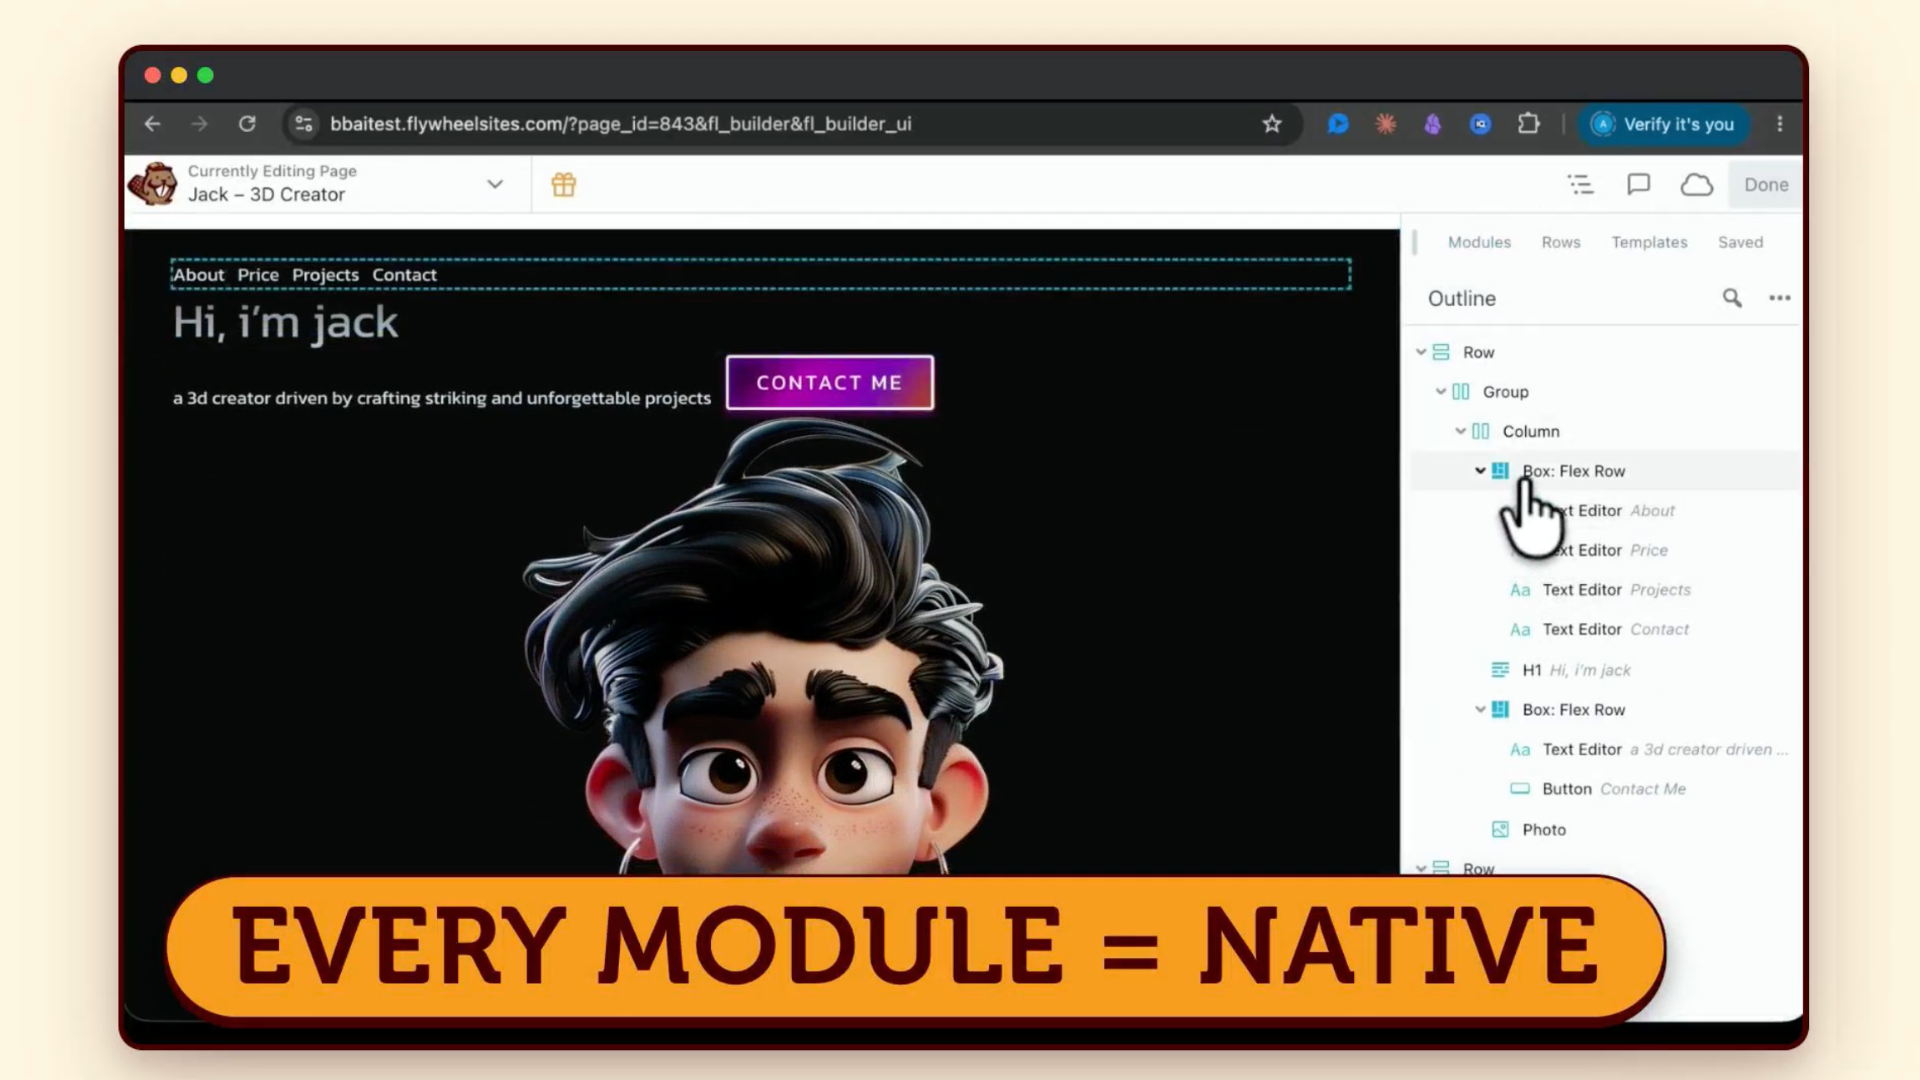
In this example, the page contained real Beaver Builder elements, including rows, columns, photo modules, headings, and text modules. This means you can use Beaver Builder to edit the content. Change text, swap images, adjust modules, and continue customizing the design.
Step 6: Refine the AI-Generated Design
One of the most useful parts of this workflow is the ability to give AI visual feedback. For example, we took screenshots of the original design and compared them to the version AI created. Then we asked Claude to compare the screenshots and make adjustments.
Some of the changes included:
- Increasing the size of the hero typography
- Adjusting the size of the main visual elements
- Improving the “About” section
- Moving visual elements toward the outer edges
- Removing unnecessary maximum-width restrictions
- Improving the overall layout
This back-and-forth process is where the workflow becomes especially powerful. Instead of trying to write a perfect prompt from the beginning, you can give AI a visual target, review the result, and then provide specific feedback.
Step 7: Work With Images and the WordPress Media Library
Another useful part of the workflow is using Claude to help with the images. Some of the images used in the initial version were being loaded from external URLs. If you want to use those images inside your WordPress Media Library instead, you can ask the AI assistant to sideload the images.
After the images are added to the Media Library, you can change the photo source inside Beaver Builder from a URL to the corresponding Media Library image. This gives you more control over the media used on your website and makes it easier to manage the images directly inside WordPress.
The Biggest Advantage: AI Speed + Beaver Builder Flexibility
The most interesting part of this workflow is the combination of AI speed and Beaver Builder flexibility.
AI can help accelerate the process of:
- Creating a starting layout
- Recreating visual designs
- Adding complex interactions
- Refining layouts
- Adjusting spacing and typography
- Managing image assets
At the same time, Beaver Builder gives you a familiar visual editing environment where you can continue making changes to the page. You can continue refining the design with additional prompts, screenshots, and traditional Beaver Builder editing tools.
Final Thoughts
AI website building is becoming much more interesting when it can work with real WordPress tools and native Beaver Builder modules. In this example, Beaver Builder AI helped create a highly interactive portfolio-style page while still keeping the page editable inside Beaver Builder.
The most effective workflow was:
- Start with a strong visual design reference
- Give AI a clear prompt
- Specify the Beaver Builder modules you want to use
- Review the first draft
- Compare it to the original design
- Give AI specific visual feedback
- Continue refining the page
- Make final adjustments directly inside Beaver Builder
This approach can help you move from a design concept to a working WordPress website much faster. If you want to experiment with AI-powered website creation inside WordPress, check out Beaver Builder AI and see what you can build.
Try Beaver Builder AI → https://www.wpbeaverbuilder.com/beaver-builder-ai/

Start here

Beaver Builder AI Demo
Build a page with AI on a site that already has Beaver Builder and Beaver Themer installed. Free AI credits included.
Our Newsletter
Our newsletter is personally written and sent out about once a month. It's not the least bit annoying or spammy.
We promise.
Try Beaver Builder Today

Related articles
Create a Dark Mode Toggle in WordPress
 -
October 15, 2026
-
October 15, 2026
Add a light and dark mode toggle to your WordPress site with Beaver Builder AI and the free Dark Mode…
How to Convert Base44 design to WordPress using Claude and Beaver Builder AI
 -
October 13, 2026
-
October 13, 2026
In this article, I share how I moved a landing page design from Base44 to WordPress using Claude and Beaver…
How to Convert Figma Design to WordPress (Claude + Beaver Builder AI)
-
October 9, 2026
How do you turn a Figma design into a WordPress site without rebuilding every section by hand? It’s a common…
Join the community
We're here for you
There's a thriving community of builders and we'd love for you to join us. Come by and show off a project, network, or ask a question.


Since 2014
Ready to build?
The WordPress page builder agencies and freelancers have trusted since 2014. Now with AI.