
Hosting events can be exciting and profitable, but the administration side of a big event can be intimidating. Not to worry, however – you can tend to your attendees and enjoy your event, while your website handles registration and tickets for you. You can use your WordPress site to both promote and manage your events, by enhancing its functionality with the right tools.
In this article, we’ll take a look at how to combine the Event Espresso plugin with the Beaver Builder page builder. We’ll also discuss some of the ins and outs of featuring events on your site effectively.
Let’s get (this party) started!
Why It’s Worth Featuring Events on Your Website
Event technology can be pretty powerful. So much so that by adding technology to your event planning process, you can increase your ticket sales by 20%. Online event information, automated ticket sales, and mobile-friendly options can provide immense convenience for busy event-goers:
Additionally, adding events ticketing and registration capabilities to your website can cut down on:
- Costs. Not only can you eliminate the cost of printing physical tickets prior to the event, but you also can save on the fees related to processing payments and employee wages. In fact, you can cut costs by as much as 30% by putting your event online.
- Volunteers. Finding enough volunteers to help register guests at fundraisers or conferences can be difficult. That’s why streamlining your registration process can cut down on the number of people needed for a smooth check-in.
There’s another benefit of implementing online event registrations, which has to do with the actual event day. Waiting in long lines while payments are processed typically doesn’t make for happy event-goers. With an online system like Event Espresso, on the other hand, checking people in at registration doesn’t have to be a hurricane of spreadsheets and lists.
What You Need to Get Started With Events on Your WordPress Website
So, what exactly do you need to start adding event information to your website? First, we recommend an excellent Content Management System (CMS) like WordPress. In the world of CMSs, WordPress is at the top. Due to the platform’s open-source nature, developers are able to create fully-featured plugins that cater to niche needs like event registration and ticketing.
Taking WordPress from great to amazing is as easy as installing a page builder plugin like our own Beaver Builder:

This plugin adds key functionality to your site, including:
- Drag-and-drop design. Beaver Builder brings drag-and-drop design options to the front end of your site. That way, you can see exactly what your pages will look like as you design them.
- Reusable templates. You can also create templates for repeat use, which is especially handy for featuring regular events. You’ll be able to build one or more event-related templates and use them as needed.
- Dynamic backgrounds. You can add animations or video backgrounds to your site, or just to parts of it. Either way, we offer easy tutorials so you can get the look you want in just a few steps.
Like any good superhero, Beaver Builder can be even more helpful with the right sidekick. When it comes to adding events to your website, Event Espresso is a useful solution:
This powerful plugin can handle ticketing, registration, forms, mobile check-ins, and much more. There are a few tricks, however, when it comes to turning Beaver Builder and Event Espresso into a dynamic duo. You’ll need a special add-on from GitHub, which is what we’ll look at next.
How to Set Up an Event With Event Espresso and Beaver Builder (In 3 Steps)
Setting up an event with Beaver Builder and Event Espresso is a lot like writing a regular WordPress post. If you’ve been creating content on your site for some time now, you should feel right at home.
As there are a few unique steps to installing Event Espresso for Beaver Builder, we’re going to assume you’re already set up with WordPress and Beaver Builder. That way, we can jump right in!
Step 1: Install the Event Espresso 4 Plugin
In order to use Event Espresso alongside Beaver Builder, you’ll actually be installing two plugins. First, you’ll set up the Event Espresso plugin itself, either the free ‘Decaf’ version from the WordPress Plugin Directory or the premium version:
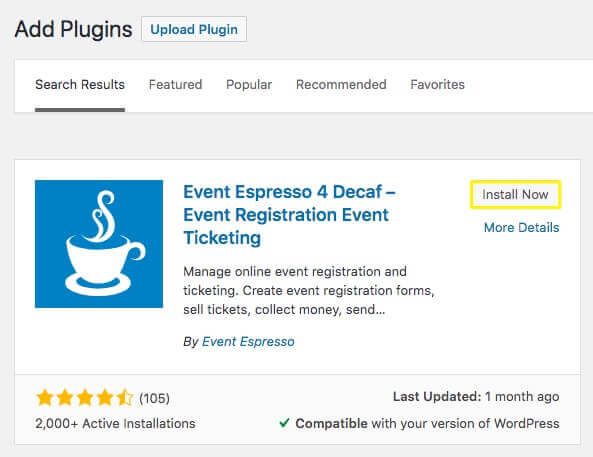
Once you’ve installed and activated the plugin, you’ll then need to pick up a special tool that will enable it to play nicely with Beaver Builder.
Step 2: Download and Install the Event Espresso Add-on for Beaver Builder from GitHub
GitHub is a code hosting platform where software developers can collaborate on open-source projects. There, you’ll find an add-on specifically designed to integrate the functionality of Beaver Builder and Event Espresso.
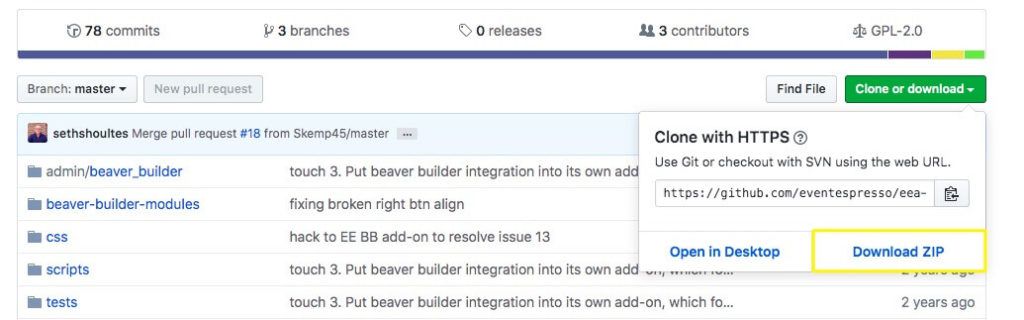
On the GitHub page for this add-on, you’ll find information and documentation about the plugin. You’ll also see a list of files with developer notes discussing bugs that were recently fixed and when. To the right of the file list, you’ll find a Clone or Download button:
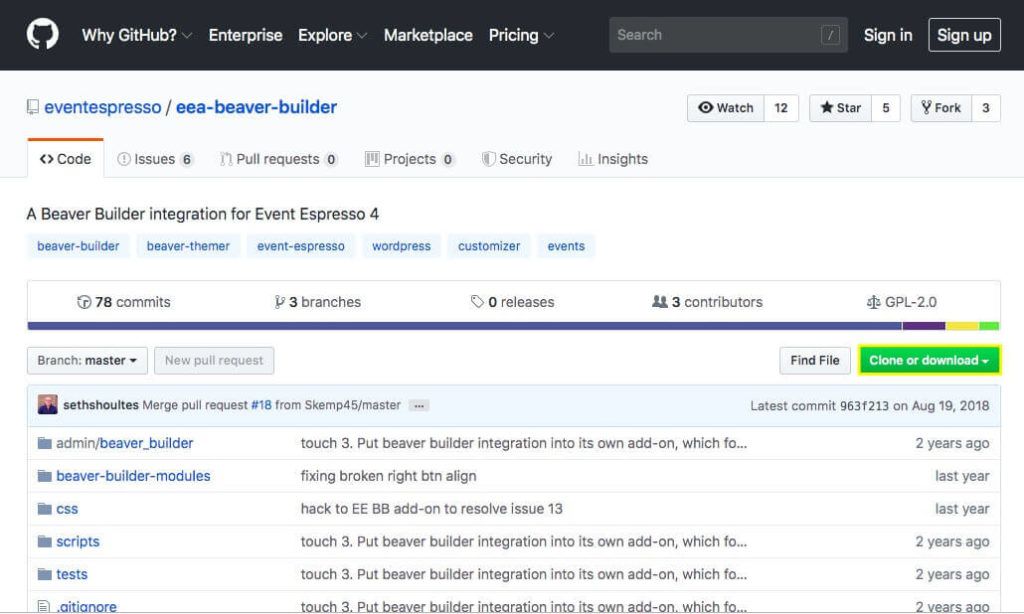
By selecting this button, you’ll have the option to Download ZIP:
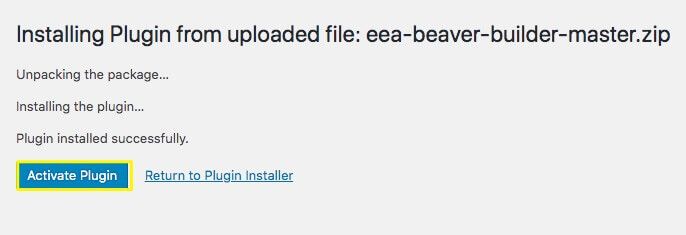
After you download the zip file that contains the add-on, be sure to note where you downloaded it to. Then, head over to your WordPress admin dashboard. From there, you’ll navigate to the Plugins > Add New option, and click on Upload File:

You’ll then be given the option to browse your computer for the plugin file, or you can simply drag-and-drop the file into the Choose File area. Then, you can proceed to install and activate it:
After activating the plugin, you’ll be able to access its documentation and settings.
Step 3: Create Events and Ticketing Options With Beaver Builder and Event Espresso
Now that you have Event Espresso activated, you can explore the multitude of options and settings the plugin offers. You can do this through the new Event Espresso menu that’s now in your WordPress dashboard:
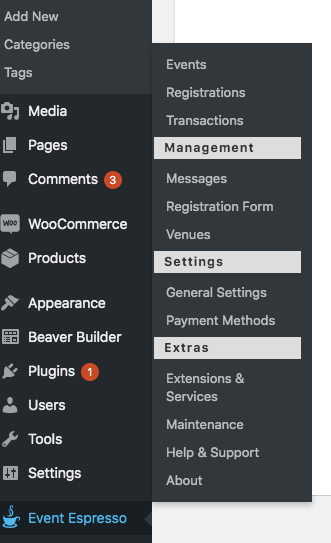
From here, you can begin to work with various aspects of your events management system. This includes viewing and creating events.
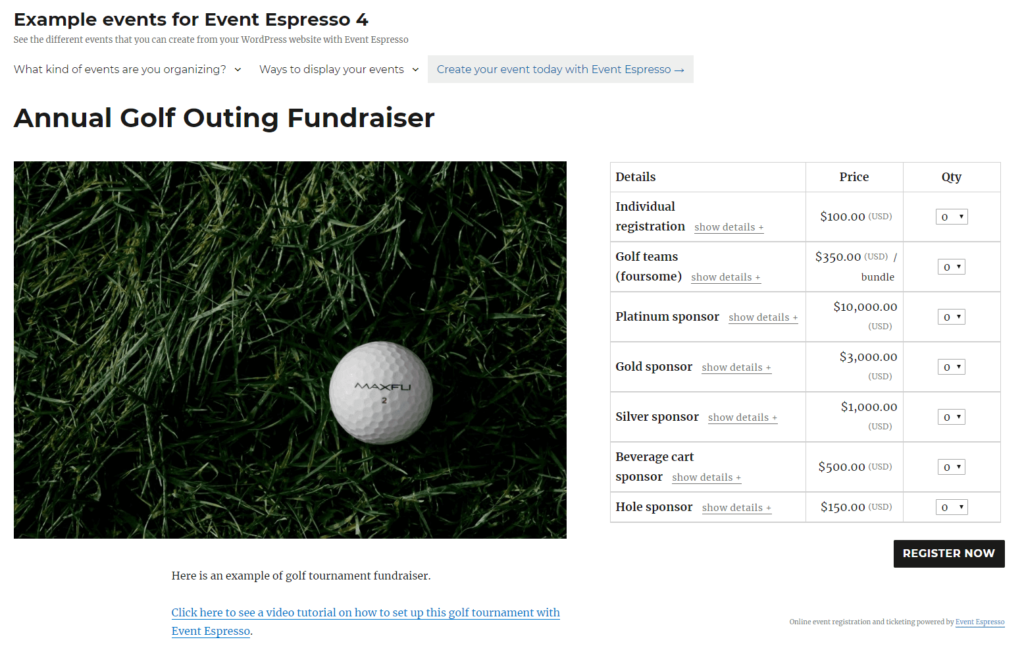
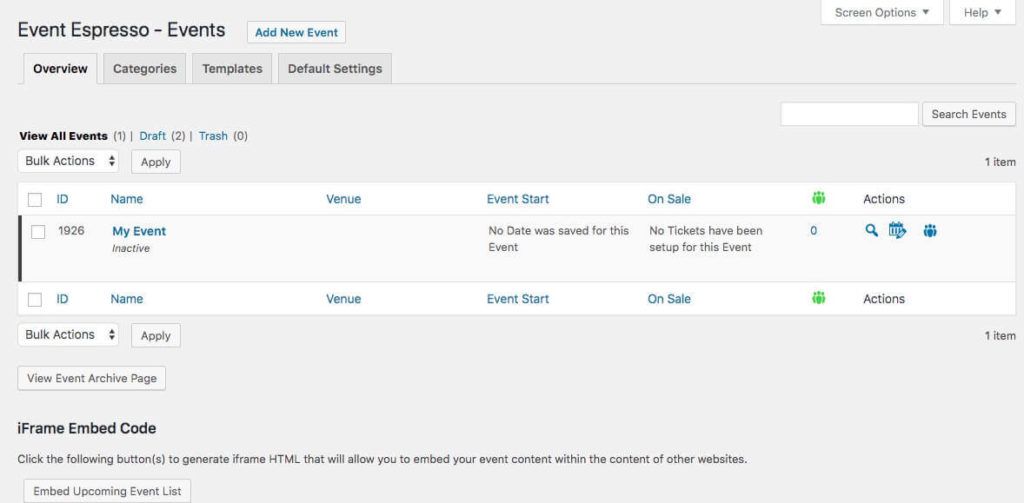
If you navigate to Event Espresso > Events in the main WordPress menu, you’ll be able to add a new event. This is an essential step that you will need to complete before you are able to access your events in the Beaver Builder modules:
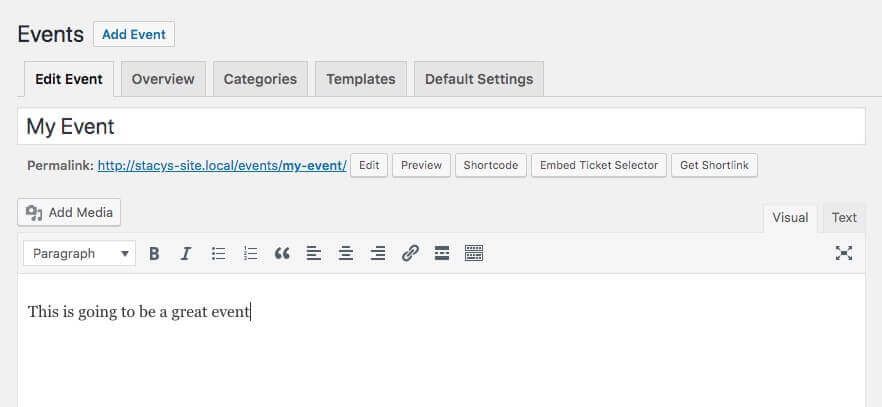
Adding an event will likely seem familiar if you have ever created a page or post in WordPress. You’ll have the option to create a title and content using the Classic editor:
The Event Espresso event creation page also has some extra features that are specific to event management. Below the content editor, you’ll find event settings for date, time, and tickets. You’ll also be able to edit the venue information:
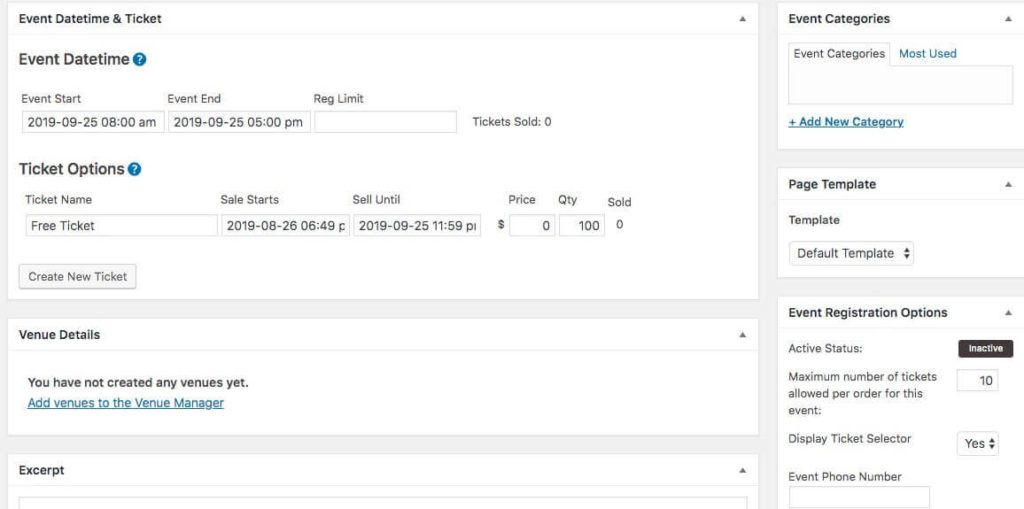
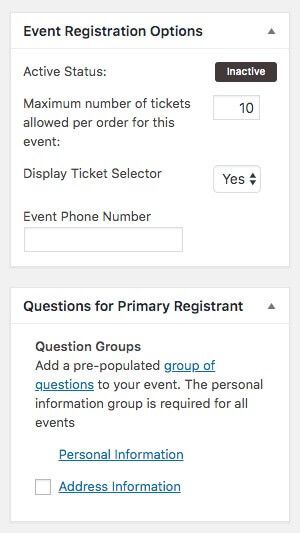
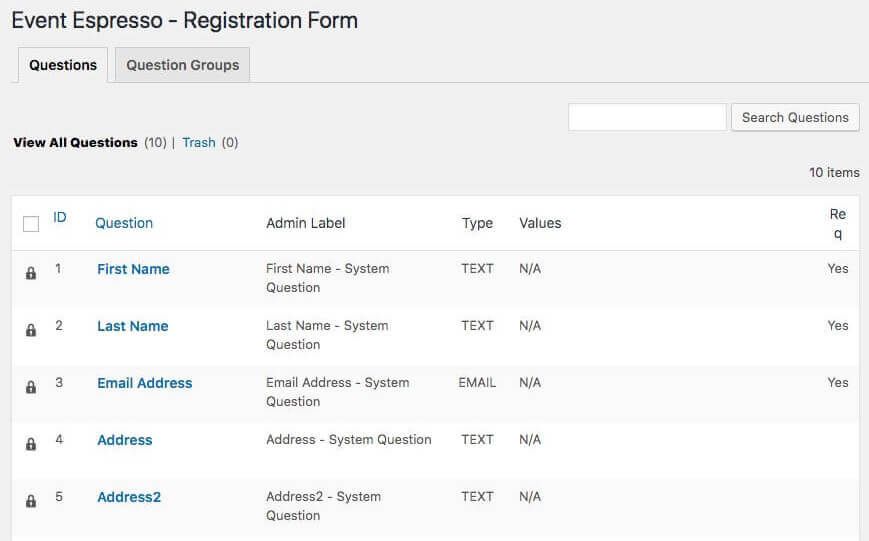
To the right side of the content editor, you’ll notice even more settings. These enable you to tailor your event, in regards to how many tickets are available and what information you want to collect from registrants:
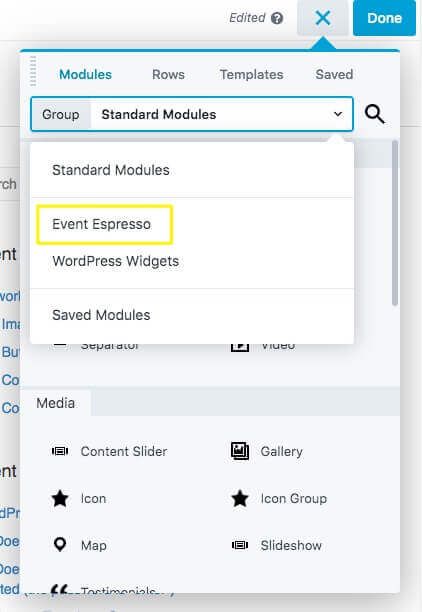
Once you add your event through Event Espresso, you can navigate to Posts > Add New in your WordPress dashboard. After you launch Beaver Builder through the post edit screen, you’ll be able to access the Event Espresso modules by clicking on the plus icon at the top-right of the screen.
Then you can select Standard Modules, where you’ll find the option to open the Event Espresso modules:
If you are running the free ‘Decaf’ version of the plugin, you’ll see two options: Event Ticket or Events List. To add these modules to your page, simply click and drag them wherever you’d like. You’ll then be able to access a settings menu with many options for colors, fonts, styles, and more.
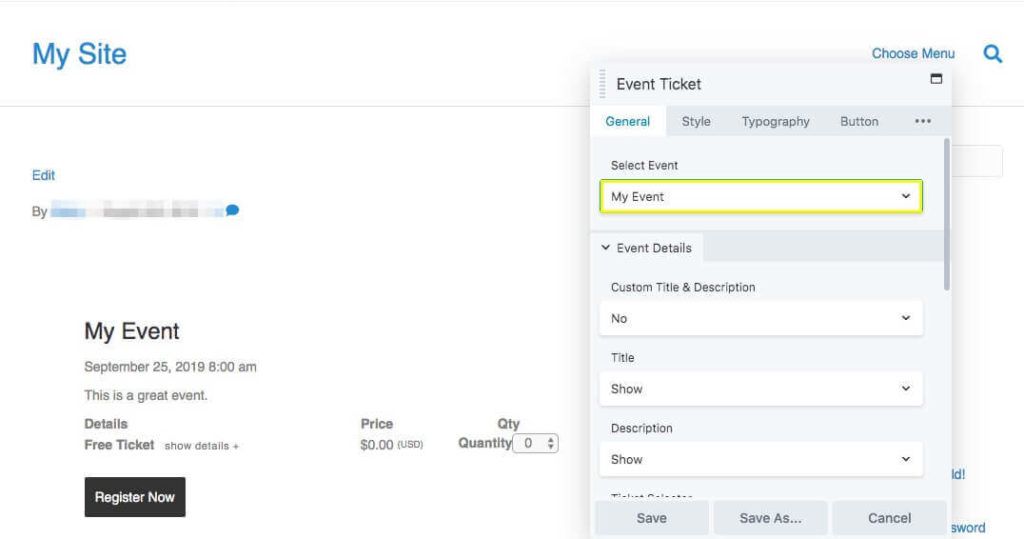
First, however, you’ll need to choose which event you want to feature on the page, using the drop-down menu under Select Event:
After you customize your settings, you can save them and return to editing and styling the rest of the page with other Beaver Builder modules.
It’s also worth noting that Event Espresso has a lot to offer back in its WordPress menu. If you navigate to Event Espresso > Registrations, you’ll find a dashboard for all the registrations to your events. This will look a little like the WordPress Posts list – but on steroids:
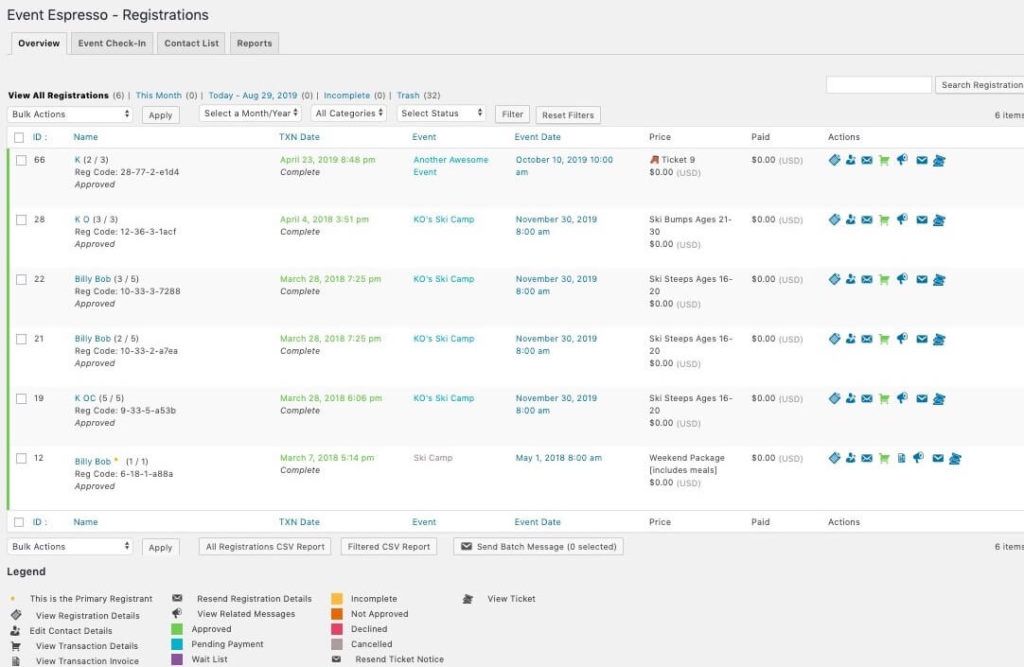
You’ll have color coding you can use to identify different types of registrations, for instance. You’ll also find a Contacts tab, and options to send messages to your registrants. You can even explore payment settings, view transaction histories, and customize your form fields:
Event Espresso Decaf is packed with features. Of course, upgrading to the premium version means that your Event Espresso module options for Beaver Builder will also expand. Either way, this will enable you to feature events on your WordPress site more stylishly and effectively.
Conclusion
Providing your customers with the convenience of online registration and ticket purchases can be a great way to boost your event attendance. You can combine the power of WordPress, Beaver Builder, and Event Espresso to create an amazing online event system.
All you need to create events with Beaver Builder and Event Espresso is to remember the following three steps:
- Install Event Espresso 4.
- Download and install the Event Espresso add-on for Beaver Builder from GitHub.
- Create and customize your events with Beaver Builder and Event Espresso.
Do you have questions about getting started with the Event Espresso add-on for Beaver Builder? Share them with us in the comments section below!
2 Comments
Our Newsletter
Our newsletter is personally written and sent out about once a month. It's not the least bit annoying or spammy.
We promise.
Try Beaver Builder Today

Related articles

Beaver Builder AI: Build WordPress Layouts with AI (Now in Alpha)
Hey everyone! Big news. After a long time of building behind the scenes, Beaver Builder AI is here. The alpha…

How Beaver Builder Products Work Together to Build Flexible WordPress Websites
Building a WordPress website often means stitching together a theme from one developer, a page builder from another, and a…

From Azeroth to WordPress: How Warcraft Tavern Uses Beaver Builder
Since releasing Beaver Builder 12 years ago, a feeling will come up from time to time that just never gets…
Join the community
We're here for you
There's a thriving community of builders and we'd love for you to join us. Come by and show off a project, network, or ask a question.
Since 2014
Build Your Website in Minutes, Not Months
Join Over 1 Million+ Websites Powered By Beaver Builder.
What’s the benefit of using something like this when The Events Cal has an integration with Themer built in?
Events Calendar is a good option as well.