
Since visitors often leave websites within 15 seconds, it’s crucial to place important information where they can immediately see it. As a web developer, you can maximize the design of your WordPress website by using an announcement bar. With this feature, you can increase revenue and web traffic by highlighting new promotions, sales, or discounts.
In this post, we’ll take a closer look at announcement bars and how they could be beneficial to your website. Then, we’ll show you how to add this feature to your WordPress site in three simple steps. Let’s get started!
What an Announcement Bar Is (And Why You Might Want to Create One)
An announcement bar is a horizontal bar at the top of a website’s homepage (although it may also be visible on other pages). It usually appears as a full-width banner above the header.
If you wish to highlight a message on your website, you might want to consider using an announcement bar. This can be an effective way to advertise a certain area of your business or website. In fact, these bars typically serve as ads. You can use them to advertise a sale, promotion, new product launch, or any other special offer.
For example, the following announcement bar features Assistant Pro, a tool that enables you to save creative content to the cloud:
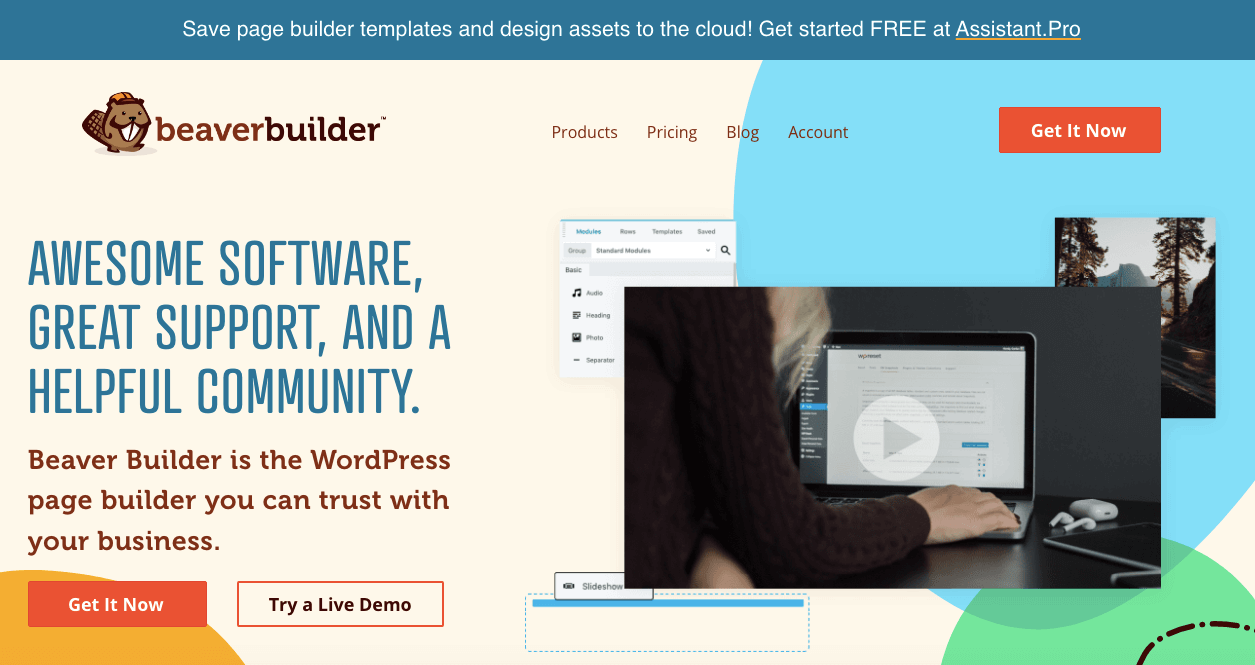
When someone visits our website, this promotion is the first thing they see. By creating an announcement bar, we’ve made it easy for visitors to quickly navigate to the Assistant Pro website.
The Benefits of Using Announcement Bars on Your Website
Announcement bars are effective because they are easily noticeable and direct users to the right place. Without them, visitors would have to find the specific page that features your sale or offer. This requires extra work that users might not want to do.
With this feature, you can keep your audience updated. Since they are placed at the top of the page, announcement bars have high visibility. Once they see your announcement bar, visitors can quickly learn about your special offers.
Many website owners use pop-up windows instead, but these can be more intrusive than announcement bars. Pop-ups tend to cover the entire screen, interrupting what the visitor was doing.
However, an announcement bar doesn’t block any of your content. Visitors can continue to navigate your website while keeping that announcement at the front of their minds. You can even set an announcement bar to ‘stick’ to the top of the page, so users will still see it as they scroll through your content.
For their announcement bar, Udemy chose to feature a time-sensitive offer. This encourages users to take advantage of the promotion while it lasts:

Promoting time-sensitive offers, such as discounts and free shipping, can help create a sense of urgency. This can encourage users to take immediate action and check out your offer (or make a purchase). Therefore, adding announcement bars could generate more click-throughs to a specific page on your website.
Moreover, you can customize your announcement bar to have an aesthetically-pleasing design. This can make your website more professional, unique, and eye-catching. With a plugin like our own Beaver Builder page builder, you can personalize an announcement bar to reinforce your brand identity and attract attention.
How to Add an Announcement Bar in WordPress (In 3 Steps)
Now that you’re aware of how announcement bars could benefit your website, it’s time to explore how to add this feature to WordPress. For this tutorial, we’ll be using our Beaver Builder plugin and the Beaver Themer add-on.
Beaver Builder is a page-building tool you can use to create and customize content in WordPress. Meanwhile, Beaver Themer is a powerful add-on that enables you to create and edit theme templates. With these tools, you can have full control over different elements of your site, including announcement bars.
Let’s look at how you can create an announcement bar in WordPress. To make things easier, we’ve also included a step-by-step video tutorial:
Before you proceed, you’ll need to have both the Beaver Builder and Beaver Themer add-on plugins installed and activated on your website. Note that you’ll need a premium version of Beaver Builder in order to access the add-on.
Step 1: Create a New Themer Layout
Once you’ve added both plugins to your site, you can start working on your first announcement bar. Navigate to Beaver Builder > Themer Layouts > Add New. Here, you’ll create a new Themer layout:
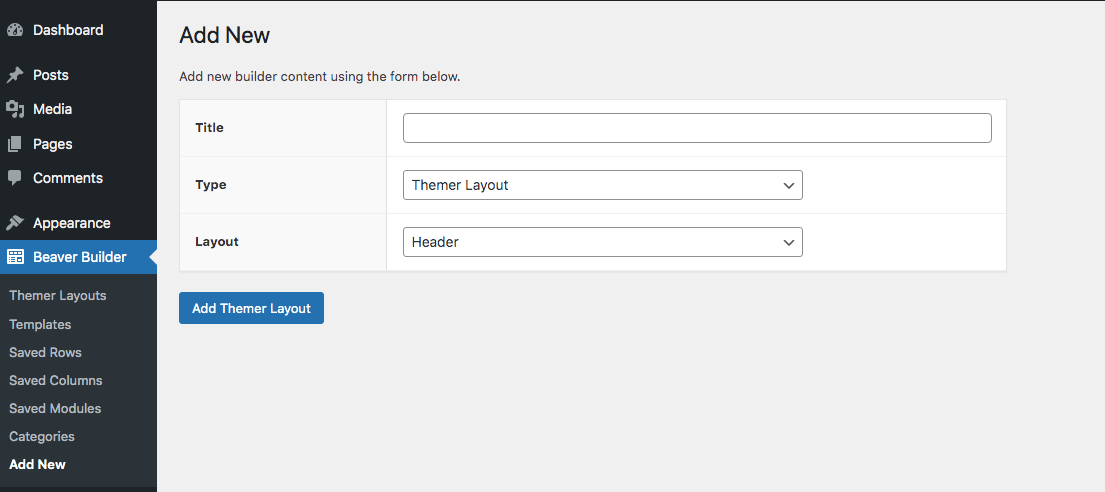
First, you’ll need to give your layout a name. For this example, you could use “Announcement Bar”.
Under the Type section, choose Themer Layout. In the Layout drop-down menu, select Part:
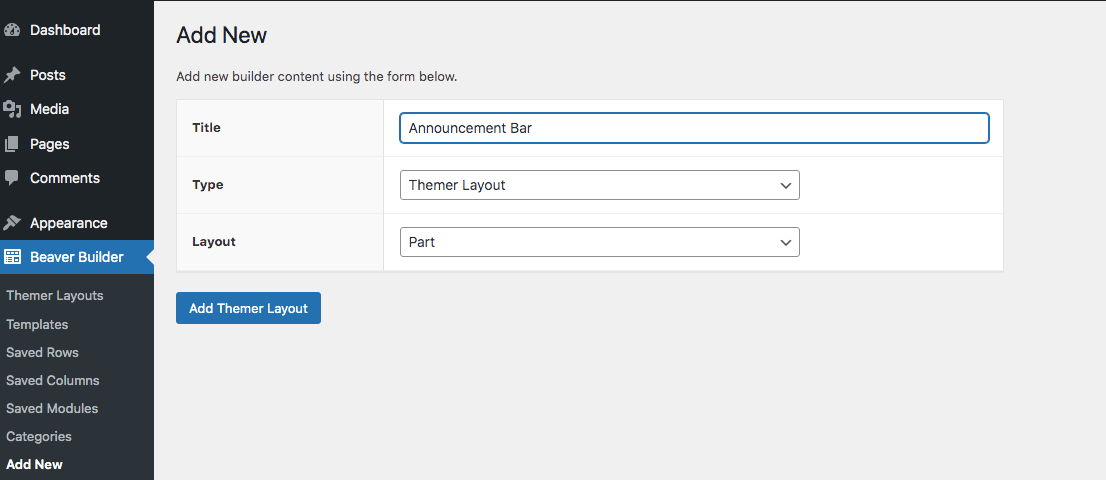
Then, save your changes by clicking on Add Themer Layout. You can now move on to the next step.
Step 2: Configure the Layout Settings
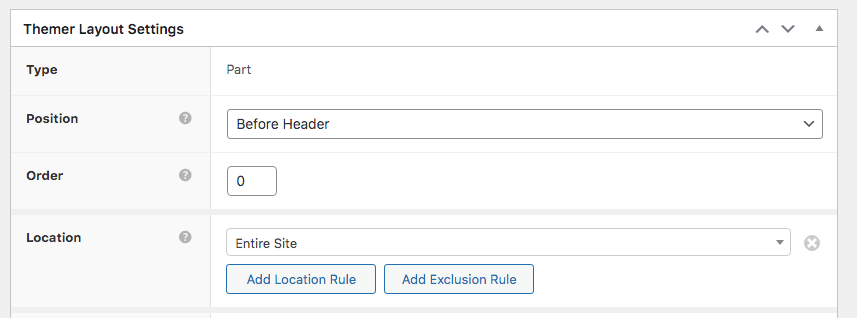
When you save your new layout, the Edit Themer Layout page will open automatically. This is where you can configure your settings, including the location and visibility rules for your content. For instance, you can choose where the announcement bar will appear on the page, and who will be able to see it.
You can customize the location and visibility rules to fit your needs. We’ll focus on the settings that are most relevant for an announcement bar.
To change the layout’s location, navigate to Position. For the announcement bar to be effective, it should reside at the top of the page. This will maximize its visibility. From the drop-down menu, choose Before Header:

Moreover, you’ll want the announcement bar to reach every user who visits your website. To do this, navigate to Location and choose Entire Site from the drop-down list.
When you’re ready, click on Publish to save your changes. You can now start customizing your announcement bar.
Step 3: Edit Your Announcement Bar’s Appearance
Once you’ve configured the layout settings, it’s time to edit the appearance of your announcement bar. To begin, click on the Launch Beaver Builder button on the Edit Themer Layout page. This will open up the builder.
Next, drag and drop a text editor module onto the page. In the General tab, enter the text that will be displayed on the announcement bar. You can also add a link if needed. For instance, you might want to consider linking to your online store to drive sales from your landing page:
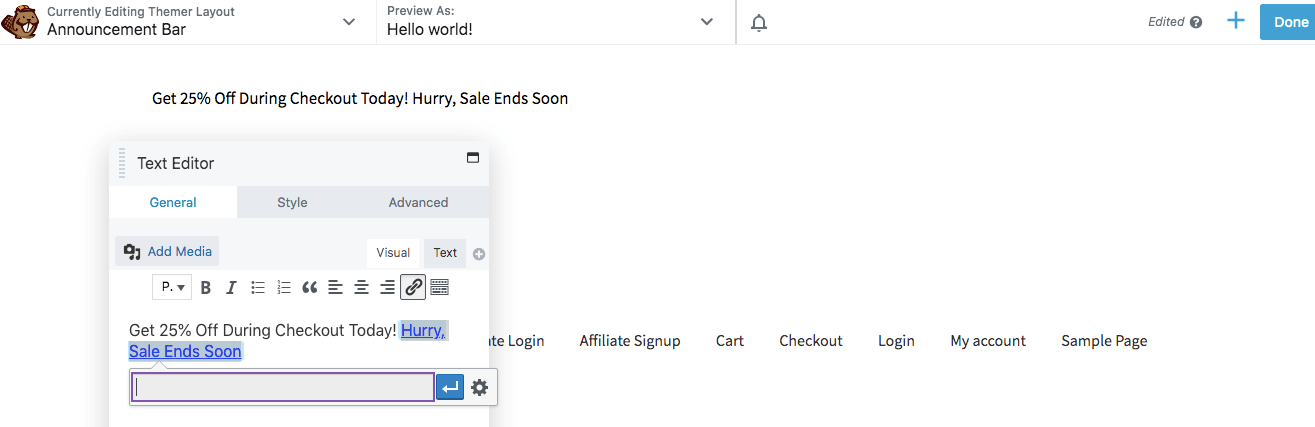
In the Style tab, you can change the font size, positioning, and line height of your text. You can also add spacing, capitalization, decoration, and text shadow.
Additionally, you can navigate to the Advanced tab to customize the margins. For instance, if you want a narrow announcement bar, set the top and bottom margins to “0”.
Moreover, you can create a custom animation for your announcement. Adding motion effects can help draw attention to your promotion.
When you’re happy with your changes, click on Save. Next, you’ll need to edit your row.
Click on the announcement bar and navigate to the wrench icon. This will open the Row Settings:
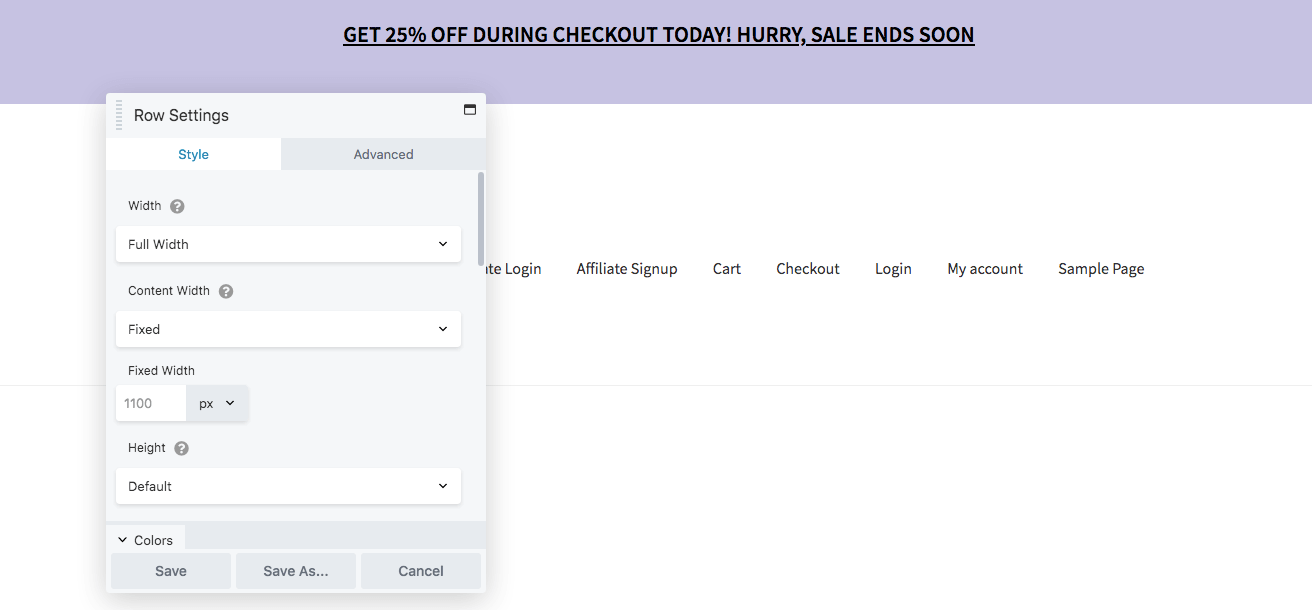
In the Style tab, you can change the color of the text, link, heading, and background. If you want the announcement bar to fill the entire screen, choose Full Width.
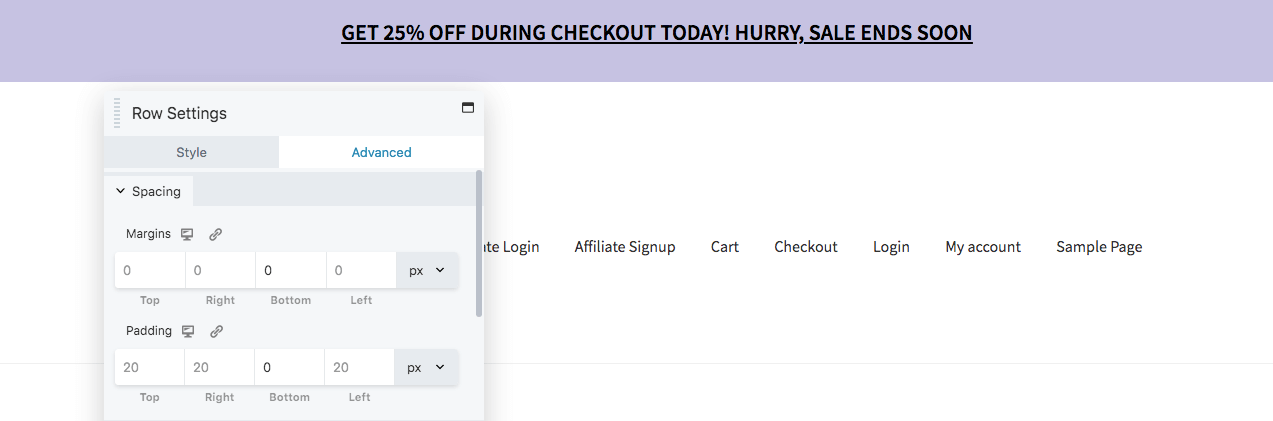
In the Advanced tab, you can edit the margins and padding of the bar. To make sure the text editor module is lined up with the header beneath it, set the bottom padding to “0”:
You also have the option to edit the announcement bar for different devices. To do this, click on the device icon to the right of each field. This will allow you to preview and adjust the announcement for each device size. If you enter custom values for either desktop, tablet, or mobile, they will only apply to that specific device.
Under the same tab, you can change the duration of any added animation. You also have the option to create a delay if needed.
Once the announcement bar is customized to your liking, click on Done and select Publish. You should now see an announcement bar at the top of your website!
Conclusion
Adding an announcement bar to your website’s homepage can be an effective way to capture your audience’s attention. Whether you’re promoting a sale or offering free shipping, announcement bars provide a clear and simple method to communicate with your users.
To recap, here’s how to create an announcement bar in WordPress, using Beaver Builder and Beaver Themer:
- Create a new Themer layout.
- Configure the layout settings.
- Edit the layout of the announcement bar.
Do you have any questions about setting up a custom announcement bar for your WordPress website? Let us know in the comments section below!
13 Comments
Our Newsletter
Our newsletter is personally written and sent out about once a month. It's not the least bit annoying or spammy.
We promise.
Try Beaver Builder Today

Related articles
How to Create Headers and Footers with Beaver Themer
Page builders are great for creating beautiful pages, but they often don’t extend customization to headers and footers. This limitation…
How to Customize WordPress Website Header
Many elements make up a well-designed website. Your WordPress website header is particularly important because it’s the first thing visitors…
How to Use a Header Template in WordPress
Customizing a WordPress header isn’t often an easy process. If you’re not comfortable editing theme files, there aren’t many ways…
Join the community
We're here for you
There's a thriving community of builders and we'd love for you to join us. Come by and show off a project, network, or ask a question.
Since 2014
Build Your Website in Minutes, Not Months
Join Over 1 Million+ Websites Powered By Beaver Builder.
Hi – great post – very helpful – is it possible to let the user close the bar or can themer be configured for the bar to disappear after x seconds please ?
Hi Stephen, thank you so much for your feedback! At this time, this isn’t possible out the box and would require custom code.
Lol, I was writing the same question :))) didn’t check the upper comms. Thanks for the answer Jennifer.
Hi George – you’re welcome! 🙂
Hi Jennifer and Will,
This is a very interesting article.
What would be the custom code for the bar to appear after x seconds and disappear after y seconds?
Is it possible to make 2-step bar, e.g. the user clicks in the bar to reveal a coupon code?
Many thanks for your advice.
Kind regards,
http://www.Pairfum.com
I’m going to agree with the previous two comments. If only the announcement bar could be closed and timed to appear and disappear at scheduled times… sounds like an invitation for a full-fledged BB add-on if it hasn’t been created already?
Hi Jordan – you might also check out PowerPack for Beaver Builder’s Announcement Bar module. It appears to have the ability to close as well as schedule the notification to appear again after a day or few days once the visitor closes it: https://wpbeaveraddons.com/demo/announcement-bar/
Well, that’s awesome. I have PowerPack and didn’t even realize it was an option. Thanks for letting me know. My life is now complete. 🙂
You’re welcome. 🙂
Hello, Thanks for this new feature! I made an Announcement Bar but it doesn’t have a link. How do I add a link to the Announcement Bar: with a link on the complete bar as the example of Fitbark? Maybe you can add this to your instruction?
Hi Marit – thank you for your question. It looks like the Fitbark example just uses a text link which you could create using the Beaver Builder Text Module. Hope this helps!
Hi Jennifer, the Fitbark example uses a text link and also a link for the whole announcement bar as you can see. You can click on the cross to make the announcement bar disappear. That is what I’m looking for. Can you help? Thank you!
Ah, I see!
Yes, you can easily create something similar to the above example using the PowerPack Announcement Bar module: https://wpbeaveraddons.com/demo/announcement-bar/
Here’s how it works: https://share.vidyard.com/watch/gNyjf132DLxhVXQhEFJgGd?