
You might already know and love our Beaver Builder plugin for WordPress. It’s handy for creating individual posts and pages, or tweaking your site’s navigation. However, if you want to create layouts for parts of the page that are outside the content area, you might need Beaver Themer as well.
In this article, we’ll provide an in-depth look at the Beaver Themer plugin and how you can use it to enhance your Beaver Builder toolkit.
We’ll also take you step-by-step through how to build layouts in locations that standard Beaver Builder can’t go.
Let’s dive in!
Introducing Beaver Themer: Everything You Need to Know
In the simplest terms, Beaver Themer is a premium theme builder plugin for Beaver Builder. That means it’s a plugin that uses and enhances our page builder.
***Note that you still need to have a WordPress theme, installed if you use the Beaver Themer plugin. We recommend the Beaver Builder Theme, of course, which comes standard with the purchase of any of our premium plans.
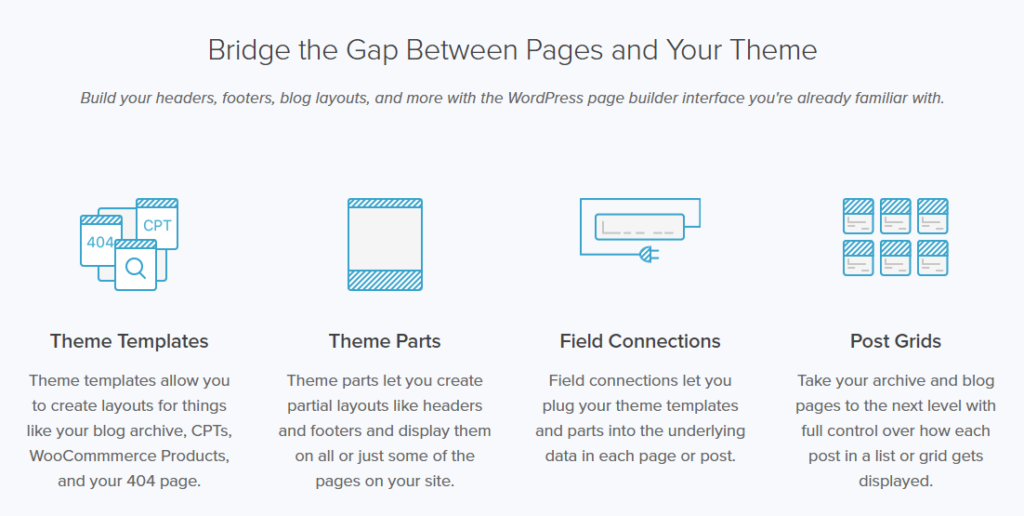
WordPress themes allow you to control many aspects and styles for your site. But, Beaver Themer lets you override layouts or parts of the page normally controlled by a theme, such as headers, footers, archive pages, and posts.
Please make the distinction that Beaver Themer is NOT a WordPress theme.
Its specialty is to take the page builder a step further, enabling you to fill in some of the gaps that might exist between your theme and your content.
For example, Beaver Themer brings the power of Beaver Builder to your website’s headers and footers.
You can also create layouts for parts of your site that are normally harder to customize, such as its archive and search pages.
One of Beaver Themer’s unique features is the use of field connections.
In a nutshell, some modules offer you an option to connect data from your site to a field in the module’s settings. We’ll give you an illustrated example of how this works later on.
How to Integrate Beaver Themer into Your Website
Before we jump to the fun part and start creating some Themer layouts, let’s make sure you have everything you need in order to install Beaver Themer.
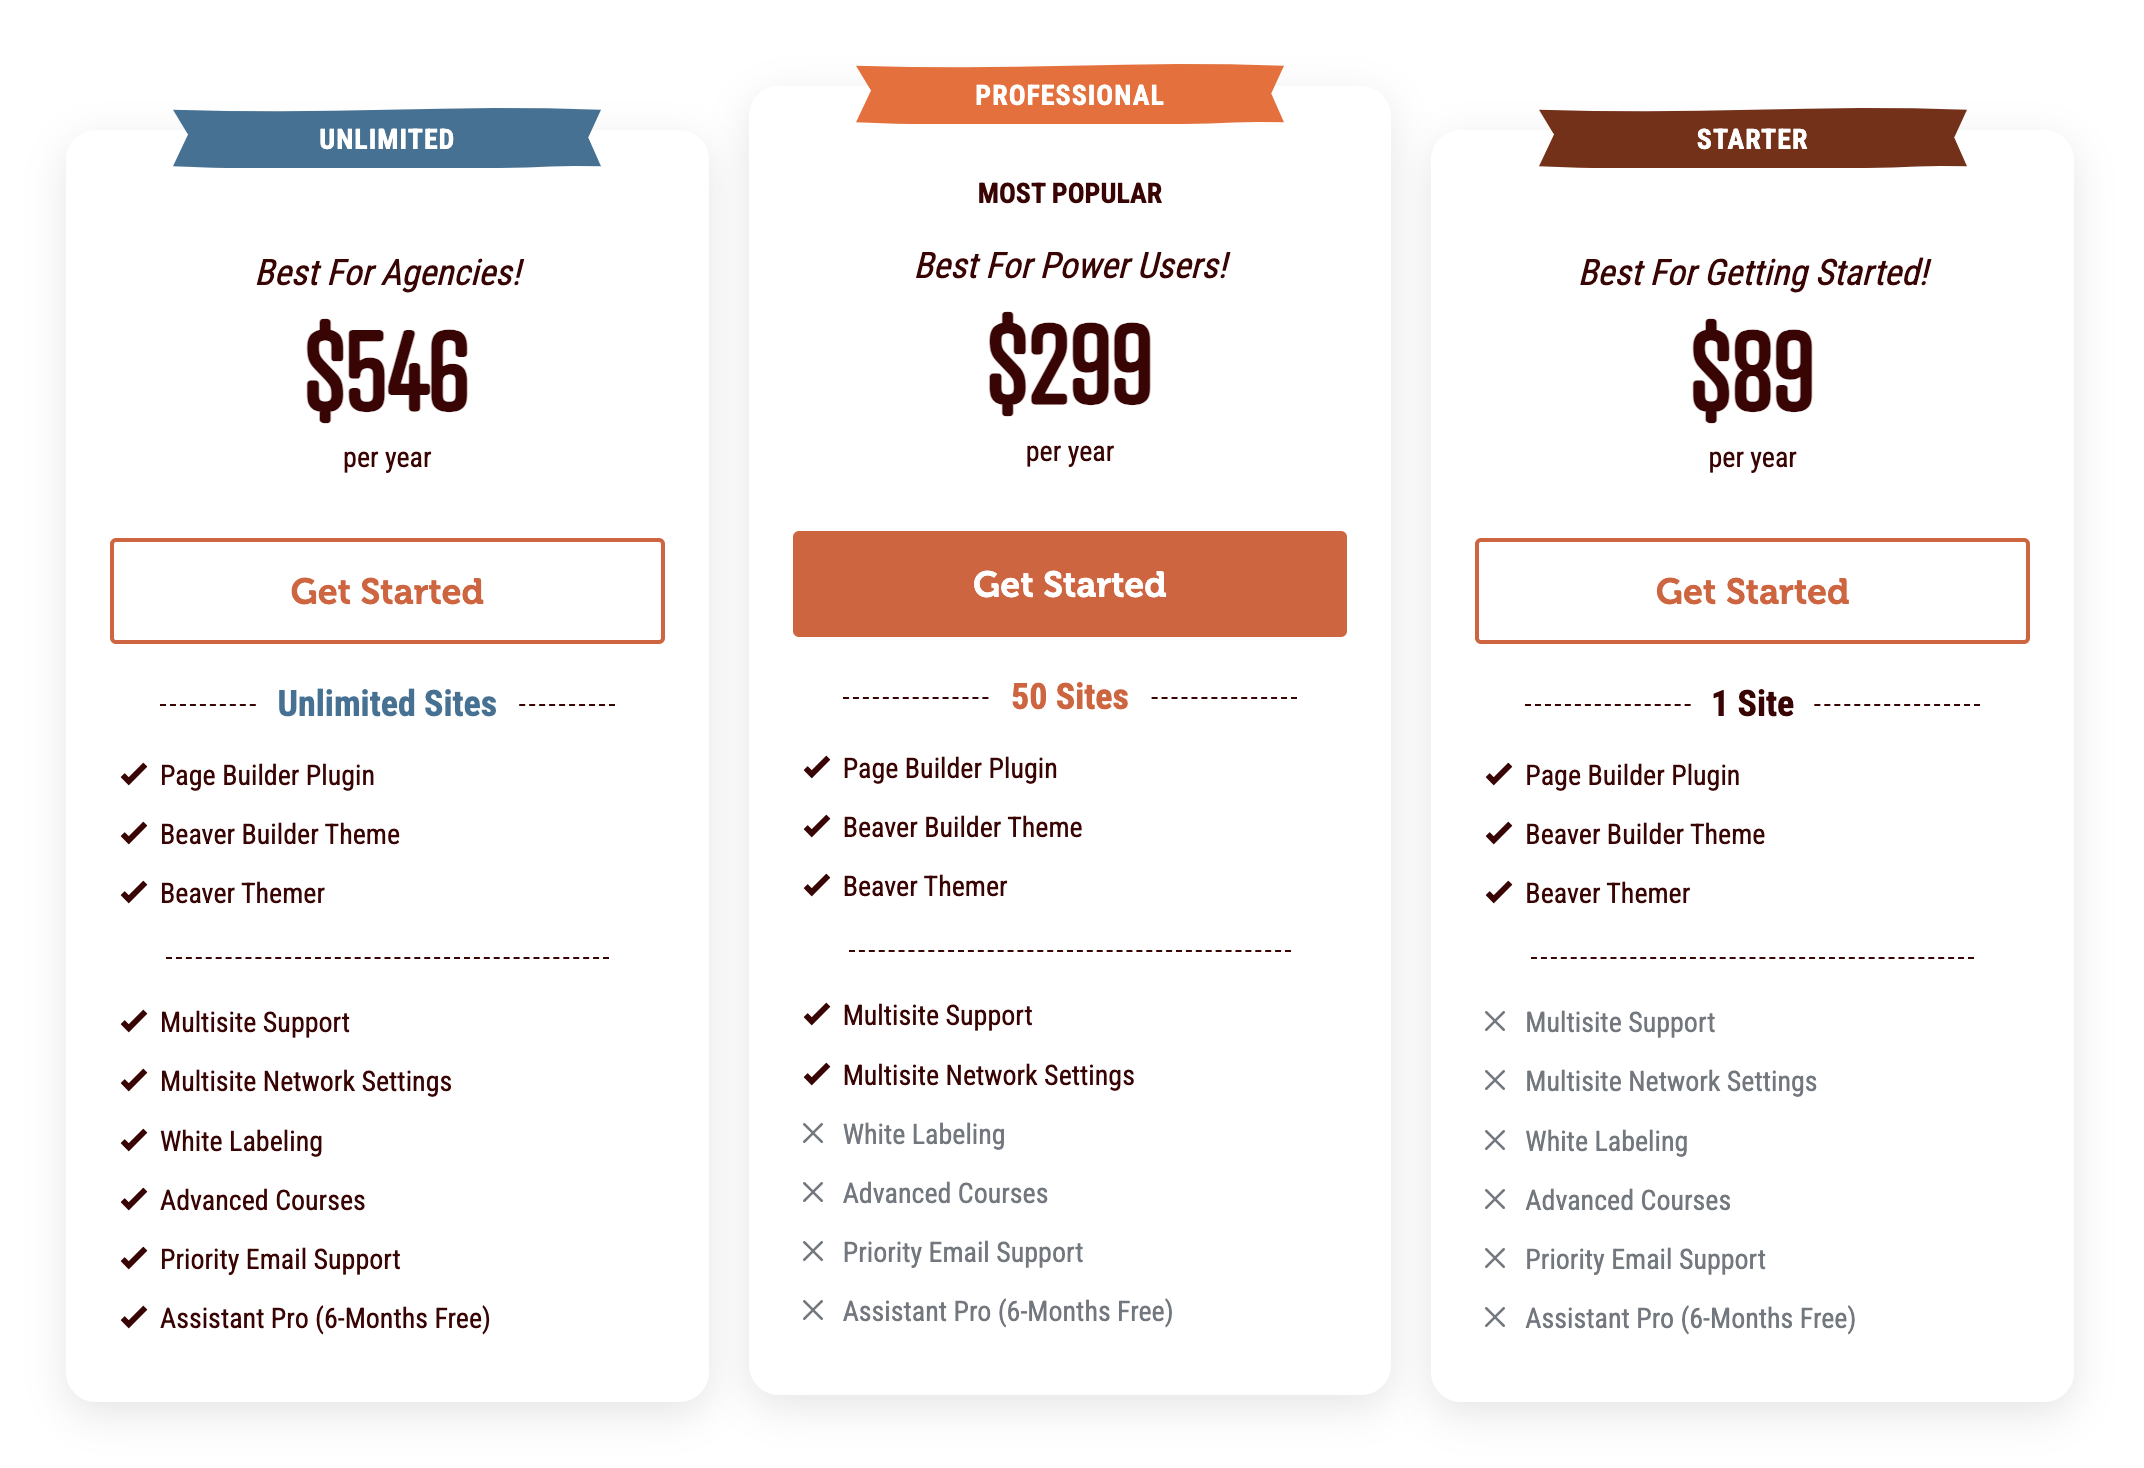
You’ll need to have a premium version of Beaver Builder installed in order to use Beaver Themer, so if you have the free Lite version, you’ll have to upgrade first.
The good news is that the Beaver Themer plugin is included with all of our Beaver Builder premium packages:
After you’ve purchased a Beaver Builder plan, you can download the premium page builder, theme, and Beaver Themer files from your My Account page.
All products are bundled under the same license, so when you install and activate the Beaver Builder plugin, Themer is automatically licensed on your site as well:
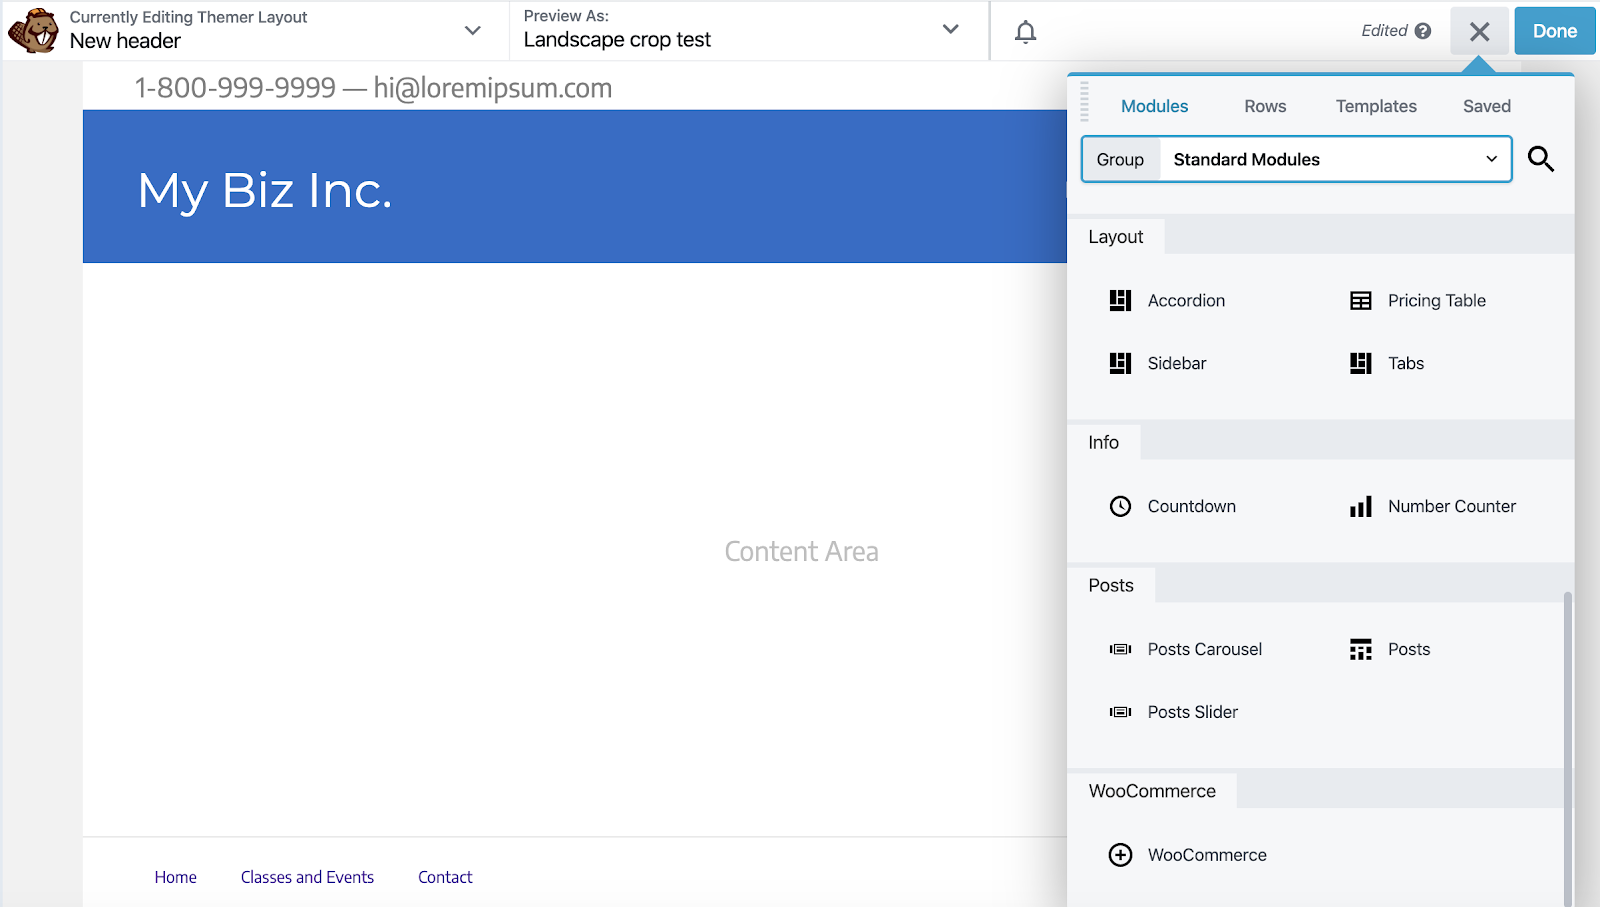
Beaver Themer gives you a new Themer Layouts option in your Beaver Builder menu:
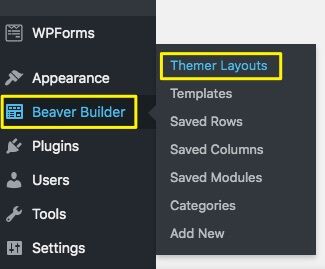
That’s the place where you’ll create and edit your Themer layouts or add rules for where the layouts are used. Here’s a screenshot of the settings for a Header-type Themer layout:
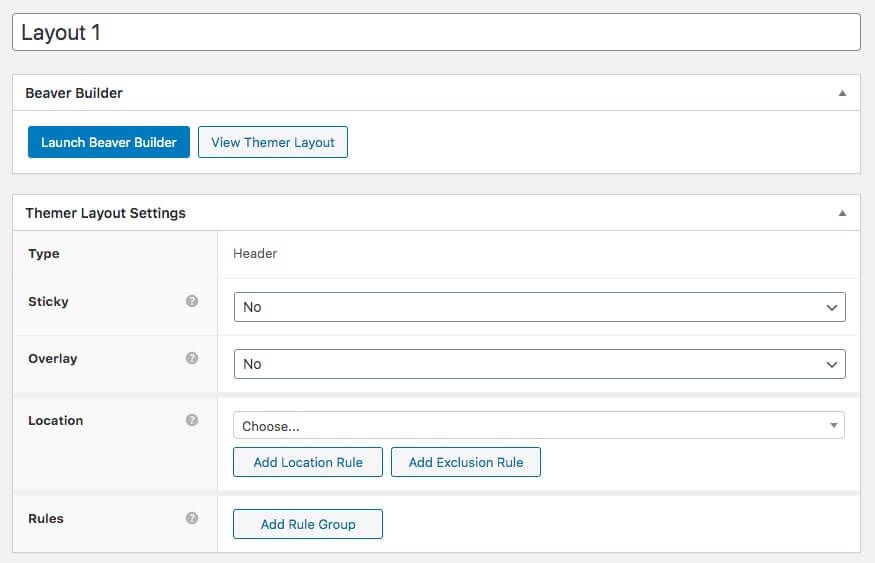
With Location settings, you include and exclude the where your layouts appear. By creating Rules, you can use conditional logic to control when your layout is applied.
For example, you could show a particular Themer header-type layout only when a user is logged into your site.
How to Build Beaver Themer Layouts in Just 4 Steps
There are just a few steps to follow to create a Themer layout. What you can accomplish with your designs is only limited by your creativity.
Step 1: Create a New Themer Layout
To get started, navigate to Beaver Builder > Add New:
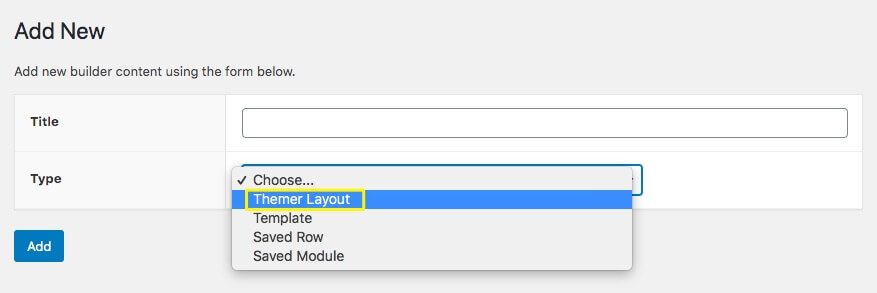
Enter a title for your Themer layout. The title is not displayed publicly.
For Type, choose Themer Layout. In this example, for Layout choose Header:
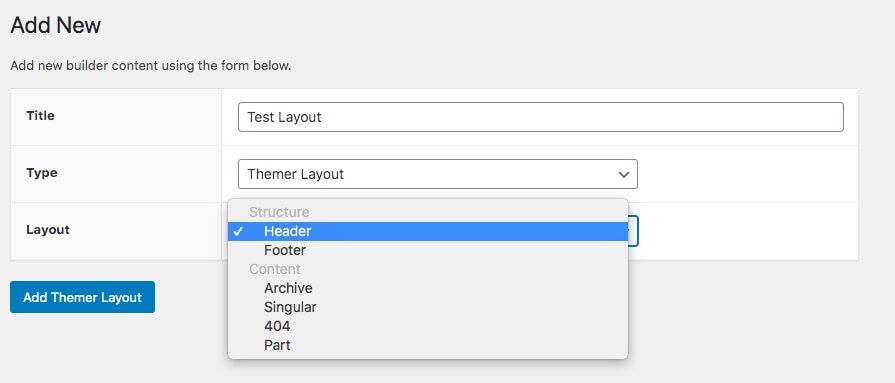
When you’re satisfied with your choices, click Add Themer Layout. This opens the Edit Themer Layout screen.
Step 2: Launch Beaver Builder and Edit Your Layout
From the Edit Themer Layout screen, you can set the location where this layout will appear:
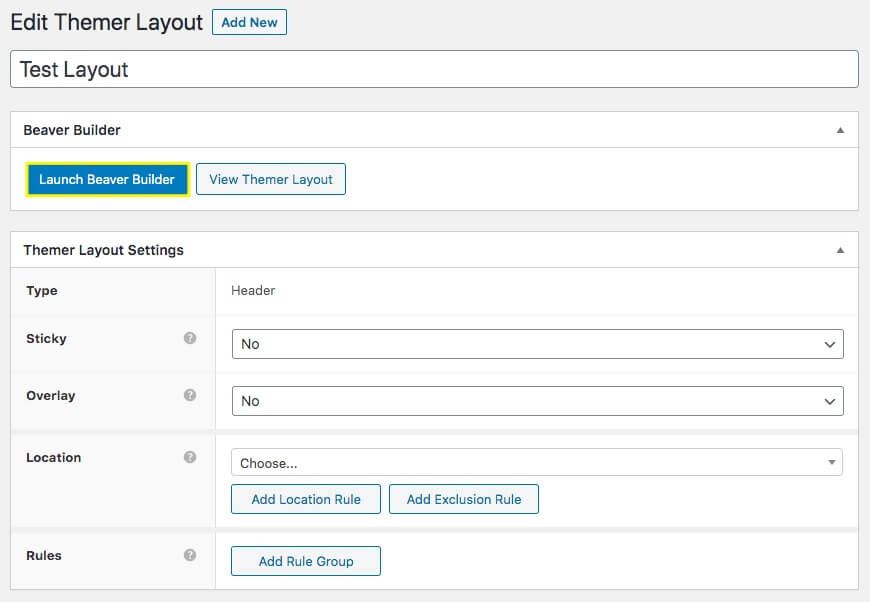
To start editing the Themer layout, click Launch Beaver Builder.
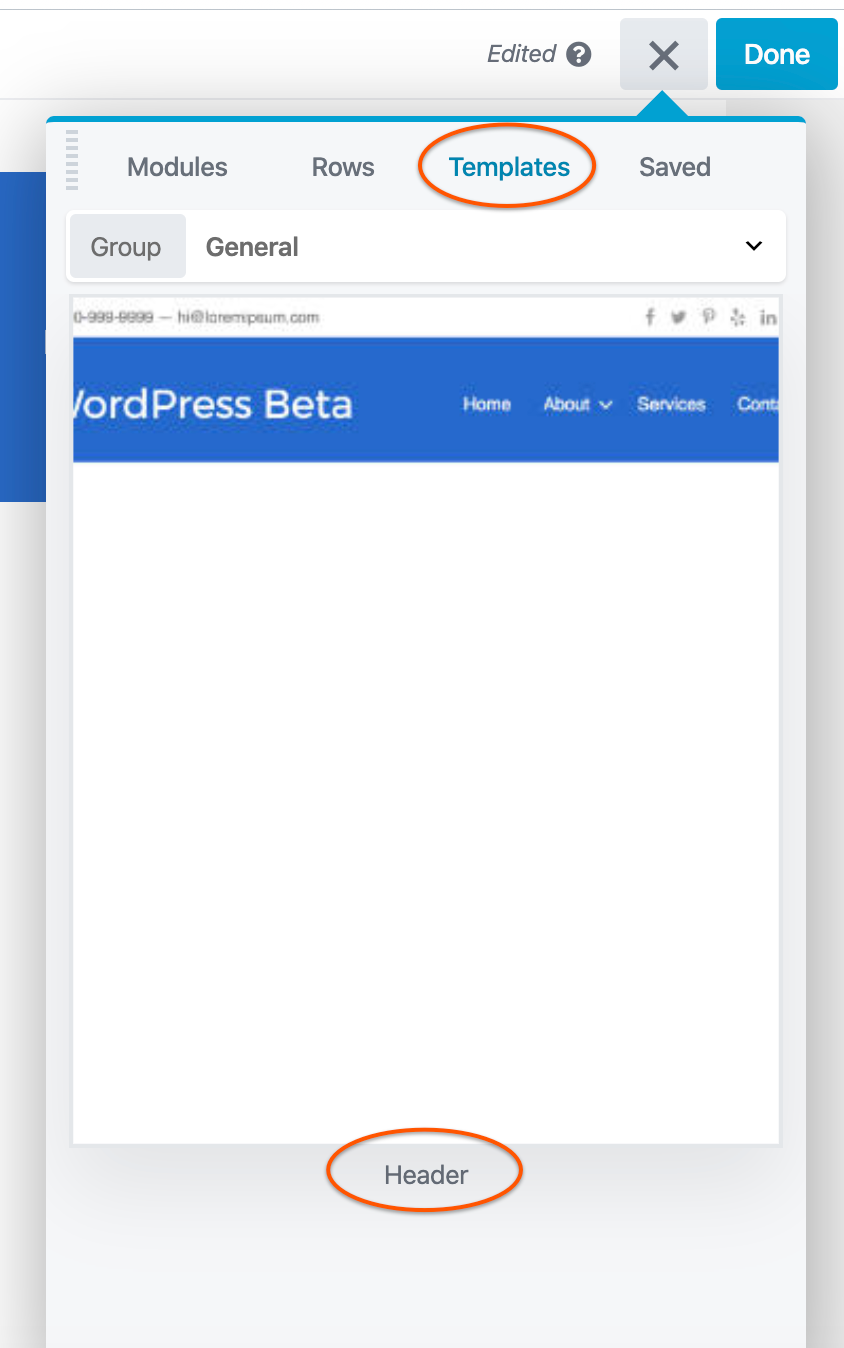
Instead of a blank layout screen, the Header layout template has already been applied to your layout.

If you ever want to go back to this template, you’ll find it on the Templates tab in the Content panel:
Just like any other Beaver Builder layout, you have access to modules and other page builder tools:
But first, let’s take a look at one of the modules included in the Header template because it shows how field connections work.
The site title is displayed through a Heading module.
As you can see in the following screenshot, instead of the name of the site, the Site Title field connection pulls that information from Settings > General > Site Title in the WordPress admin area.
The URL for the site title in the header is pulled from Settings > General > WordPress Address (URL).
By adding the URL, If the user clicks on the site title in the header they will go back to the home page.
The beauty of using field connections rather than static text is that if your site title or address ever changes, your heading will automatically be updated.
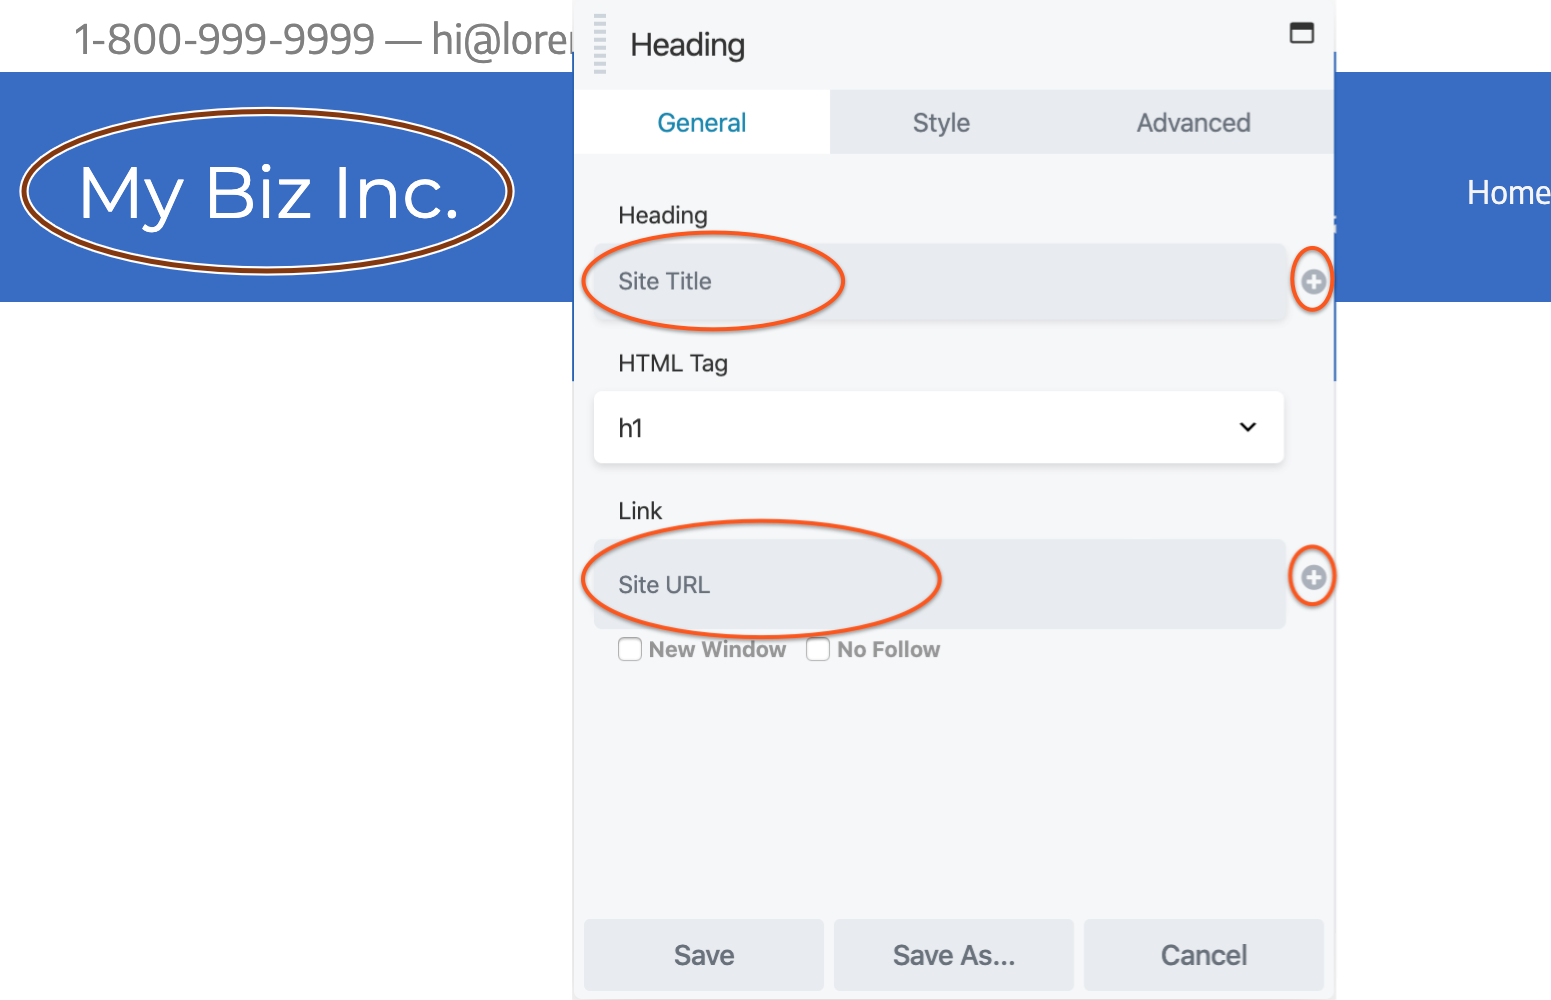
Any setting in Beaver Builder that accepts a field connection has a plus sign at the right-hand side of the field.
Besides site information, there are other field connections to content that changes page-by-page, such as Post Title, Post Featured Image, and so on.
This is what makes the Themer layout act as a “template,” displaying the correct information wherever it appears on your site.
You can also set field connections to custom fields, both native to WordPress and using plugins like Advanced Custom Fields and Pods. This gives you the ability to create and use information that truly makes your site unique.
Let’s add a Photo module to the header layout:
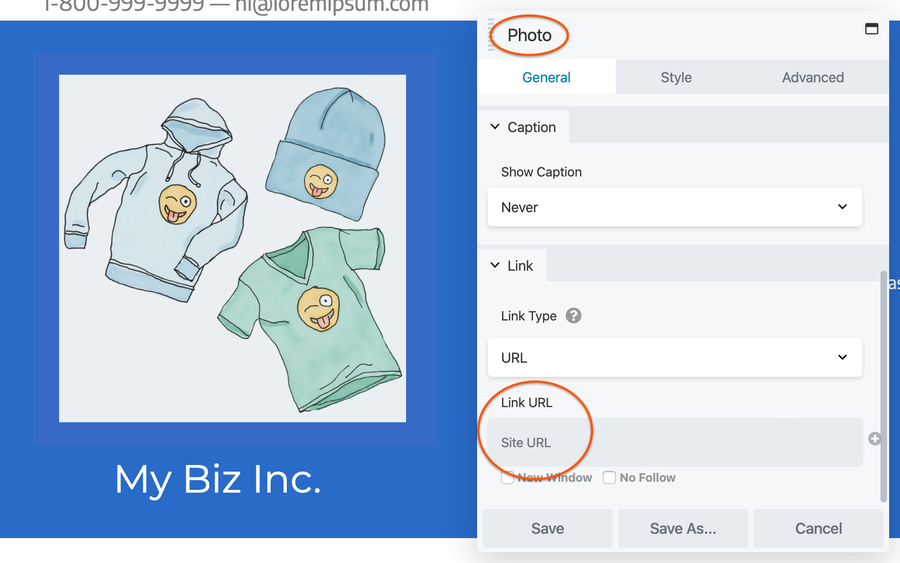
The Photo module’s Photo field does allow field connections, but there’s no WordPress setting for a header logo, so you have to add an image from your Media Library or a URL.
However, you can use the Site URL field connection for the link back to your home page.
When you’re done, click Done > Save Draft.
Step 3: Add Location Rules
Click Edit Themer Layout in the WordPress admin top bar or navigate back to open the editing screen for your layout from the WordPress dashboard.
Click on the drop-down menu in the Location section, and choose the location where you want to apply the header you just created:
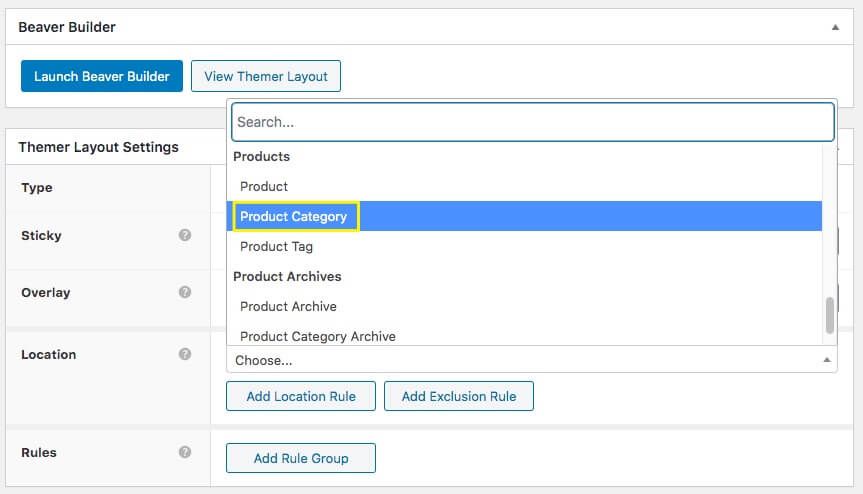
This is a WooCommerce site, so we’ll choose Product Category for this example. This activates a second location field with all of your previously-created product categories, where you can choose all categories or specific ones.
You can add more rules if you want specific pages, or use a blank rule and exclude specific pages.
We’ll choose Hoodie as our product category, which means any product that is in the Hoodie category, and only those product pages, display the Themer header layout.
When you’re done, click Add Location Rule and move on to the last step.
Step 4: Publish Your Custom Themer Layout
When you’re ready for your layout to go live, open it for editing in Beaver Builder and click Done > Publish, just like you would for a standard Beaver Builder layout.
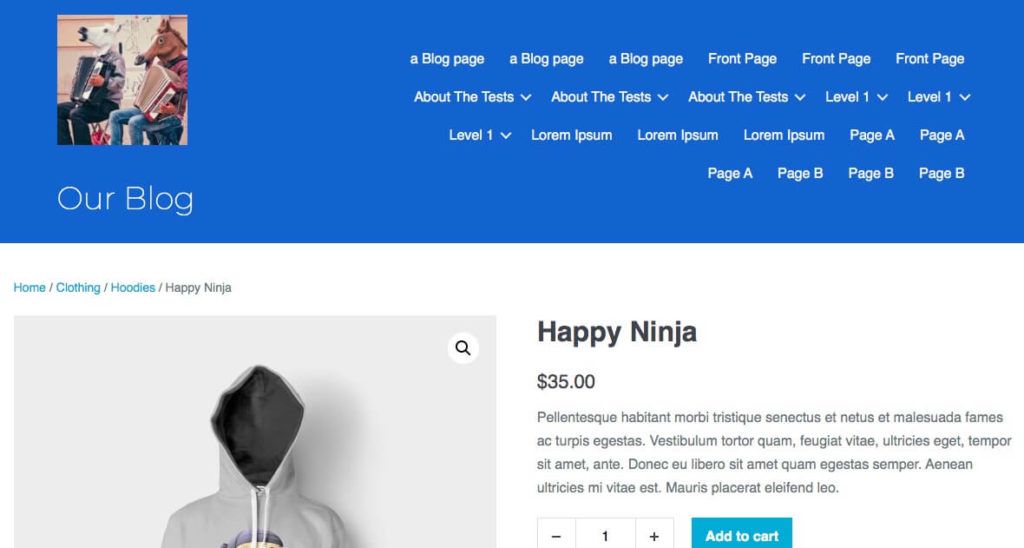
Then test your location rules. For our example, you can go to your shop page, which should display your default site header, not the Themer header:
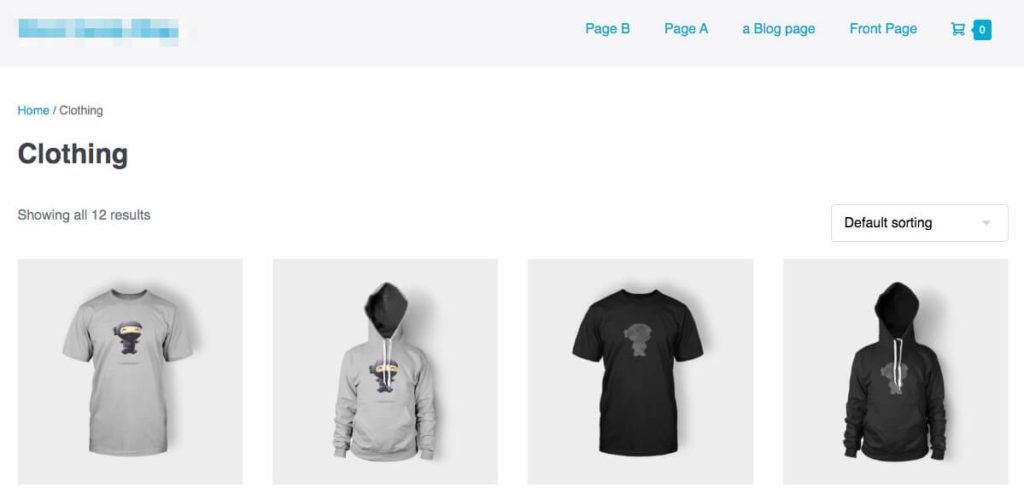
Now click one of the hoodie products to open the product page. You should see the Beaver Themer layout you just created, rather than the header that appeared on the main product page:
With that, you’ve just created and applied a custom Beaver Themer header layout. It’s really as easy as that.
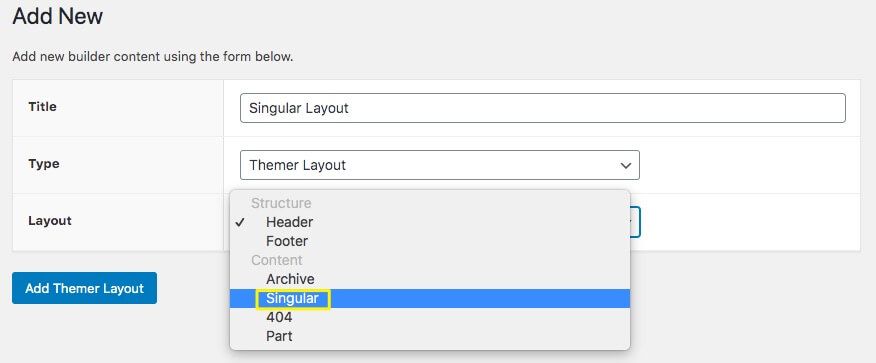
How to Create Singular Themer Layouts
Another kind of layout template you can make that’s extremely powerful is the Singular Themer Layout. This template is most often used to display single posts in a blog or any kind of custom post.
Follow the steps described above for creating a new layout but select Singular as your Layout type:
Click Launch Beaver Builder. Once again, you’ll see that the Singular layout template has already been applied, containing most of the information you typically find for a single post, with the standard field connections already set up.
You can tweak this template or start from scratch.
The Singular layout has a few of its own special modules, which can be accessed in the Content panel group called Themer Modules:

Some of these modules are just special versions of existing modules. For example, the Post Title module is just a Heading module with a field connection to the post title.
If you mouse over this module’s toolbar in the template layout, it will say it’s a Heading module.
The Post Content module is unique and worth mentioning. Unlike all other Beaver Builder modules, it serves as a placeholder in the Singular Themer layout.
The actual content is pulled from the WordPress block or classic editor.
Because of how WordPress works, you can create a standard Beaver Builder layout for the post content, or you can create a Themer layout for the area outside the post content (namely the post title, featured image, meta information, navigation, and so on), but you can’t have both in the same post.
Here is a video that walks you through this…
Fine-tune When Content Should Be Displayed
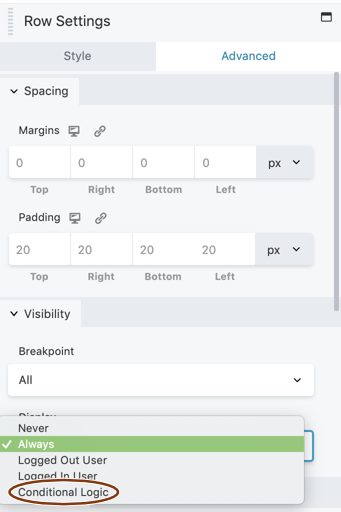
Beaver Themer adds one more feature to both standard Beaver Builder layouts and Themer layouts: conditional logic to fine-tune who can see your content.
Here’s a screenshot example of setting conditional logic rules when you’re editing your Themer layout:
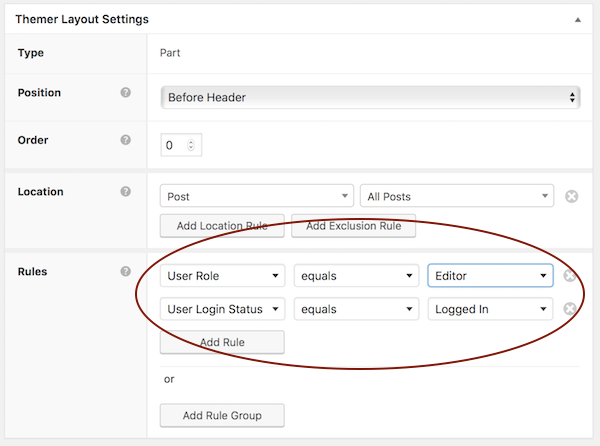
In this example, the Themer layout is displayed only when the user is logged in with the role of Editor.
Also, with Beaver Themer installed, these conditional logic settings are available as an extra choice in the Display setting on the Advanced tab for individual rows, columns, and modules in any Beaver Builder layout:
As another example, you could display an item like a button only when a specified custom field has a value.
The best way to learn more about conditional logic rules is to consult our knowledge base article.
Conclusion
Being able to pick and choose exactly where certain design elements appear on your website can be a game-changer. When you add Beaver Themer to your toolkit, you’ll be able to make sure that your entire site looks and feels cohesive.
Getting started with Beaver Themer is easy if you remember these four key steps:
- Add new Themer layouts from Beaver Builder > Add New in your WordPress dashboard.
- Choose a Themer layout type and launch Beaver Builder to access the design modules.
- Save your layout and add custom Location Rules to apply the layout to specific kinds of content.
- Publish your custom Beaver Themer layout, and test out your location rules by visiting those locations on your site.
Is there a specific Beaver Themer layout that you’re excited about? Share your thoughts with us in the comments section below!
4 Comments
Our Newsletter
Our newsletter is personally written and sent out about once a month. It's not the least bit annoying or spammy.
We promise.
Try Beaver Builder Today

Related articles
How to Create Headers and Footers with Beaver Themer
Page builders are great for creating beautiful pages, but they often don’t extend customization to headers and footers. This limitation…
How to Customize WordPress Website Header
Many elements make up a well-designed website. Your WordPress website header is particularly important because it’s the first thing visitors…
How to Use a Header Template in WordPress
Customizing a WordPress header isn’t often an easy process. If you’re not comfortable editing theme files, there aren’t many ways…
Join the community
We're here for you
There's a thriving community of builders and we'd love for you to join us. Come by and show off a project, network, or ask a question.
Since 2014
Build Your Website in Minutes, Not Months
Join Over 1 Million+ Websites Powered By Beaver Builder.
Excellent article. Beaver Themer saves us a great deal of time, especially when we create templates we use for multiple sites. It takes a little time to learn how to use Beaver Themer, but it is time well spent.
Thank you Allan for the feedback. We’re happy that Beaver Themer can help make your life easier =)
I would like each blog post to be on its own page. I would like to layout the page that the post is displayed on with as much flexibility as I can on an ordinary WordPress page using Beaver Builder. Then I would like to save that layout as a theme and have all blog posts displayed according to the theme. Is that possible?
Hi Douglas, yes you can create custom layouts for your blog posts using Beaver Themer. It will have the same drag and drop flexibility. Once you create your layout you can set rules to show where it applies. (i.e. to all blog posts, specific blog posts, categories, tags, etc.) Here is a video that helps walk you through it. https://youtu.be/px7K6KnIUOI