
Many elements make up a well-designed website. Your WordPress website header is particularly important because it’s the first thing visitors see when they arrive at your site. By creating a custom header, you can grab your visitors’ attention and build brand recognition.
In this post, we’ll show you why some well-known headers are effective and explain how you can easily create your own custom header with Beaver Themer.
What Custom Headers Are (And Why They’re Important)
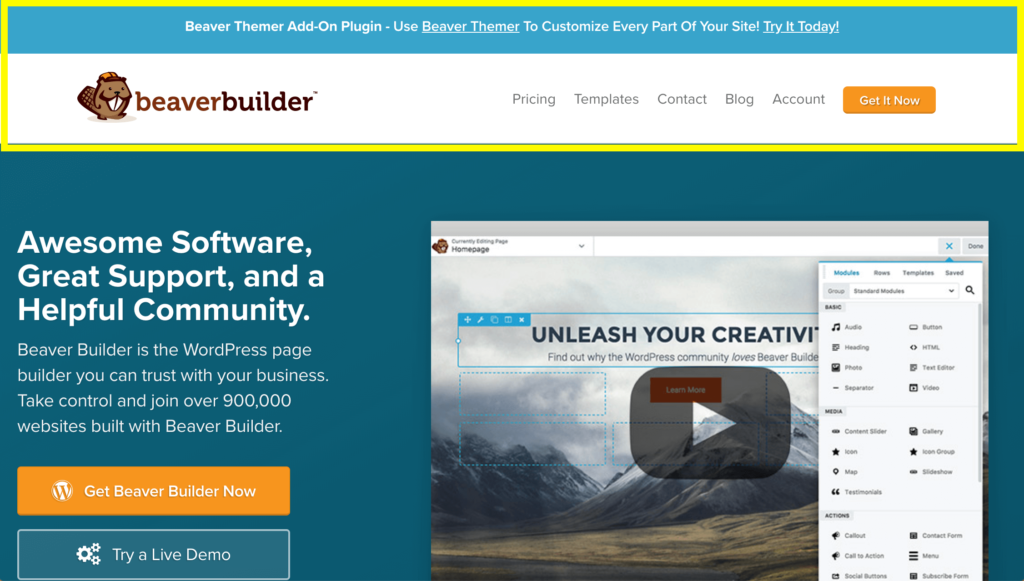
Your WordPress website header is at the top of the page. It usually contains the site’s name, logo, and other identifying information. In this screenshot of the Beaver Builder website, there’s a banner in the top bar, then the main part of the header with a logo and navigation menu:
The header displays on every page, so visitors see it multiple times. In fact, the header is often the only element that remains consistent across all of your pages. As a result, your header plays a huge role in your website’s identity and helps to improve brand recognition.
On WordPress sites, your active theme controls nearly everything about your header. You can make a few tweaks in the WordPress Customizer, such as uploading your own header image, adjusting the color scheme, and perhaps controlling the layout a bit. Some themes have specific areas where you can add your logo and another branding.
However, the Customizer almost never gives you complete control over your header’s appearance. If you want to create a truly custom header that helps visitors remember your brand, you need more control over customization.
Examples of Effective Website Headers
Let’s look at some high-quality examples of custom website headers. They exemplify how this key design element plays a huge role in your site’s branding, navigation, and more.
WPBeginner
As a popular resource on all things WordPress, it’s not surprising that WPBeginner has an excellent, professional header. The orange color is a common feature across the website, making it a strong signifier for the site’s brand:

This header also includes a navigation menu so users can easily move between pages no matter where they are on the site. The lower portion is a prominent Call to Action (CTA), which points users in the direction of WP Beginner’s most popular resources.
WP Beginner’s header incorporates its branding, improves User Experience (UX) through clear and accessible navigation, and drives conversions with a highly-visible CTA. This example shows that you can pack a lot into a small space.
WP Engine
This WordPress hosting company provides UX and branding through its header. It displays the WP Engine brand name and logo prominently on the left. Like WPBeginner’s header, it has a simple and unobtrusive navigation menu:

This header offers some other very important features. First, it has a sign-in link so returning users can easily access their accounts.
Then there are the support features. You can open an instant chat window and talk to a customer support representative. You can also access a variety of self-help resources. By being placed on the header, these features are easily accessible from every page.
These features reinforce an image of WP Engine as a reliable hosting provider, so they both improve the UX and strengthen brand identity.
Blondish.net
Headers can be highly effective on smaller sites as well. Blondish.net is the website of WordPress developer, designer, blogger, and podcaster Nile Flores:

With the bright colors, the star logo, and key navigation links, this is a memorable header. The prominent color scheme provides a lot of personality to the site. If you were browsing the web for a developer to hire, this site would definitely get your attention.
A Cup of Jo
Popular lifestyle blog A Cup of Jo features a header that’s perfectly matched to its owner, Joanna Goddard, who comes across as a laid-back, approachable, yet sophisticated professional. Her header’s classic typography and streamlined look reflect great design and imagination, as you can see in this screenshot.

What captures your attention is the small image within the first ‘o’ in the blog’s title. It changes as you move from page to page, reflecting the topic at hand. For example, check out how it features slices of citrus fruit when you navigate to the Food page:

Small details like this dynamic photo can create an instant impression of the site and its creator even with a minimalist design.
Amazon
Even the biggest name brands use headers to reinforce their branding and encourage visitors to convert. Take the Amazon header, for example:

It has the well-known Amazon logo in the top-left corner and multiple navigation menus. There’s a cart icon that counts the number of items you’ve added, and not one but two CTAs – Try Prime and Shop Deals of the Day.
That’s a lot to squeeze into a small space. However, Amazon is known for providing access to a huge range of products, so the header’s design fits the brand’s image.
How to Customize Your WordPress Website Header
Traditionally, in order to customize a theme, a developer would write custom code. This requires advanced coding skills, especially with the requirement for sites to be responsive.
Nowadays, even if you don’t have coding experience, you can still create highly effective custom headers by using Beaver Themer, our theme builder for the Beaver Builder plugin. Beaver Themer gives you the power to create custom headers using the drag-and-drop front-end Beaver Builder editor, which is normally used for layouts in the content area.
Here’s how easy it is. This is the template for a Themer header layout:

You can see in the screenshot above how Beaver Themer seamlessly integrates with the Beaver Builder editor. The header template features two rows: a top bar, a Heading module, and a Menu module.
With just a few clicks, you can create a similar layout, but with a noticeable impact on design and functionality:

Here’s all we did to update the template:
- Changed the top bar background to a dark color and made the text and icons white.
- Added a background image and overlay color gradient to the second row and made it full height.
- Moved the right column’s Menu module underneath the heading.
- Tweaked styles and row padding in the rows and modules.
In addition to headers, you can create layouts for footers, archive and single post pages, search pages, 404 pages, and “parts” of pages such as sales banners, and similar layouts for WooCommerce, The Events Calendar, and Easy Digital Downloads, if you have those plugins installed.
Beaver Themer is included with all Beaver Builder Premium Plans, with usage limited by the number of sites. To use it, you’ll need both the Beaver Builder Page Builder and Beaver Themer plugins installed and activated.
Steps to Create Your Custom Header with Beaver Themer
Here is how you create a Themer layout for your custom header. Start by installing and activating a premium version of the Beaver Builder plugin and the Beaver Themer Add-On plugin. Then go to your site’s dashboard and click Beaver Builder > Themer Layouts in the sidebar.
Click Add New at the top of the screen. As shown in this screenshot, create a title for your header layout (it doesn’t display on your web page or in the URL), and set the Type as Themer Layout and Layout as Header:
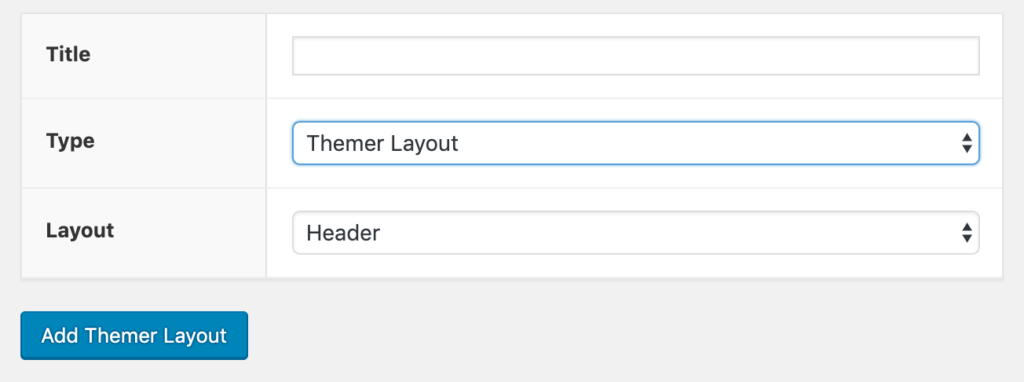
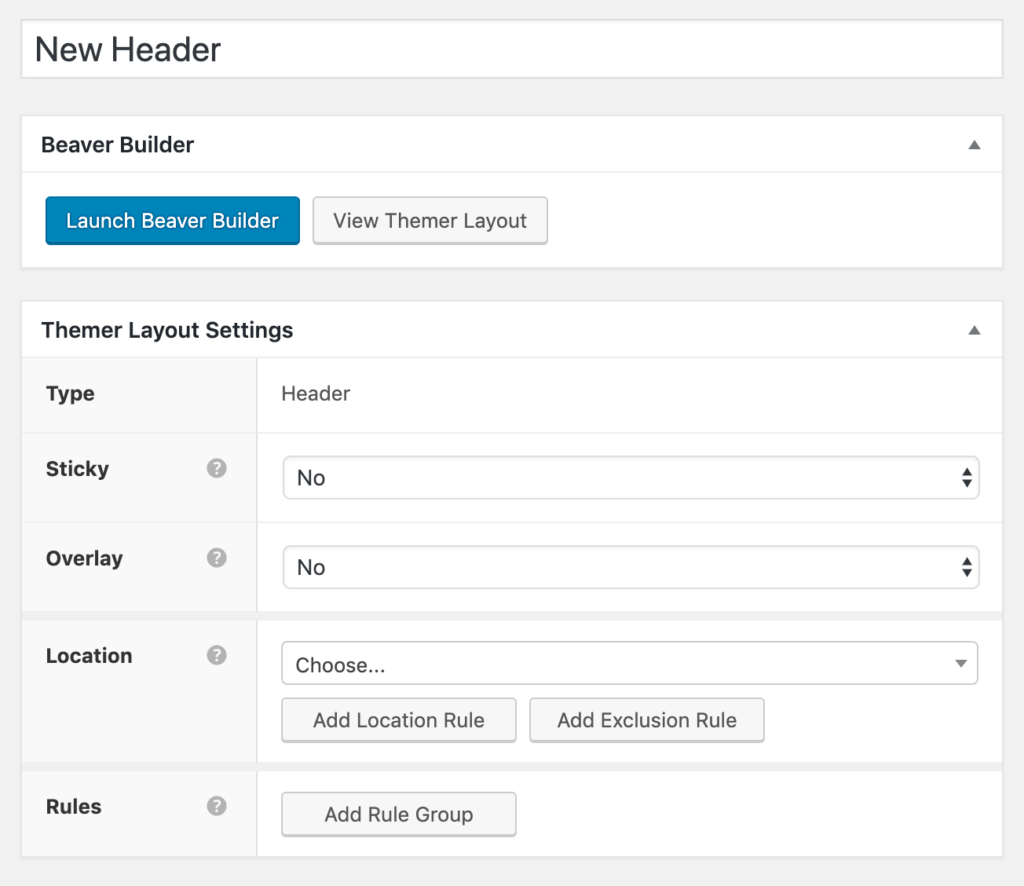
Click the Add Themer Layout button. Then click Launch Beaver Builder, the blue button in this screenshot.
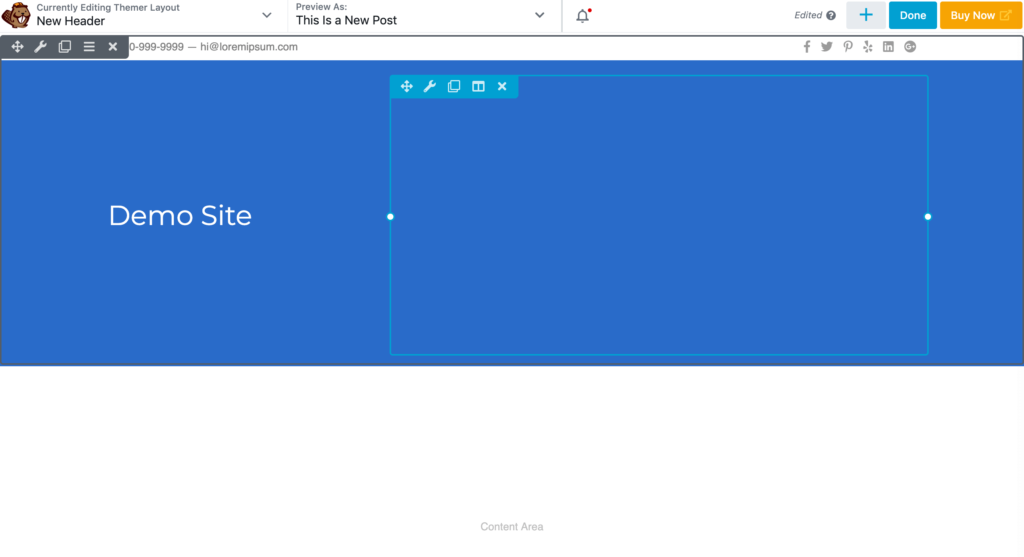
This opens the Beaver Builder editor with the Header layout template already imported. Modify the template to create your custom header, as shown in the following screenshot. Or you can delete one or both rows in the template and start from scratch.
Remember that you can use the Beaver Builder editor’s Responsive Editing Mode to view how your header will look on medium and small devices and make changes to settings that apply to only one device size. Just use the keyboard shortcut R while you’re in the editor to toggle large, medium, and small screen views.
One thing you’ll notice when you open the template rows and modules is that some of the fields use a field connection instead of static text. In this example, the “Demo Site” text that appears on the screen is dynamically created from the Site Title field connection, as shown in this screenshot.
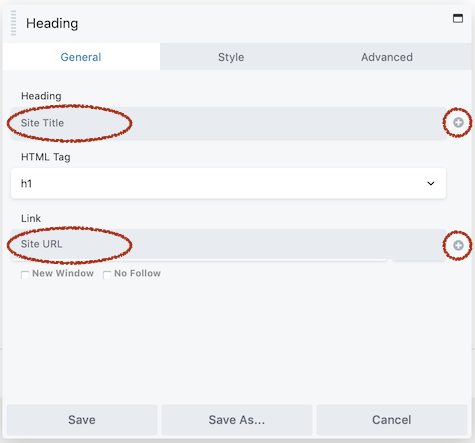
You can create field connections by clicking the plus sign that appears on the right for eligible fields, then choosing one of the dynamic values in the list. In this case, the Site Title field connection draws its value from the WordPress setting found at Settings > General > Site Title, and the Site URL field connection draws its value from Settings > General > Site Address (URL). You can type in static text in those fields if you prefer, but the advantage of the field connections is that if you ever change your WordPress settings, the new values will automatically display in your header.
In other locations, field connections allow the value to change depending on which page the layout occurs on. For example, if you’re creating a single post layout and the Heading module’s field connection is set to Post Title, the heading changes depending on which post is being displayed. Besides the field connections that come with Beaver Themer, you can connect to WordPress custom fields, Advanced Custom Fields, or Pods custom fields, so your customization options are almost unlimited.
When you’re finished creating your header, save your changes in the editor by clicking Done > Publish.
Click Edit Themer Layout in the WordPress admin bar at the top of the page to return to the settings for your header, as shown in this screenshot.
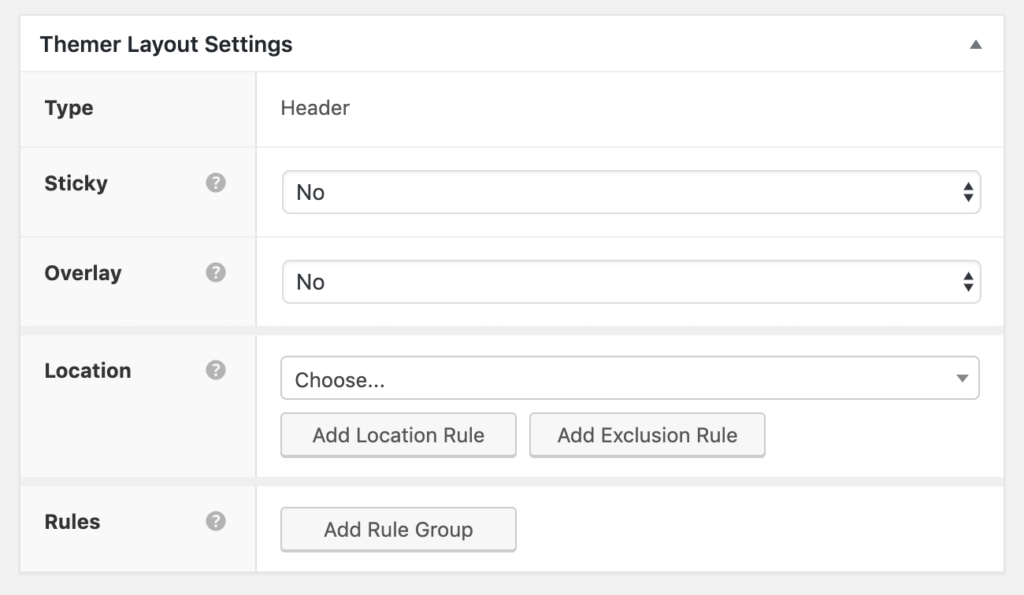
Specify how you want to display your header. You can make it sticky, meaning that it will remain visible when users scroll down the page. Or you can make it an overlay with a transparent background:

Choose where to display your header by setting the location where it will appear, as shown in this screenshot:

Selecting Entire Site makes your header visible across all posts and pages. For more control, you can apply specific location rules to target certain post types or pages, and even add multiple rules for precise placement.
If there are any areas where you’d like your header to not be visible, use an exclusion rule. Select the Add Exclusion Rule button and specify which locations on your site you would like your header not to appear. For these excluded pages, you could use another Themer header layout or your theme’s header will display.
Once you’ve configured all the necessary rules, click the blue Update button. Your custom header is ready to go!
You can also create custom transparent headers with Beaver Themer. Here is a video tutorial that walks you through how to do it. Check it out below:
Conclusion
Effective branding and design are essential to any site. Your header can help establish your site’s identity and capture visitors’ attention.
With Beaver Themer, you can create custom WordPress website headers quickly without any advanced coding skills. You can test it out for free with our Live Demo site.
Do you have any questions about using custom headers with Beaver Themer? Let us know in the comments section below!
16 Comments
Our Newsletter
Our newsletter is personally written and sent out about once a month. It's not the least bit annoying or spammy.
We promise.
Try Beaver Builder Today

Related articles

How to Create Headers and Footers with Beaver Themer
Page builders are great for creating beautiful pages, but they often don’t extend customization to headers and footers. This limitation…
How to Use a Header Template in WordPress
Customizing a WordPress header isn’t often an easy process. If you’re not comfortable editing theme files, there aren’t many ways…

How to Create a WordPress Author Page with Beaver Themer (In 5 Steps)
If your blog has multiple contributors, readers may want to browse posts by a specific author. While WordPress provides a…
Join the community
We're here for you
There's a thriving community of builders and we'd love for you to join us. Come by and show off a project, network, or ask a question.
Since 2014
Build Your Website in Minutes, Not Months
Join Over 1 Million+ Websites Powered By Beaver Builder.
thanks anthony! does it work with wpml language switcher?
Hi, yes WPML is compatible with Beaver Builder. You can learn more from their article: https://wpml.org/documentation/plugins-compatibility/beaver-builder/
Yes, i know WPML works fine with the BB. But with the Themer? I try with the themer, but I wasen’t successfull. Problems to change the header with WPML.
Hello WPML is compatible with Beaver Themer too =) We’re sorry you’re experiencing problems. If you need assistance you can submit a support ticket to help look into this for you.
Thanks I’am happy to hear that, i will have a closer look to this articles.
Hello! great article.
Is there a tutorial of how to hide the complete header, until the user scrolls and then see the menu appear in sticky mode?
Thanks in advance
I don’t believe there are any tutorials for that specific case, but I think you can hide the main header with CSS. And/or, this would be a good question to run by our Facebook community: https://www.facebook.com/groups/beaverbuilders/
Is there any plans to adapt Beaver Themer Headers? I would like to see a few more options. Side Menu down left, centred logo menu, sticky menu on mobile, logo/header inverting colour on scroll, that kind of thing.
A bit more control over styling of the mobile menu colours without custom css. These things would really help us open up more possibilities without adding some custom code.
Themer works great for basic menus, but I would like to see it expand a bit more in future versions and hopefully something in the pipeline.
This is great feedback Billy. I shared it with our development team =)
Hi – why is the menue not staying on the responsive version? on the mobile – the menue is just showing up – if you click on the empty white background …
https://eventchalet.ch/ you can see what I mean.
It looks like there is a CSS rule that is making the mobile menu transparent. If you submit a support ticket we can dig a bit deeper and try to help fix it. 🙂
https://www.wpbeaverbuilder.com/beaver-builder-support/
Im trying to customize the header so that the info div/bar hides upon scroll. Ive tried the many ways that they suggest online with js but i get errors. Nothing seems to work.
Hi Manny if you submit a ticket to our support team we would be happy to look into this for you =)
hi i dont have the theme layout, how can i get it
Hi there, you can purchase the Beaver Themer add-on here: https://www.wpbeaverbuilder.com/beaver-themer/
Thank you for sharing with us. Good article, by the way.