
How to Fix Social Share Image Issues in Beaver Builder (So Your Posts Look Great)
TL;DR: The social share image issue isn’t with Beaver Builder itself. It’s the missing social metadata. Pair Beaver Builder with an SEO plugin, set custom social images, and optionally display featured images in Beaver Themer templates to take control of how your content looks on social media.
Have you ever shared a blog post or page on Facebook, only to see the wrong image show up in the preview?
If so, you’re not alone.
One user recently asked this question in the Beaver Builder Facebook group:
“Does anyone have a Beaver Builder-friendly solution for cross-posting to social media? For example, when I post to Facebook, I’m not getting a proper thumbnail of the featured image—Beaver Builder seems to pull the first image on the page, blows it up, and it looks terrible.”
This is a common issue, and thankfully, there are some solid workarounds (and proactive solutions) that will help you take control of how your content appears when shared.
Let’s walk through why this happens and how to solve it using SEO plugins, Beaver Themer templates, and a few optimization best practices.
How to Fix the Wrong Image Showing When I Share My Page?
When you post a link to Facebook or other social platforms, they rely on Open Graph meta tags to determine which image, title, and description to display. If those tags aren’t set correctly, the platform might just grab the first image it finds on the page — and it’s not always pretty.
Beaver Builder doesn’t handle social metadata out of the box. But with a few simple options, you can fix social share image issues in Beaver Builder and guide platforms to display exactly what you want:
1. Use an SEO Plugin to Set Custom Social Images
The most effective way to fix social share image issues in Beaver Builder is to use an SEO plugin. Some popular options include:
These plugins let you set a custom social media image, title, and description for every post and page separate from your regular SEO title or featured image:

How to Set a Social Image in Yoast SEO:
- Open your post or page in the WordPress editor.
- Click the Yoast icon in the top navigation.
- Scroll down and click the Social media appearance button to open the social settings.
- Upload your custom social image and write your preferred title and description.
This gives you full control over what Facebook, LinkedIn, X (formerly Twitter), and others show in previews.
Tip from a Beaver Builder Pro (See #5 Below): Use the Facebook Sharing Debugger to test how your page appears and force Facebook to re-scrape it after making changes.
2. Use Beaver Themer to Output the Featured Image
Another approach suggested by a user in the Beaver Builder Facebook group is to make sure your featured image is actually visible on the page.
Why This Approach Works:
Beaver Builder templates often replace the default theme output. If you don’t explicitly add the featured image to your layout, it may not exist in the page’s HTML and social platforms won’t detect it.
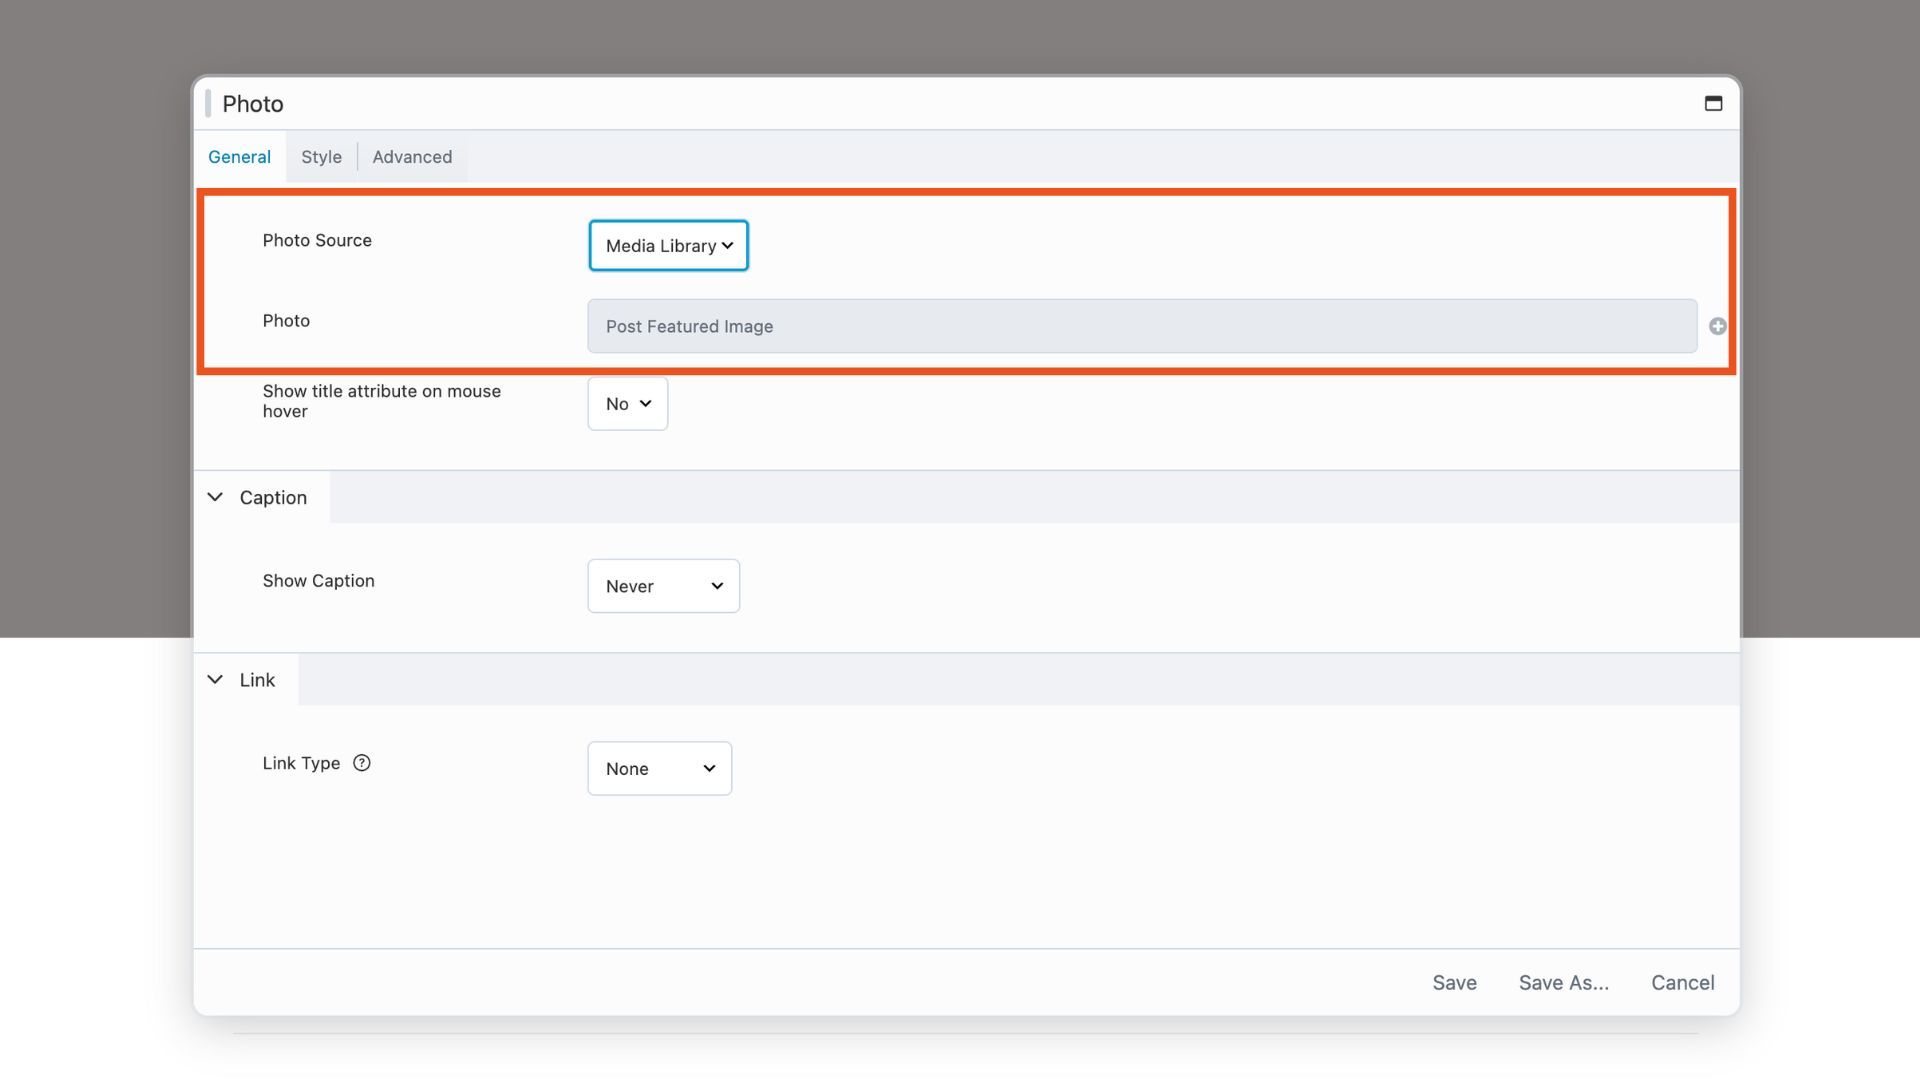
If you’re building custom layouts with Beaver Themer, you can follow these steps to set a featured image:
- Go to Beaver Builder > Themer Layouts.
- Edit your singular post template or create a new one.
- Add the Featured Image module from the Beaver Builder Modules panel (try using the search bar to search ‘featured image module’ if at first you don’t see it listed).
- Position it strategically such as at the top of the page, or visually hidden using CSS if preferred.
Beyond social sharing, this approach creates visual consistency across your blog posts. Every post will have a properly sized, well-positioned featured image that enhances the reader experience. You can also apply consistent styling, filters, or overlays through the module settings, creating a cohesive brand aesthetic.
3. Set a Default Social Share Image (as a Backup)
Even if you forget to set a custom image, your SEO plugin can define a default social image for all pages or posts. This ensures that if something slips through the cracks, the shared link still looks clean and professional — not like a zoomed-in logo or random image.
Why Use a Default Image?
- Acts as a safety net when no custom image is set.
- Maintains a professional, branded appearance.
- Prevents social platforms from pulling irrelevant or low-quality images.
What Makes a Good Default Image?
- Your logo on a clean, branded background
- A generic blog graphic with your URL and brand colors
- Dimensions: 1200 × 630 pixels
Most SEO plugins allow you to upload a default image in their global settings. Navigate to the social media section of your plugin’s settings and look for options like “Default Image” or “Fallback Image.” Some plugins even let you set different defaults for Facebook and Twitter.
Periodically review your default image to ensure it still aligns with your current branding and hasn’t become outdated.
4. Image Optimization Tips for Social Sharing
To make your shared images shine, follow these guidelines:
- Size: 1200 x 630 pixels (ideal for Facebook and LinkedIn)
- Format: JPG or PNG
- Aspect Ratio: 1.91:1
- Less text, more visuals: Text-heavy images may get less reach on some platforms.
Technical Specifications Deep Dive: The 1200 x 630 pixel dimension isn’t arbitrary; it’s the sweet spot that works across multiple platforms. Facebook recommends this size, LinkedIn displays it perfectly, and Twitter crops it appropriately. While Twitter’s native format is different (1200 x 675), the 1.91:1 aspect ratio ensures your image displays well everywhere.
File size matters too. Keep images under 1MB for faster loading times. JPG works best for photographs and complex images with many colors, while PNG is ideal for graphics with text, logos, or simple designs with fewer colors.
5. Refresh Facebook’s Cache with the Sharing Debugger
If your page has been shared on Facebook before you updated the social share image, Facebook may still show the old one. This happens because Facebook caches your page’s metadata (title, description, and image).
To force Facebook to use your updated image:
- Visit the Facebook Sharing Debugger.
- Enter your page URL and click Debug.
- Review the preview. If you see the wrong image, click Scrape Again.
- Facebook will refresh its cache with your latest settings.
Note that if you make several changes in a row, you may need to scrape again after each update.
What’s Your Preferred Fix?
Do you have a go-to method for solving the social share image issues in Beaver Builder?
Join the conversation in the Facebook Group: Have you found a clever Beaver Builder-specific tip, we’d love to hear it!
Happy building (and sharing)!
4 Comments
Our Newsletter
Our newsletter is personally written and sent out about once a month. It's not the least bit annoying or spammy.
We promise.
Try Beaver Builder Today

Related articles
Beaver Builder Maintenance Mode: How to Set It Up
Beaver Builder Maintenance Mode helps you keep your website looking professional while you work behind the scenes. Whether you’re redesigning…
Beaver Builder 2.11: Popup Module, Maintenance Mode, and Settings Snapshots
Beaver Builder 2.11, also known as Kariba, is now available and delivers some exciting updates: a new Popup Module for…

Beaver Builder AI: Build WordPress Layouts with AI (Now in Alpha)
Hey everyone! Big news. After a long time of building behind the scenes, Beaver Builder AI is here. The alpha…
Join the community
We're here for you
There's a thriving community of builders and we'd love for you to join us. Come by and show off a project, network, or ask a question.
Since 2014
Build Your Website in Minutes, Not Months
Join Over 1 Million+ Websites Powered By Beaver Builder.
Thank you for sharing this helpful content
Jennifer, I always read your blogs — they’re amazing and have given me a lot of information.
Great insights! Really appreciate the clear breakdown of how Open Graph metadata affects social previews. I’ve noticed that many page builders don’t expose social metadata by default, which leads to inconsistent sharing displays. Using SEO plugins like Yoast or Rank Math to set a fallback image is such a smart workaround. Thanks for sharing this practical solution!
Jennifer, informative article