
After you install and activate the plugin, you’ll be greeted with an introductory screen with information and an option to start the setup wizard, which provides some simple options for your redirects. The plugin uses Redirection uses the WordPress REST API to communicate with WordPress, the setup wizard also checks that functionality and reports any problems. Here’s a screenshot of the information screen:
After you’ve completed the setup wizard, you can create redirects by navigating to Tools > Redirection:
Here you’ll see a list of all your current redirects. Below that list, there are fields where you can enter a current URL and the target URL to create a new
Don’t forget to test your redirects to make sure they’re functioning correctly. You can also visit Tools > Redirection and use the tabs at the top of the screen to monitor your
Conclusion
Whether you’re planning to move your website, want to change your permalink structure, or are looking to use redirects to fix broken links and improve your SEO, there are several ways to implement them in WordPress. Which is best for you will depend on your situation and skill level.
The three methods you might consider include:
- Via your .htaccess file: This is the best option for whole-site redirects.
- Editing your functions.php file: A better option for more in-depth and specific redirects.
- Installing a plugin: Ideal for users who aren’t comfortable editing core files, or who want ongoing
redirect and 404 error monitoring.
Do you have questions about using redirects on your WordPress website? Share them with us in the comments section below!
Sometimes you may have to reveal hidden files in order to view and edit your .htaccess file.
Open the .htaccess file in a text editor and enter the appropriate 301
Redirect 301 /old-page.html http://www.mydomain.com/new-page.html
In the first line, modify old-page.html to match the old URL, and in the new URL modify the URL to match the target URL,
If your site has an SSL certificate, it’s good practice to
RewriteEngine On
RewriteCond %{HTTPS} off
RewriteRule ^(.*)$ https://%{HTTP_HOST}%{REQUEST_URI} [L,R=301]
Finally, you can
#Options +FollowSymLinks
RewriteEngine on
RewriteRule ^(>*)$ http://www.mynewdomain.com/$1 [R=301,L]
Save the changes to your .htacess file. If you edited the file on your local system, don’t forget to upload it to your site’s server. To test your
2. Edit Your WordPress functions.php File to Create a Redirect
Another way to create a 301
Locate the functions.php file in your child theme via one of the same methods we described for accessing .htaccess. Here’s a screenshot of a typical WordPress installation with a child theme:
To
wp_redirect( "http://www.my-blog.com/a-new-destination", 301 );
exit;
Change the URL to the
Embedded in additional PHP code, the wp_redirect function can be used to
3. Redirect Your WordPress Pages With a Plugin
If you’re not keen on slicing and dicing your website files and adding new code strings, don’t fret. There are other ways to employ redirects on your website. In fact, there are many WordPress
A great plugin option is 301 Redirects – Easy

It offers an import/export feature for bulk management of redirects. If you’re working on a one-time restructuring or moving to a new host, it can be helpful.
Redirection plugin is another popular and highly rated tool for this purpose:

It acts as a bit of a housekeeper for your website. It can keep track of 404 errors, manage 301 redirects, and make sure your links stay tidy so your page rank remains respectable.
Let’s walk you through how to use it.
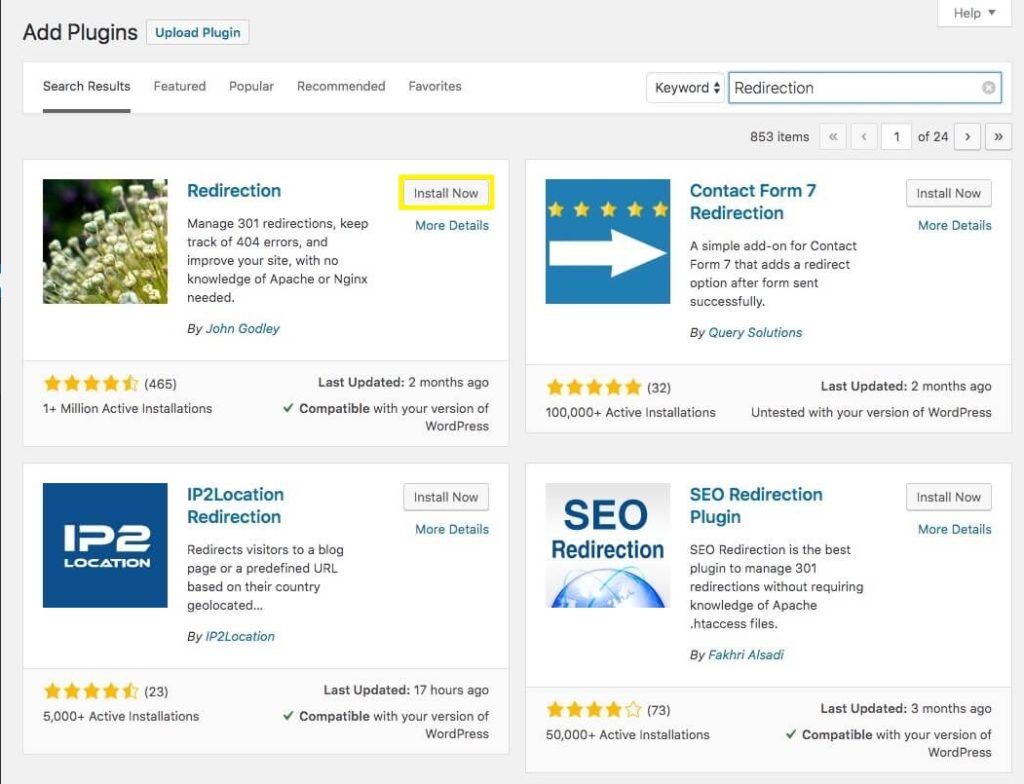
Start by navigating to Plugins > Add New in your WordPress dashboard and searching for it:
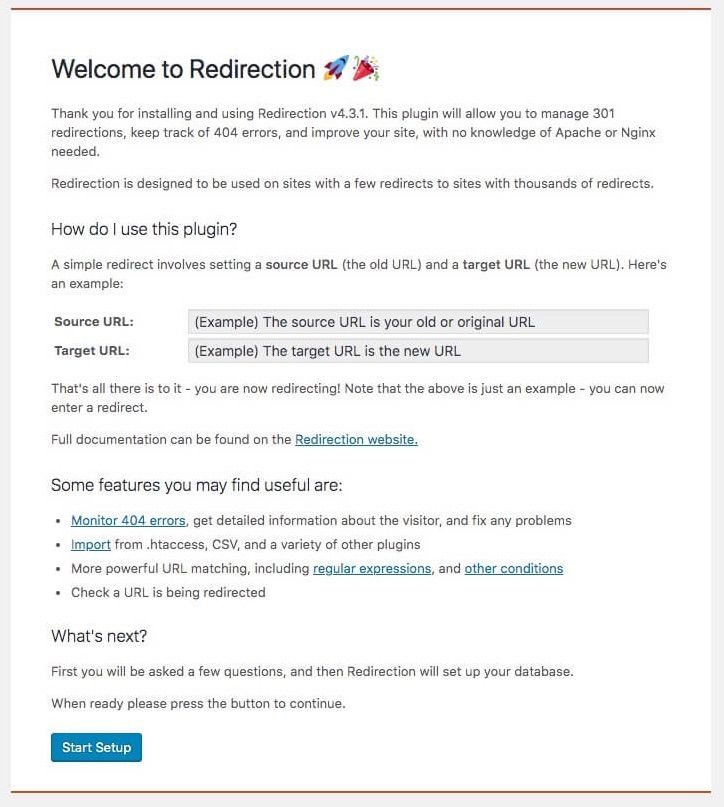
After you install and activate the plugin, you’ll be greeted with an introductory screen with information and an option to start the setup wizard, which provides some simple options for your redirects. The plugin uses Redirection uses the WordPress REST API to communicate with WordPress, the setup wizard also checks that functionality and reports any problems. Here’s a screenshot of the information screen:
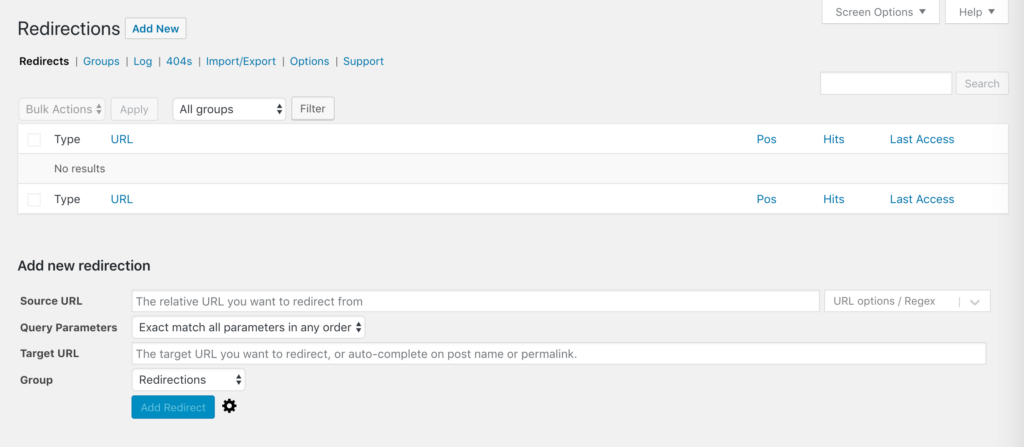
After you’ve completed the setup wizard, you can create redirects by navigating to Tools > Redirection:
Here you’ll see a list of all your current redirects. Below that list, there are fields where you can enter a current URL and the target URL to create a new
Don’t forget to test your redirects to make sure they’re functioning correctly. You can also visit Tools > Redirection and use the tabs at the top of the screen to monitor your
Conclusion
Whether you’re planning to move your website, want to change your permalink structure, or are looking to use redirects to fix broken links and improve your SEO, there are several ways to implement them in WordPress. Which is best for you will depend on your situation and skill level.
The three methods you might consider include:
- Via your .htaccess file: This is the best option for whole-site redirects.
- Editing your functions.php file: A better option for more in-depth and specific redirects.
- Installing a plugin: Ideal for users who aren’t comfortable editing core files, or who want ongoing
redirect and 404 error monitoring.
Do you have questions about using redirects on your WordPress website? Share them with us in the comments section below!
Sometimes you may have to reveal hidden files in order to view and edit your .htaccess file.
Open the .htaccess file in a text editor and enter the appropriate 301
Redirect 301 /old-page.html http://www.mydomain.com/new-page.html
In the first line, modify old-page.html to match the old URL, and in the new URL modify the URL to match the target URL,
If your site has an SSL certificate, it’s good practice to
RewriteEngine On
RewriteCond %{HTTPS} off
RewriteRule ^(.*)$ https://%{HTTP_HOST}%{REQUEST_URI} [L,R=301]
Finally, you can
#Options +FollowSymLinks
RewriteEngine on
RewriteRule ^(>*)$ http://www.mynewdomain.com/$1 [R=301,L]
Save the changes to your .htacess file. If you edited the file on your local system, don’t forget to upload it to your site’s server. To test your
2. Edit Your WordPress functions.php File to Create a Redirect
Another way to create a 301
Locate the functions.php file in your child theme via one of the same methods we described for accessing .htaccess. Here’s a screenshot of a typical WordPress installation with a child theme:
To
wp_redirect( "http://www.my-blog.com/a-new-destination", 301 );
exit;
Change the URL to the
Embedded in additional PHP code, the wp_redirect function can be used to
3. Redirect Your WordPress Pages With a Plugin
If you’re not keen on slicing and dicing your website files and adding new code strings, don’t fret. There are other ways to employ redirects on your website. In fact, there are many WordPress
A great plugin option is 301 Redirects – Easy
It offers an import/export feature for bulk management of redirects. If you’re working on a one-time restructuring or moving to a new host, it can be helpful.
Redirection plugin is another popular and highly rated tool for this purpose:
It acts as a bit of a housekeeper for your website. It can keep track of 404 errors, manage 301 redirects, and make sure your links stay tidy so your page rank remains respectable.
Let’s walk you through how to use it.
Start by navigating to Plugins > Add New in your WordPress dashboard and searching for it:
After you install and activate the plugin, you’ll be greeted with an introductory screen with information and an option to start the setup wizard, which provides some simple options for your redirects. The plugin uses Redirection uses the WordPress REST API to communicate with WordPress, the setup wizard also checks that functionality and reports any problems. Here’s a screenshot of the information screen:
After you’ve completed the setup wizard, you can create redirects by navigating to Tools > Redirection:
Here you’ll see a list of all your current redirects. Below that list, there are fields where you can enter a current URL and the target URL to create a new
Don’t forget to test your redirects to make sure they’re functioning correctly. You can also visit Tools > Redirection and use the tabs at the top of the screen to monitor your
Conclusion
Whether you’re planning to move your website, want to change your permalink structure, or are looking to use redirects to fix broken links and improve your SEO, there are several ways to implement them in WordPress. Which is best for you will depend on your situation and skill level.
The three methods you might consider include:
- Via your .htaccess file: This is the best option for whole-site redirects.
- Editing your functions.php file: A better option for more in-depth and specific redirects.
- Installing a plugin: Ideal for users who aren’t comfortable editing core files, or who want ongoing
redirect and 404 error monitoring.
Do you have questions about using redirects on your WordPress website? Share them with us in the comments section below!
Sometimes you may have to reveal hidden files in order to view and edit your .htaccess file.
Open the .htaccess file in a text editor and enter the appropriate 301
Redirect 301 /old-page.html http://www.mydomain.com/new-page.html
In the first line, modify old-page.html to match the old URL, and in the new URL modify the URL to match the target URL,
If your site has an SSL certificate, it’s good practice to
RewriteEngine On
RewriteCond %{HTTPS} off
RewriteRule ^(.*)$ https://%{HTTP_HOST}%{REQUEST_URI} [L,R=301]
Finally, you can
#Options +FollowSymLinks
RewriteEngine on
RewriteRule ^(>*)$ http://www.mynewdomain.com/$1 [R=301,L]
Save the changes to your .htacess file. If you edited the file on your local system, don’t forget to upload it to your site’s server. To test your
2. Edit Your WordPress functions.php File to Create a Redirect
Another way to create a 301
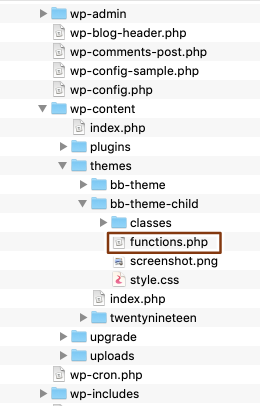
Locate the functions.php file in your child theme via one of the same methods we described for accessing .htaccess. Here’s a screenshot of a typical WordPress installation with a child theme:
To
wp_redirect( "http://www.my-blog.com/a-new-destination", 301 );
exit;
Change the URL to the
Embedded in additional PHP code, the wp_redirect function can be used to
3. Redirect Your WordPress Pages With a Plugin
If you’re not keen on slicing and dicing your website files and adding new code strings, don’t fret. There are other ways to employ redirects on your website. In fact, there are many WordPress
A great plugin option is 301 Redirects – Easy
It offers an import/export feature for bulk management of redirects. If you’re working on a one-time restructuring or moving to a new host, it can be helpful.
Redirection plugin is another popular and highly rated tool for this purpose:
It acts as a bit of a housekeeper for your website. It can keep track of 404 errors, manage 301 redirects, and make sure your links stay tidy so your page rank remains respectable.
Let’s walk you through how to use it.
Start by navigating to Plugins > Add New in your WordPress dashboard and searching for it:
After you install and activate the plugin, you’ll be greeted with an introductory screen with information and an option to start the setup wizard, which provides some simple options for your redirects. The plugin uses Redirection uses the WordPress REST API to communicate with WordPress, the setup wizard also checks that functionality and reports any problems. Here’s a screenshot of the information screen:
After you’ve completed the setup wizard, you can create redirects by navigating to Tools > Redirection:
Here you’ll see a list of all your current redirects. Below that list, there are fields where you can enter a current URL and the target URL to create a new
Don’t forget to test your redirects to make sure they’re functioning correctly. You can also visit Tools > Redirection and use the tabs at the top of the screen to monitor your
Conclusion
Whether you’re planning to move your website, want to change your permalink structure, or are looking to use redirects to fix broken links and improve your SEO, there are several ways to implement them in WordPress. Which is best for you will depend on your situation and skill level.
The three methods you might consider include:
- Via your .htaccess file: This is the best option for whole-site redirects.
- Editing your functions.php file: A better option for more in-depth and specific redirects.
- Installing a plugin: Ideal for users who aren’t comfortable editing core files, or who want ongoing
redirect and 404 error monitoring.
Do you have questions about using redirects on your WordPress website? Share them with us in the comments section below!
After you install and activate the plugin, you’ll be greeted with an introductory screen with information and an option to start the setup wizard, which provides some simple options for your redirects. The plugin uses Redirection uses the WordPress REST API to communicate with WordPress, the setup wizard also checks that functionality and reports any problems. Here’s a screenshot of the information screen:
After you’ve completed the setup wizard, you can create redirects by navigating to Tools > Redirection:
Here you’ll see a list of all your current redirects. Below that list, there are fields where you can enter a current URL and the target URL to create a new
Don’t forget to test your redirects to make sure they’re functioning correctly. You can also visit Tools > Redirection and use the tabs at the top of the screen to monitor your
Conclusion
Whether you’re planning to move your website, want to change your permalink structure, or are looking to use redirects to fix broken links and improve your SEO, there are several ways to implement them in WordPress. Which is best for you will depend on your situation and skill level.
The three methods you might consider include:
- Via your .htaccess file: This is the best option for whole-site redirects.
- Editing your functions.php file: A better option for more in-depth and specific redirects.
- Installing a plugin: Ideal for users who aren’t comfortable editing core files, or who want ongoing
redirect and 404 error monitoring.
Do you have questions about using redirects on your WordPress website? Share them with us in the comments section below!
Sometimes you may have to reveal hidden files in order to view and edit your .htaccess file.
Open the .htaccess file in a text editor and enter the appropriate 301
Redirect 301 /old-page.html http://www.mydomain.com/new-page.html
In the first line, modify old-page.html to match the old URL, and in the new URL modify the URL to match the target URL,
If your site has an SSL certificate, it’s good practice to
RewriteEngine On
RewriteCond %{HTTPS} off
RewriteRule ^(.*)$ https://%{HTTP_HOST}%{REQUEST_URI} [L,R=301]
Finally, you can
#Options +FollowSymLinks
RewriteEngine on
RewriteRule ^(>*)$ http://www.mynewdomain.com/$1 [R=301,L]
Save the changes to your .htacess file. If you edited the file on your local system, don’t forget to upload it to your site’s server. To test your
2. Edit Your WordPress functions.php File to Create a Redirect
Another way to create a 301
Locate the functions.php file in your child theme via one of the same methods we described for accessing .htaccess. Here’s a screenshot of a typical WordPress installation with a child theme:
To
wp_redirect( "http://www.my-blog.com/a-new-destination", 301 );
exit;
Change the URL to the
Embedded in additional PHP code, the wp_redirect function can be used to
3. Redirect Your WordPress Pages With a Plugin
If you’re not keen on slicing and dicing your website files and adding new code strings, don’t fret. There are other ways to employ redirects on your website. In fact, there are many WordPress
A great plugin option is 301 Redirects – Easy
It offers an import/export feature for bulk management of redirects. If you’re working on a one-time restructuring or moving to a new host, it can be helpful.
Redirection plugin is another popular and highly rated tool for this purpose:
It acts as a bit of a housekeeper for your website. It can keep track of 404 errors, manage 301 redirects, and make sure your links stay tidy so your page rank remains respectable.
Let’s walk you through how to use it.
Start by navigating to Plugins > Add New in your WordPress dashboard and searching for it:
After you install and activate the plugin, you’ll be greeted with an introductory screen with information and an option to start the setup wizard, which provides some simple options for your redirects. The plugin uses Redirection uses the WordPress REST API to communicate with WordPress, the setup wizard also checks that functionality and reports any problems. Here’s a screenshot of the information screen:
After you’ve completed the setup wizard, you can create redirects by navigating to Tools > Redirection:
Here you’ll see a list of all your current redirects. Below that list, there are fields where you can enter a current URL and the target URL to create a new
Don’t forget to test your redirects to make sure they’re functioning correctly. You can also visit Tools > Redirection and use the tabs at the top of the screen to monitor your
Conclusion
Whether you’re planning to move your website, want to change your permalink structure, or are looking to use redirects to fix broken links and improve your SEO, there are several ways to implement them in WordPress. Which is best for you will depend on your situation and skill level.
The three methods you might consider include:
- Via your .htaccess file: This is the best option for whole-site redirects.
- Editing your functions.php file: A better option for more in-depth and specific redirects.
- Installing a plugin: Ideal for users who aren’t comfortable editing core files, or who want ongoing
redirect and 404 error monitoring.
Do you have questions about using redirects on your WordPress website? Share them with us in the comments section below!
This article was revised and republished in August 2023. Are you interested in learning more about using WordPress and Beaver Builder? You should check out our free course library.
If you’re planning to make big changes to your website structure or to move it all together from one host to another, taking the time to
In this article, we’ll dig into what redirects are and why you might need or want to use them. We’ll also discuss three ways of implementing them on your website.
Understanding Redirects in WordPress
When we talk about redirects, we’re referring to the process of mapping one URL to a different one. In other words, when a user types in a URL or clicks on a link to Page A, you can
There are five main types of redirects you can use:
- 301. This type of
redirect is permanent. and indicates that the original page no longer exists at its original address. This is the bestredirect to use for making sure your search rankings stay respectable. - 302. This
redirect serves as an alternative page when the requested file exists at the specified address, but can’t be found for some reason. This is a temporaryredirect that caused problems for some browsers, so most site managers no longer use it. - 303. Created as a replacement for the less-than-helpful 302
redirects , this type helps prevent screen refreshing or bookmarking of sensitive data, such as credit card information. - 307. This
redirect is temporary and nearly identical to a 303redirect . They differ only in that a 307 utilizes the same technique to send and get information. A 303 uses two different techniques. - 308. A cousin to the 303 and 307 redirects, this type of
redirect achieves the same functionality. However, it’s permanent rather than temporary. It’s most useful for programmers rather than everyday WordPress users.
Each type has its own specific purpose and benefits. For this post, we’ll be focusing on 301 redirects, as they’re most often the type you’ll encounter when working with WordPress.
Why You Might Need to Use a Redirect in WordPress
Some redirects can be used to directly benefit your site and business, while others serve as fixes for various technical issues.
Some of the main reasons you might need a
- 404 errors. These occur when a user requests a page that can’t be found. This may happen when you move a page to a new address, or simply because a user has typed in a URL incorrectly. You can also use custom 404 pages to keep lost users engaged and entertained.
- Permalink changes. Changing your WordPress permalinks to something more readable might benefit your site. If you change your existing links’ default structure, however, you’ll want to set up redirects so your site visitors don’t receive a 404 error.
- URL optimization. If your site has been established for some time, you might look at some of your old yet still popular pages and posts and decide if it would be better to optimize the URLs for mobile use or readability. During this process, make sure any bookmarked favorites your visitors have
redirected to the new URL. This will also keep Google happy. - Directory changes. You might need to move a directory of your website, either for general reorganization or even for security reasons. A 301
redirect will help to make sure site visitors still get to the right place. - Search Engine Optimization (SEO). Whether you’re rebranding your website or want more control over the URLs your visitors see, experimenting with 301 redirects is one way to boost your SEO. For example, you might want all your site’s pages to display the same URL. Another SEO booster is to
redirect all HTTP input to HTTPS.
Regardless of your reasons for redirecting one or more WordPress posts or pages, there are some things to be aware of before you get started. In particular, it’s wise to plan how to structure your redirects and what Google Page Rank might do with them.
For example, it’s important that the page you
How to Redirect a WordPress Page (3 Ways)
There are several ways to
1. Create Manual Redirects in WordPress Through Your .htaccess File
If you’re comfortable editing your WordPress files directly, your .htaccess file is probably the quickest way to set up a
First, find the URL you want to
Second, make sure to back up your WordPress site. If you encounter any issues, you can restore the previous version of your site.
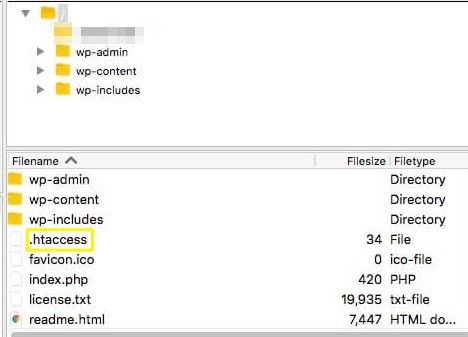
Next, go to your site’s file directory. There are a few ways to access it: through your web host control panel, the native WordPress file editor, or using File Transfer Protocol (FTP) and an FTP client such as FileZilla:
Here you’ll see a list of all your current redirects. Below that list, there are fields where you can enter a current URL and the target URL to create a new
Don’t forget to test your redirects to make sure they’re functioning correctly. You can also visit Tools > Redirection and use the tabs at the top of the screen to monitor your
Conclusion
Whether you’re planning to move your website, want to change your permalink structure, or are looking to use redirects to fix broken links and improve your SEO, there are several ways to implement them in WordPress. Which is best for you will depend on your situation and skill level.
The three methods you might consider include:
- Via your .htaccess file: This is the best option for whole-site redirects.
- Editing your functions.php file: A better option for more in-depth and specific redirects.
- Installing a plugin: Ideal for users who aren’t comfortable editing core files, or who want ongoing
redirect and 404 error monitoring.
Do you have questions about using redirects on your WordPress website? Share them with us in the comments section below!
After you’ve completed the setup wizard, you can create redirects by navigating to Tools > Redirection:
Here you’ll see a list of all your current redirects. Below that list, there are fields where you can enter a current URL and the target URL to create a new
Don’t forget to test your redirects to make sure they’re functioning correctly. You can also visit Tools > Redirection and use the tabs at the top of the screen to monitor your
Conclusion
Whether you’re planning to move your website, want to change your permalink structure, or are looking to use redirects to fix broken links and improve your SEO, there are several ways to implement them in WordPress. Which is best for you will depend on your situation and skill level.
The three methods you might consider include:
- Via your .htaccess file: This is the best option for whole-site redirects.
- Editing your functions.php file: A better option for more in-depth and specific redirects.
- Installing a plugin: Ideal for users who aren’t comfortable editing core files, or who want ongoing
redirect and 404 error monitoring.
Do you have questions about using redirects on your WordPress website? Share them with us in the comments section below!
After you install and activate the plugin, you’ll be greeted with an introductory screen with information and an option to start the setup wizard, which provides some simple options for your redirects. The plugin uses Redirection uses the WordPress REST API to communicate with WordPress, the setup wizard also checks that functionality and reports any problems. Here’s a screenshot of the information screen:
After you’ve completed the setup wizard, you can create redirects by navigating to Tools > Redirection:
Here you’ll see a list of all your current redirects. Below that list, there are fields where you can enter a current URL and the target URL to create a new
Don’t forget to test your redirects to make sure they’re functioning correctly. You can also visit Tools > Redirection and use the tabs at the top of the screen to monitor your
Conclusion
Whether you’re planning to move your website, want to change your permalink structure, or are looking to use redirects to fix broken links and improve your SEO, there are several ways to implement them in WordPress. Which is best for you will depend on your situation and skill level.
The three methods you might consider include:
- Via your .htaccess file: This is the best option for whole-site redirects.
- Editing your functions.php file: A better option for more in-depth and specific redirects.
- Installing a plugin: Ideal for users who aren’t comfortable editing core files, or who want ongoing
redirect and 404 error monitoring.
Do you have questions about using redirects on your WordPress website? Share them with us in the comments section below!
Sometimes you may have to reveal hidden files in order to view and edit your .htaccess file.
Open the .htaccess file in a text editor and enter the appropriate 301
Redirect 301 /old-page.html http://www.mydomain.com/new-page.html
In the first line, modify old-page.html to match the old URL, and in the new URL modify the URL to match the target URL,
If your site has an SSL certificate, it’s good practice to
RewriteEngine On
RewriteCond %{HTTPS} off
RewriteRule ^(.*)$ https://%{HTTP_HOST}%{REQUEST_URI} [L,R=301]
Finally, you can
#Options +FollowSymLinks
RewriteEngine on
RewriteRule ^(>*)$ http://www.mynewdomain.com/$1 [R=301,L]
Save the changes to your .htacess file. If you edited the file on your local system, don’t forget to upload it to your site’s server. To test your
2. Edit Your WordPress functions.php File to Create a Redirect
Another way to create a 301
Locate the functions.php file in your child theme via one of the same methods we described for accessing .htaccess. Here’s a screenshot of a typical WordPress installation with a child theme:
To
wp_redirect( "http://www.my-blog.com/a-new-destination", 301 );
exit;
Change the URL to the
Embedded in additional PHP code, the wp_redirect function can be used to
3. Redirect Your WordPress Pages With a Plugin
If you’re not keen on slicing and dicing your website files and adding new code strings, don’t fret. There are other ways to employ redirects on your website. In fact, there are many WordPress
A great plugin option is 301 Redirects – Easy
It offers an import/export feature for bulk management of redirects. If you’re working on a one-time restructuring or moving to a new host, it can be helpful.
Redirection plugin is another popular and highly rated tool for this purpose:
It acts as a bit of a housekeeper for your website. It can keep track of 404 errors, manage 301 redirects, and make sure your links stay tidy so your page rank remains respectable.
Let’s walk you through how to use it.
Start by navigating to Plugins > Add New in your WordPress dashboard and searching for it:
After you install and activate the plugin, you’ll be greeted with an introductory screen with information and an option to start the setup wizard, which provides some simple options for your redirects. The plugin uses Redirection uses the WordPress REST API to communicate with WordPress, the setup wizard also checks that functionality and reports any problems. Here’s a screenshot of the information screen:
After you’ve completed the setup wizard, you can create redirects by navigating to Tools > Redirection:
Here you’ll see a list of all your current redirects. Below that list, there are fields where you can enter a current URL and the target URL to create a new
Don’t forget to test your redirects to make sure they’re functioning correctly. You can also visit Tools > Redirection and use the tabs at the top of the screen to monitor your
Conclusion
Whether you’re planning to move your website, want to change your permalink structure, or are looking to use redirects to fix broken links and improve your SEO, there are several ways to implement them in WordPress. Which is best for you will depend on your situation and skill level.
The three methods you might consider include:
- Via your .htaccess file: This is the best option for whole-site redirects.
- Editing your functions.php file: A better option for more in-depth and specific redirects.
- Installing a plugin: Ideal for users who aren’t comfortable editing core files, or who want ongoing
redirect and 404 error monitoring.
Do you have questions about using redirects on your WordPress website? Share them with us in the comments section below!
7 Comments
Our Newsletter
Our newsletter is personally written and sent out about once a month. It's not the least bit annoying or spammy.
We promise.
Try Beaver Builder Today

Related articles

How Beaver Builder Products Work Together to Build Flexible WordPress Websites
Building a WordPress website often means stitching together a theme from one developer, a page builder from another, and a…
Growing a Facebook Group to 14,000 Members: Community Management Tips with David McCan
David McCan grew the Dynamic WordPress Facebook group to over 14,000 members. We sat down to talk about his moderation...

Why Agencies Are Switching to Beaver Builder: Performance Testing Results
By Chris Smith – HYPEsites.com For WordPress agencies, page builder choice directly impacts the metrics that matter most: project margins,…
Join the community
We're here for you
There's a thriving community of builders and we'd love for you to join us. Come by and show off a project, network, or ask a question.
Since 2014
Ready to build?
The WordPress page builder agencies and freelancers have trusted since 2014.
I actually find the easiest way to edit the .htaccess file is the File Editor tool that is built into Yoast SEO. Lets us do it straight from the WP Dashboard!
Great info! Thanks for sharing..
Redirecting a Wordpress page is not that hard. All you need to install is a 404 Plugin.
This is such a great content. All you need is to use plugins wisely. Like using 404 Redirection Plugin would help you in the same
Yeah but guys, why bloat your website with plugins you don’t need? They just introduce more potential security risks. Most of us are already using Yoast SEO anyway. All you need to do is to go to Yoast > Tools > File Editor and edit your .htaccess right there. Keep your WordPress site slim and safe!
It is really helpful for me
Very well explained, no doubt redirecting manually is better than using any plugin for this purpose if you are a technical person