
Beaver Builder makes building WordPress sites so much faster. But what if you could customize it to work even better for your workflow?
Most developers stick with default settings and miss out on powerful customization options that save time and reduce friction.
Learn how to turn Beaver Builder into a tool that feels custom-built for your process. This article reveals six high-impact tweaks that take just minutes to set up and help you work faster, stay focused longer, and enjoy building more.
Why Workflow Optimization Matters in Web Design
Small inefficiencies compound over time. Opening an extra panel thirty times a day wastes ten minutes. Scrolling through long layouts or jumping between settings screens breaks your focus.
These tiny interruptions may not seem like much in the moment—but they add up. They drain creative energy, slow projects down, and make building feel more tedious than it should.
The solution isn’t to work harder. Rather, it’s to fine-tune your tools so they work with you, not against you. By optimizing your Beaver Builder workflow, you eliminate friction and create space for deeper focus and creativity.
Tweak #1: Choose Your Visual Comfort with Light or Dark Mode
Staring at bright white screens for hours can cause eye strain, while light mode improves clarity in well-lit workspaces. Beaver Builder lets you switch between Light, Dark, and Auto modes to suit your comfort:
- Light Mode: Crisp text and accurate colors, ideal for bright environments.
- Dark Mode: Reduces eye strain and blue light, with better contrast for long editing sessions.
- Auto Mode: Automatically switches between light and dark based on your system settings for optimal comfort throughout the day.
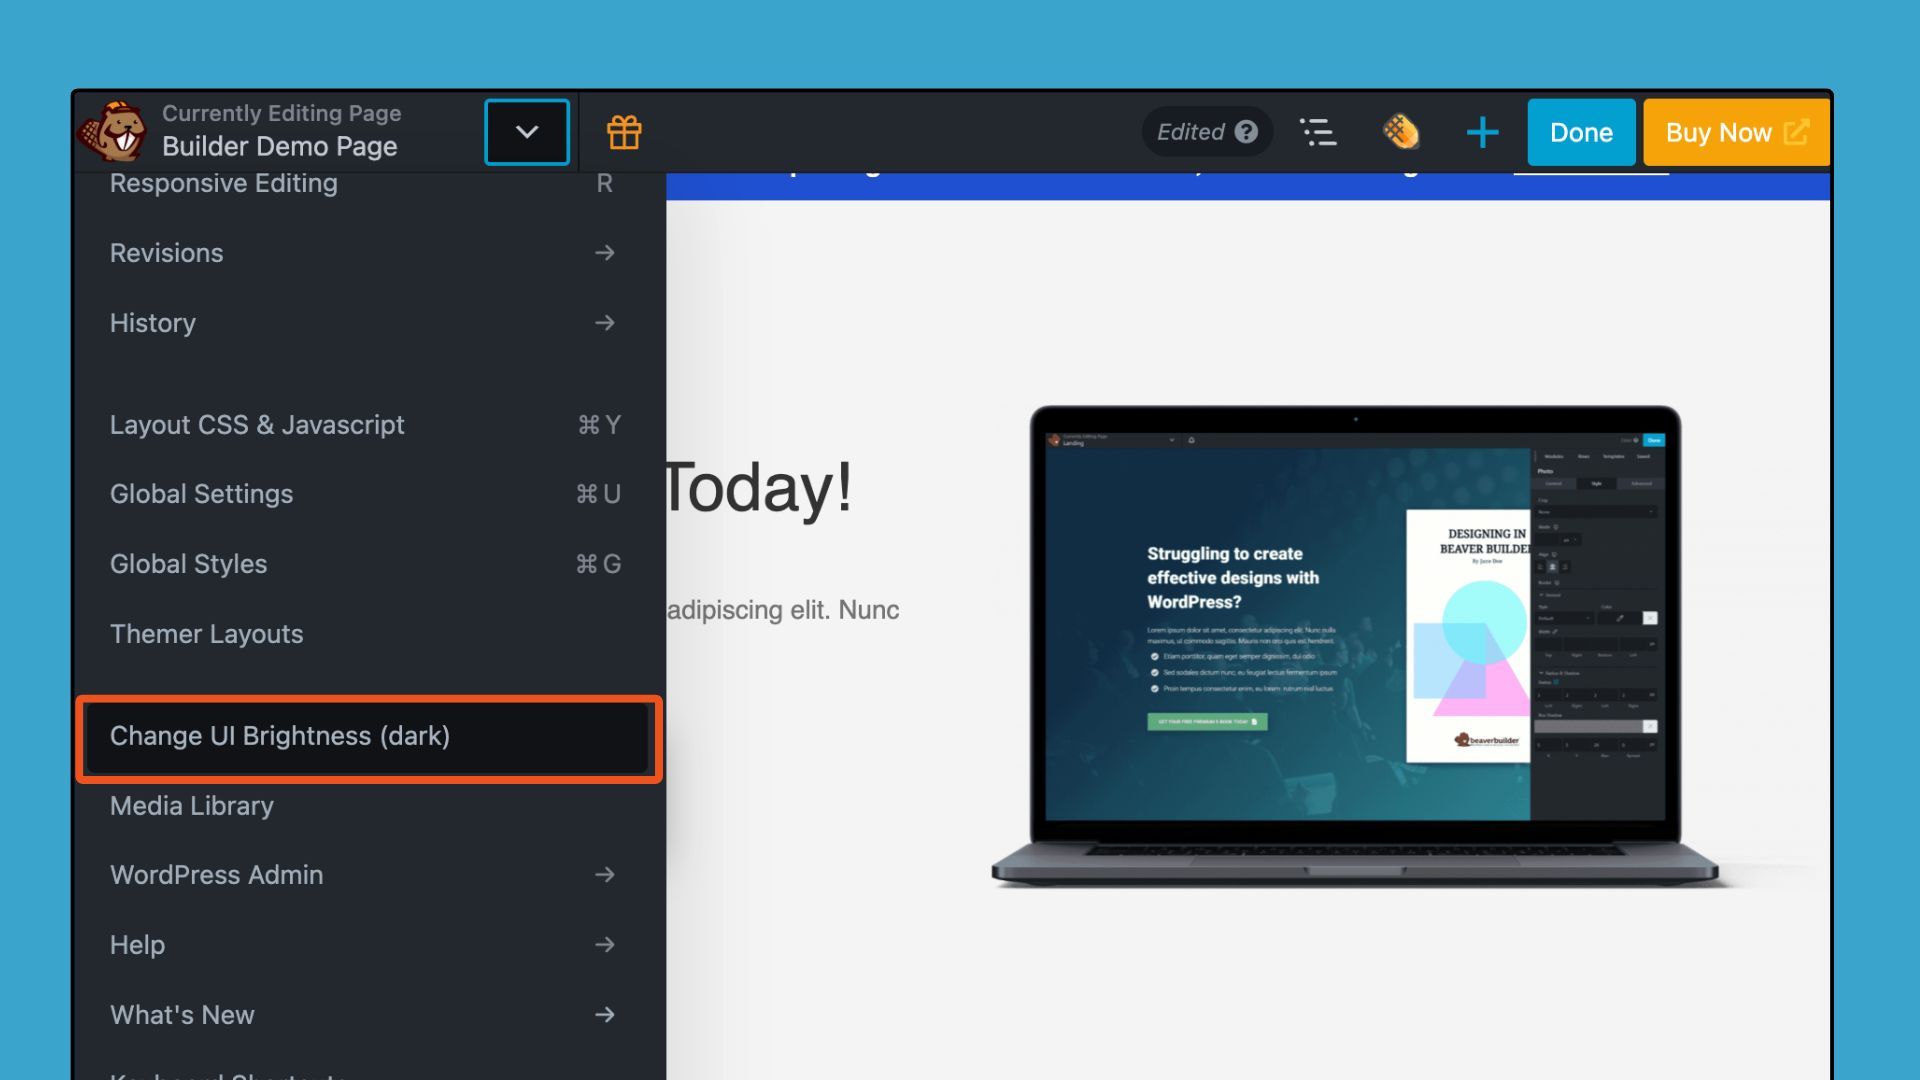
How to switch between light, dark, and auto modes:
- Click the Tools menu in Beaver Builder’s toolbar.
- Select Change UI Brightness.
- Toggle between Light Mode, Dark Mode, or Auto.
What each mode does:
- Light Mode: Crisp text and accurate colors, ideal for bright environments or daytime work.
- Dark Mode: Reduces eye strain and blue light, with higher contrast for long editing sessions.
- Auto Mode: Matches your system settings, switching automatically between light and dark for optimal comfort throughout the day.
Choosing the right mode protects your eyes, improves focus, and makes long editing sessions more comfortable—so you can work longer and more efficiently without fatigue.
Tweak #2: Set Up Global Styles from the Start
Global Styles can save massive amounts of time on every project. Define your colors, fonts, links, and buttons once so that they will apply consistently throughout your site.
Colors Tab
The Colors tab allows you to establish a global color palette, which can be accessed across your website through the Beaver Builder color picker tool.
“Once you have your color palette, setting up Global Colors from the outset can really help you cut down on time building out a site—and if there’s a color change later, it makes it easier to make that change without re-styling everything.” – Jamie, Beaver Builder Team
How to set up Global Colors:
- Open the Tools menu.
- Select Global Styles.
- Navigate to the Colors tab.
- Add your brand colors with descriptive labels.
- Save your settings.
You have the option to include additional global colors by either clicking the Add Global Colors button or duplicating a color item using the duplicate icon located in the upper right-hand corner:
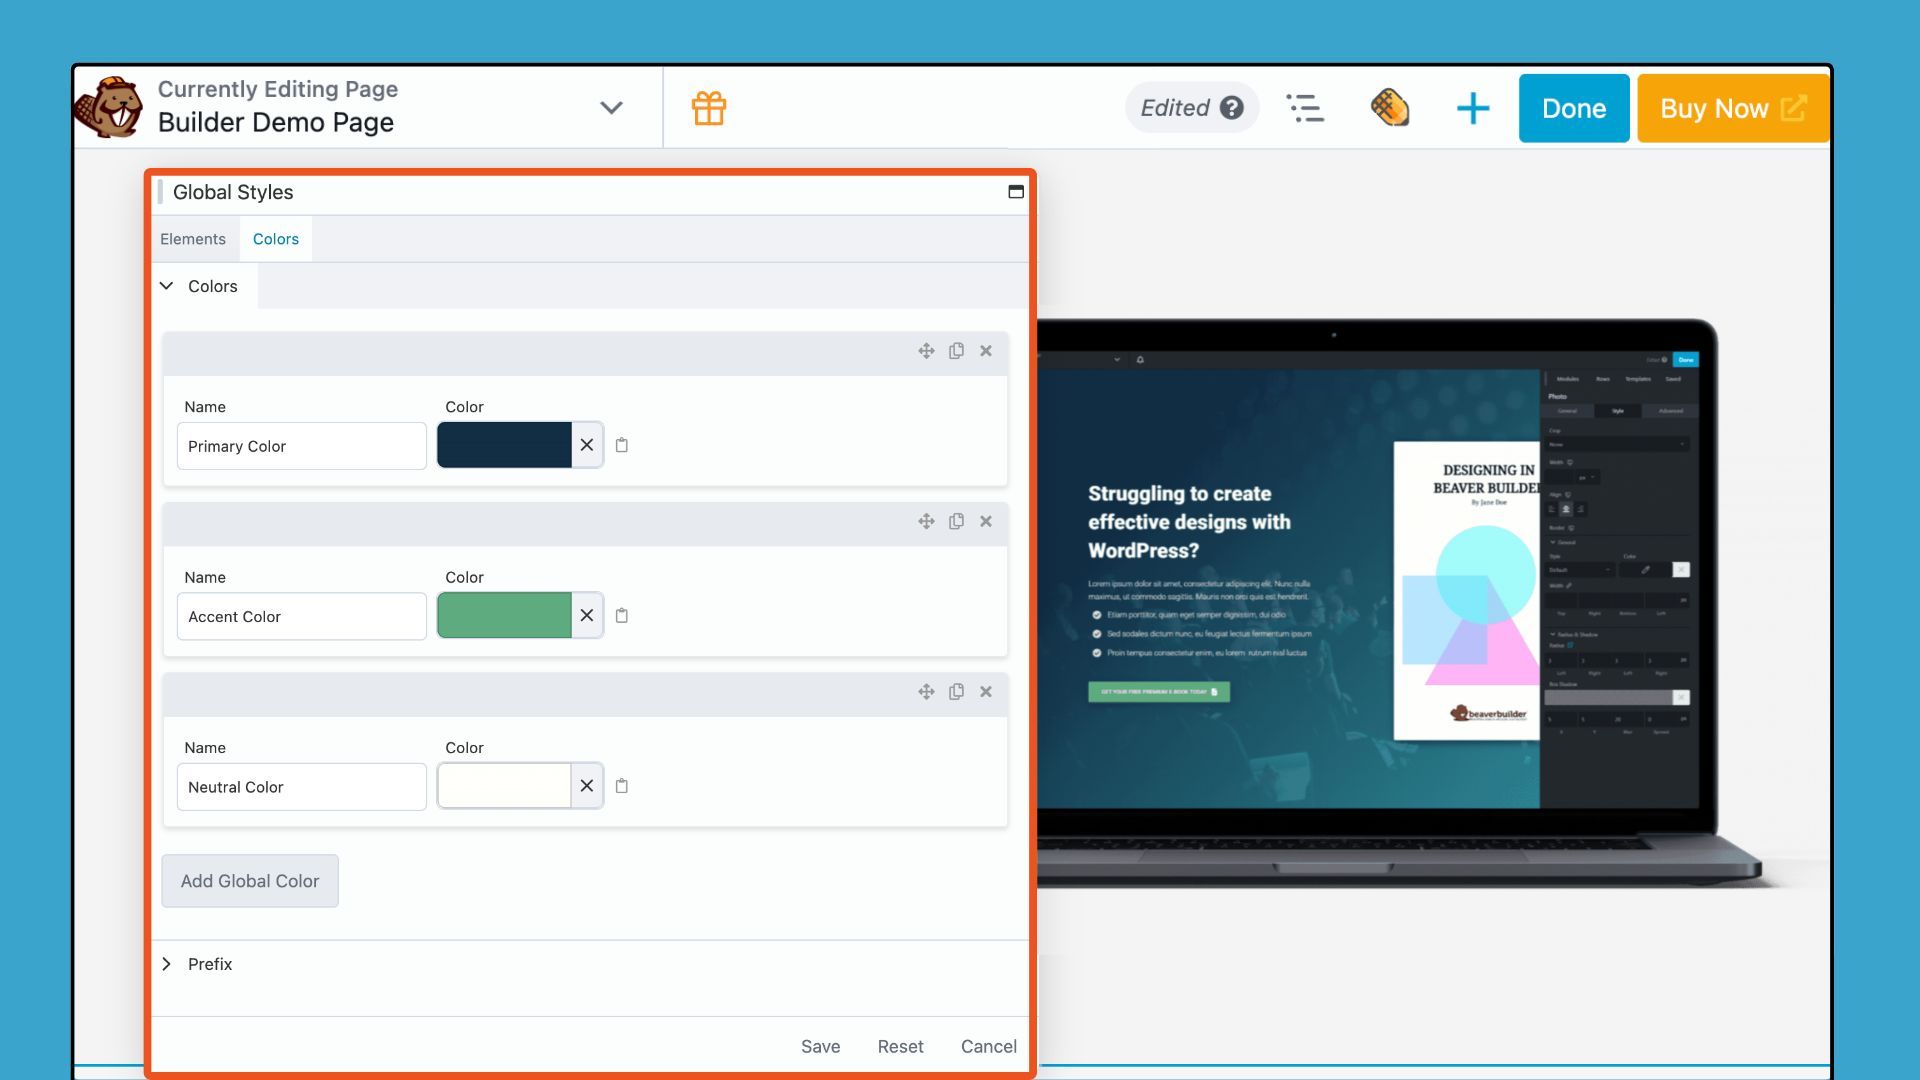
Once your global color choices are set, they are made available across your Beaver Builder layouts, ensuring a seamless and cohesive design experience.
Elements Tab
In the Elements tab, you can set up global styles for text, headings, links, and buttons. The available styling options consist of a color picker, typography settings, and for buttons, there are choices for borders and radius adjustments:

How to set up Global Elements:
- Open the Tools menu.
- Select Global Styles.
- Navigate to the Elements tab.
- Customize your site’s Text, Headings, Links, and Buttons.
- Save your settings.
Note that you can override these styling options on a case-by-case basis using the module styling options.
Tweak #3: Master the Outline Panel for Instant Navigation
As layouts grow more complex, scrolling through long pages to find the right module can be frustrating. The Outline Panel gives you a bird’s-eye view of your entire page structure, making it easy to see, select, and rearrange elements without endless scrolling:
How to access the Outline Panel:
- Click the Outline icon in the Beaver Builder editor’s top bar.
- The panel opens on the right side of your screen.
- Expand or collapse sections using the arrows.
- Click any element name to jump directly to it.
You can also:
- Hover over elements to highlight them on the page.
- Right-click for quick actions like open settings, duplicate, copy/paste settings or remove.
- Add labels inline by moving your cursor to the “type a label” field, and entering a custom name.
- Search for specific modules by name.
- Drag and drop elements to reorganize your layout directly in the panel.
The Outline Panel even helps you catch layout issues early. Uneven columns, nested rows, or hidden modules stand out clearly in the hierarchy view. Whether you’re managing a simple landing page or a complex multi-section layout, it’s one of Beaver Builder’s most powerful workflow tools for staying organized and saving time.
Tweak #4: Speed Up Content Updates with Inline Editing
Traditional editing interrupts your flow with panels and clicks. Inline Editing lets you click any text, such as a heading, paragraph, or button, and type directly on the page:
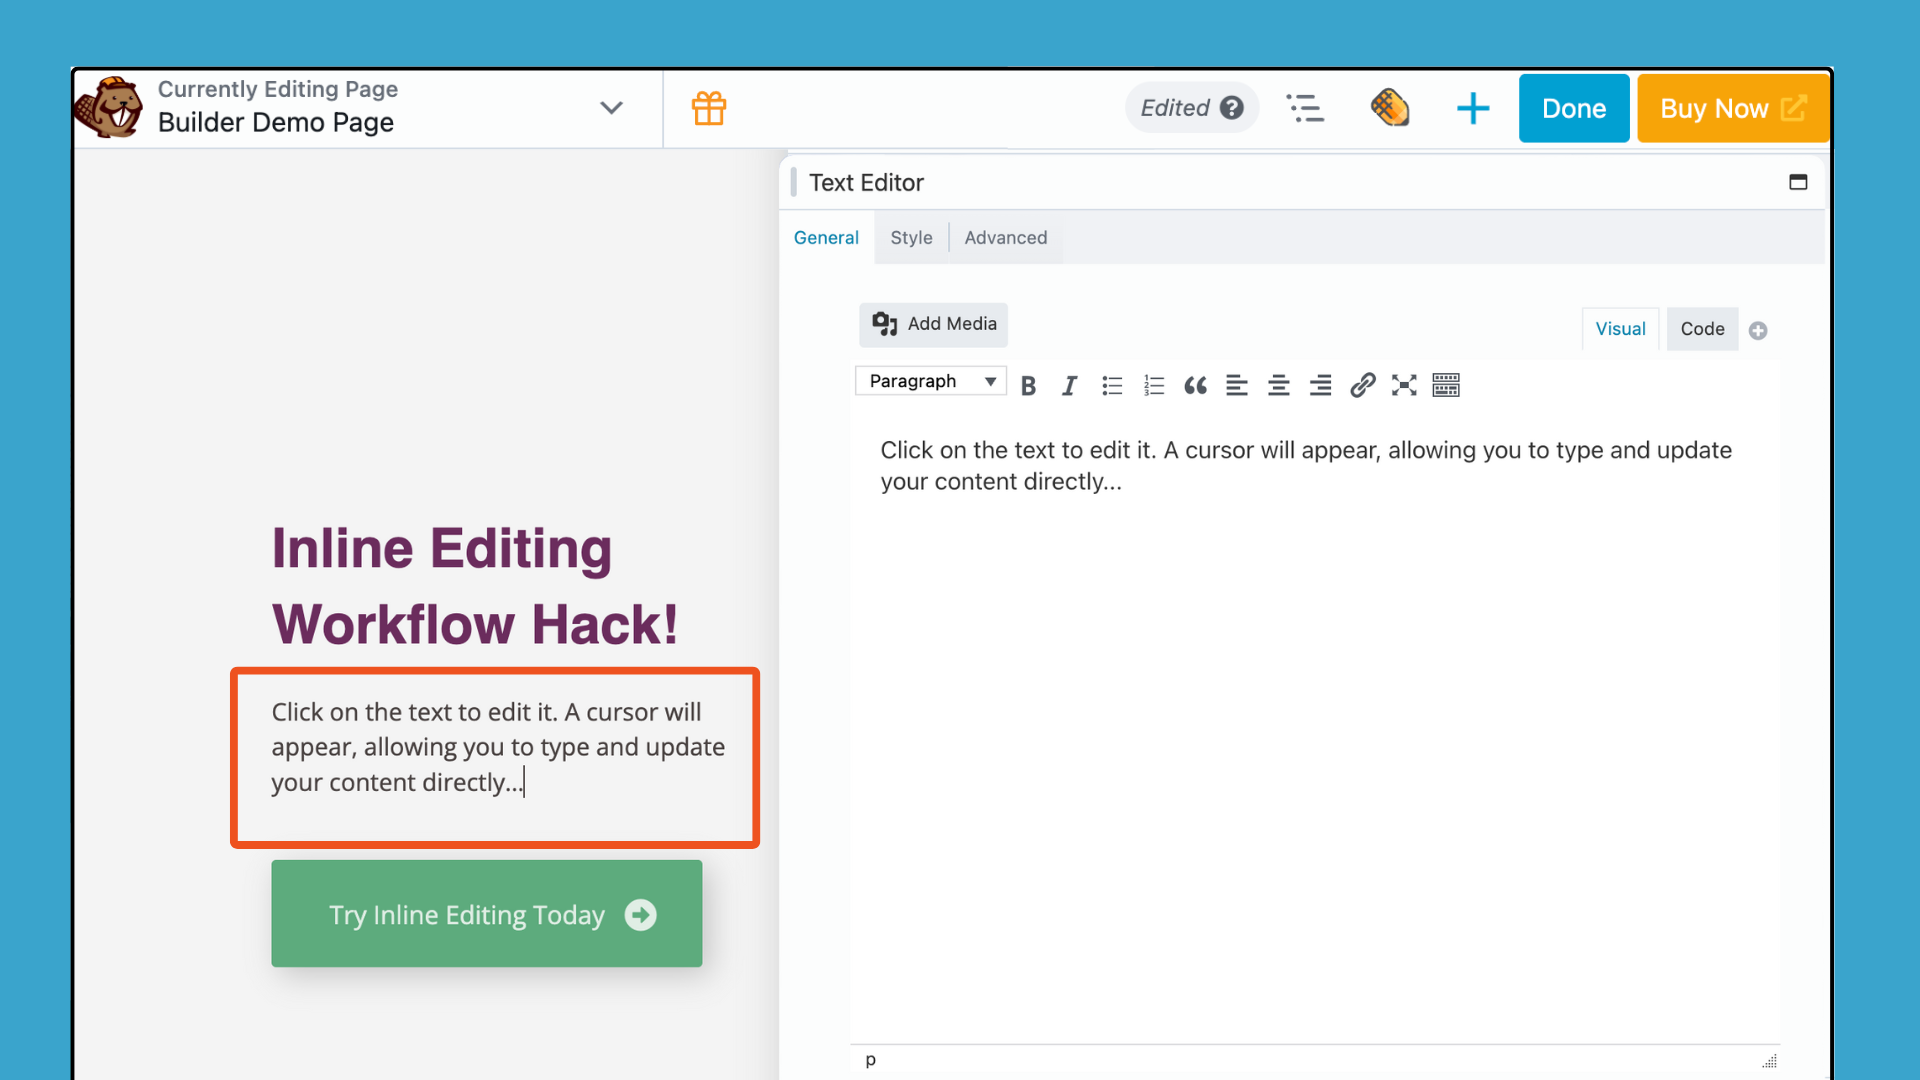
How to use Inline Editing:
- Click directly on any text element, such as a heading, paragraph, or button, to start editing.
- Make your changes and click Save or click out of the box to save them.
Inline editing allows you to see how your content will look while you type and instantly correct any spelling or grammar errors. For complex styling, typography settings, or advanced options, use the traditional settings panel.
By keeping your hands on the keyboard and eyes on the content, Inline Editing lets you move faster, maintain focus, and enjoy building more. It’s a small tweak with a big impact on efficiency and workflow.
Tweak #5: Memorize Essential Keyboard Shortcuts
Keyboard shortcuts may seem small, but they’re powerful time-savers. Once they become second nature, you’ll navigate, edit, and manage layouts faster without breaking your focus.
Keyboard shortcuts to boost your workflow:
- Open Global Settings — Ctrl + U / Cmd + U
Access site-wide settings, CSS, JavaScript, and Row Shapes instantly. - Open Layout Settings — Ctrl + Y , / Cmd + Y ,
Edit page-level CSS or JavaScript without digging through menus. - Toggle Preview Mode — P
Preview your page on desktop, tablet, or mobile. Press Continue Editing to return. - Enter Responsive Editing Mode — R
Cycle through mobile, tablet, and desktop views for responsive layouts. - Open Content Panels — Modules: J | Rows: K | Templates: L | Saved: ;
Quickly access modules, rows, templates, or saved items. Tabs are organized into groups for fast navigation. - Search Modules — Ctrl + I / Cmd + I
Jump directly to module search to drop in elements without scrolling. - Undo / Redo Changes — Ctrl + Z / Cmd + Z | Ctrl + Shift + Z / Cmd + Shift + Z
Reverse or restore your last action—perfect for testing iterations. - Open Outline Panel — Shift + O
See your full page structure at a glance and navigate complex hierarchies with ease.
Did you know? Beaver Builder lets you remove keyboard shortcuts, modify them, or register your own. Click here to learn how to customize shortcuts for your workflow.
Tweak #6: Build and Reuse Components
I am loving the new Components feature in Beaver Builder 2.10, and I think you will too! Components provide a balance between consistency and flexibility. Unlike templates, which are fully independent layouts, or globals, which update universally, components let you choose which options remain fixed and which can be customized per instance.
This makes them perfect for layouts where the overall design should stay consistent, but content varies across different pages:
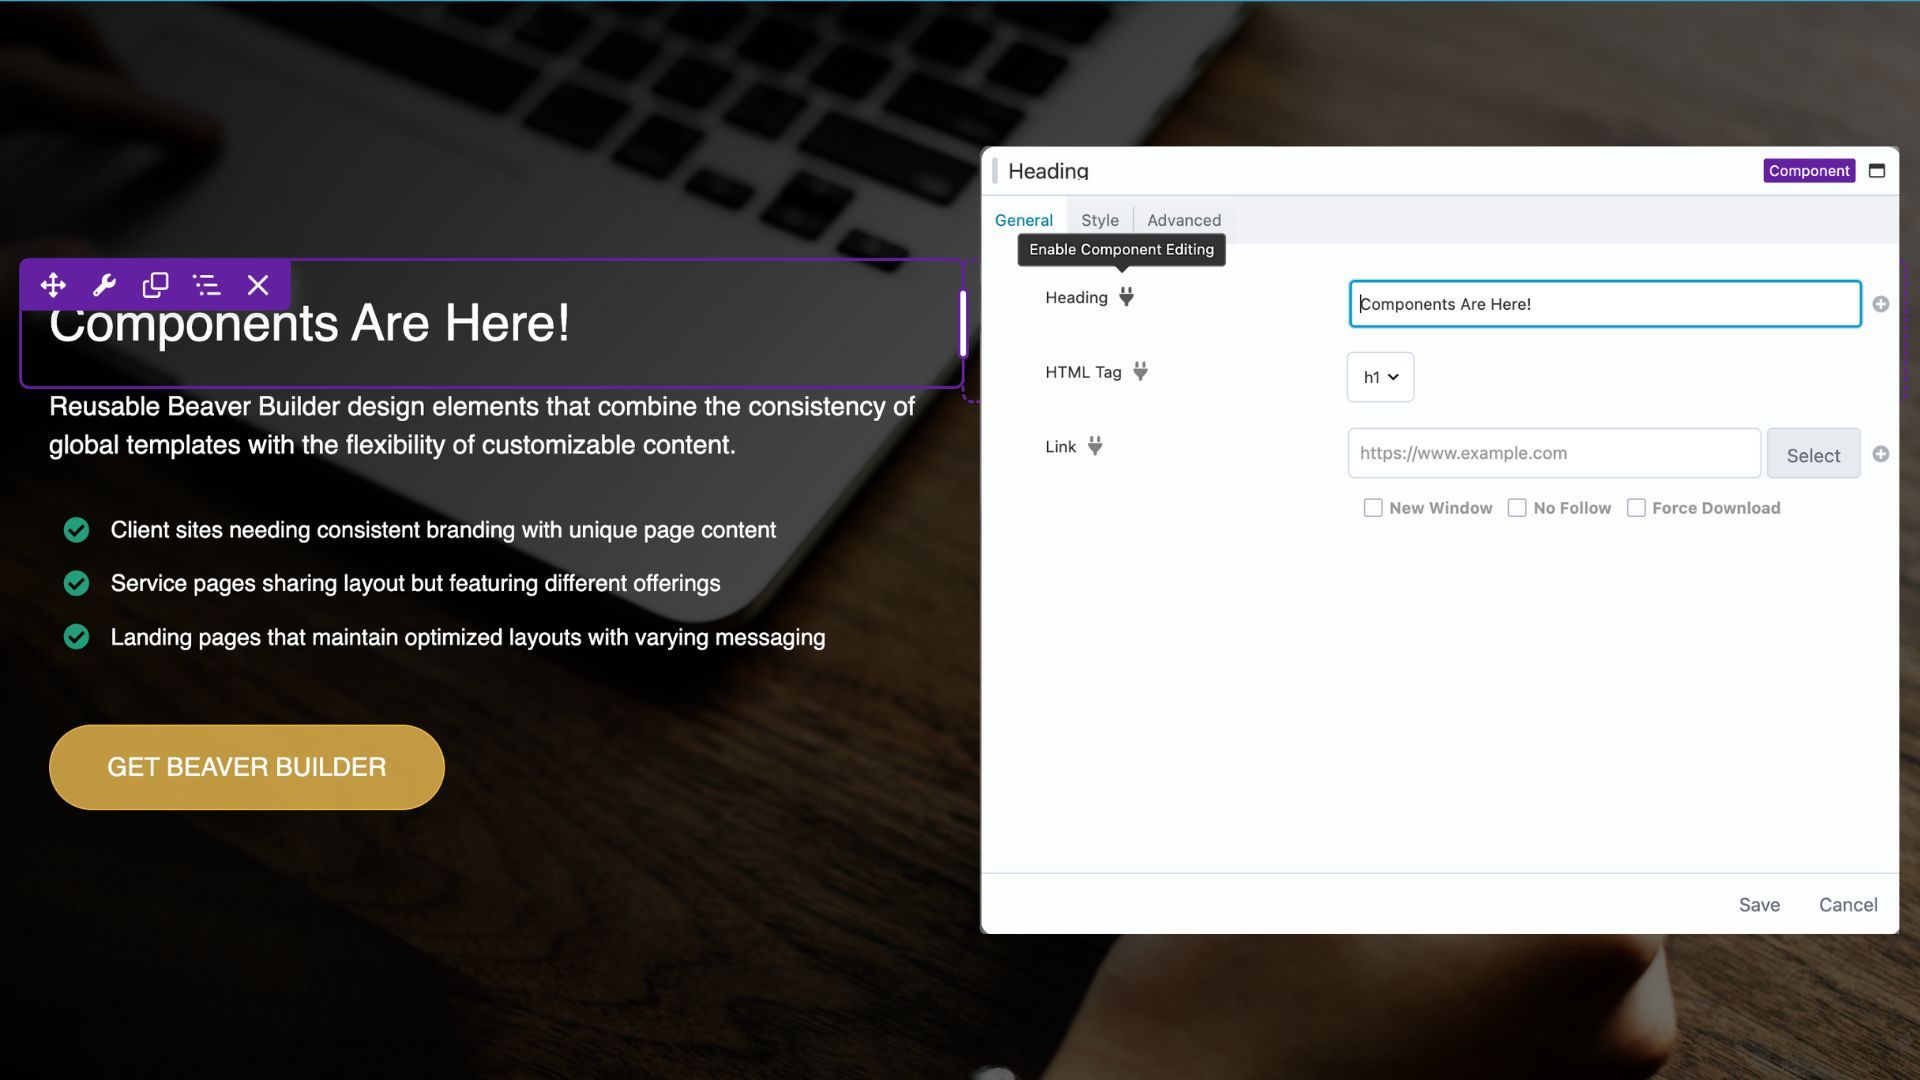
Components help you save time, reduce errors, and maintain design consistency across projects. For a complete overview of Components, check out this article in the knowledge base.
Conclusion
Small workflow improvements can have a huge impact on your productivity and design consistency. Experiment with what works best for your process, and watch Beaver Builder transform from a tool you use into an extension of your creative workflow. With these strategies, you can focus less on repetitive tasks and more on what matters most: designing beautiful, functional websites efficiently.
Ready to supercharge your workflow? Share your favorite workflow hacks or tips in the comments below. We’d love to see what’s making your website builds faster and easier.
Our Newsletter
Our newsletter is personally written and sent out about once a month. It's not the least bit annoying or spammy.
We promise.
Try Beaver Builder Today

Related articles

How to Nest Components in Beaver Builder: Build a Design System That Scales
In the last tutorial, we built a component from scratch. Now we’re taking it a step further by nesting components…
How to Build Beaver Builder Components: Step-by-Step Tutorial
If you build client websites or large WordPress sites, you know the struggle: keeping layouts consistent while allowing edits on…
What Are Beaver Builder Components? Beginner’s Guide to Reusable Layouts
Are you rebuilding the same layouts over and over in WordPress? If so, Beaver Builder Components are about to save…
Join the community
We're here for you
There's a thriving community of builders and we'd love for you to join us. Come by and show off a project, network, or ask a question.
Since 2014
Build Your Website in Minutes, Not Months
Join Over 1 Million+ Websites Powered By Beaver Builder.