
How to Create Single Post Templates in WordPress (With and Without Coding)
If you have a large website, keeping styles and formatting consistent across your entire site may feel like an impossible task. If your site has multiple authors, the consistency challenge gets even harder.
Your theme normally takes care of headers, footers, and sidebars, and there are tools for creating layout templates that apply to the content areas of static pages, such as the ability to save layout templates in Beaver Builder.
Single posts are a little trickier, because the display of post information that is outside of the content area, such as the post title, post info, categories, navigation, and comments, is usually controlled by your theme, and you often don’t get a lot of customization options.
This is where creating one or more single post templates solves the problem. Templates that are automatically applied ensure that each different post type uses the correct style without any effort from the author of the content. Templates are useful for a wide variety of post types, even within a single site. For example, if you run a magazine-style site, you could create templates for different types of articles, such as reviews, interviews, and editorial content.
In this article, we’ll talk about two ways you can create a single post template:
- Coding your own single post template and uploading it to a child theme.
- Using Beaver Themer to create a layout for single post pages and specifying where to apply it.
Custom Single Post Templates Using Code
If you know PHP, you can create custom-coded WordPress post templates. Templates are PHP files saved in your theme’s folder under wp-content that apply default and custom styles to posts, pages, headers, and footers.
While this native WordPress feature is highly beneficial, it’s not widely used. This is primarily because creating templates by hand requires fairly extensive coding knowledge. If you’re up to the challenge, creating templates manually has its benefits. For one, you have all the control, because you can customize them to meet your exact needs and desires.
If you want to try coding your own template, there are plenty of resources to get you started, such as this WPBeginner article. Just be sure to back up your site’s files and database first and use a child theme so your changes don’t disappear in the next theme update. You’ll create a custom PHP file that will override the default single.php template, and you’ll be able to select it in the Post Attributes section when you’re editing a single post in WordPress.
In the meantime, there’s a faster and easier way to create the equivalent of single post templates without coding, using Beaver Themer. Check out the video tutorial and step-by-step instructions below…
Create a Custom Single Post Layout Using Beaver Themer
(Check out step-by-step video tutorial above)
If you’re already using Beaver Builder, you may also be familiar with the Beaver Themer plugin. This useful tool gives you the power to customize various parts of your site that would normally require coding knowledge, including single post templates:
This solution uses the Beaver Builder editor to create the templates (which are called Themer layouts to distinguish them from all the other kinds of templates), so it’s very easy to master. Beaver Themer is included with the purchase of any Beaver Builder premium plan.
While Beaver Builder and Beaver Themer work best when used in combination with the Beaver Builder Theme, they’re compatible with most other WordPress themes as well. Therefore, you shouldn’t have a problem using our tools to modify your site with its existing theme.
The steps below show you how to create Beaver Themer layouts that will apply to single posts. We’ll assume that you have both Beaver Builder and Beaver Themer installed and activated on your site.
Go to your WordPress dashboard and navigate to Beaver Builder > Themer Layouts in the sidebar:
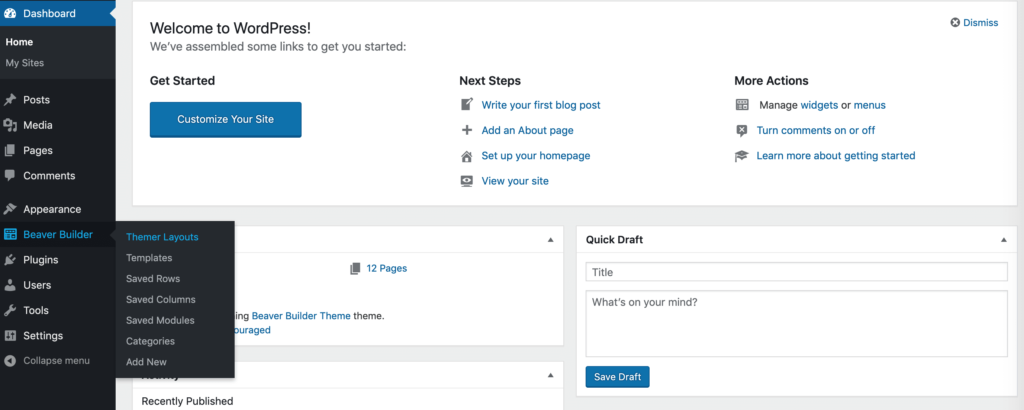
Don’t select Templates from the Beaver Builder sub-menu. That feature refers to Beaver Builder layout templates, which are different from Themer layouts.
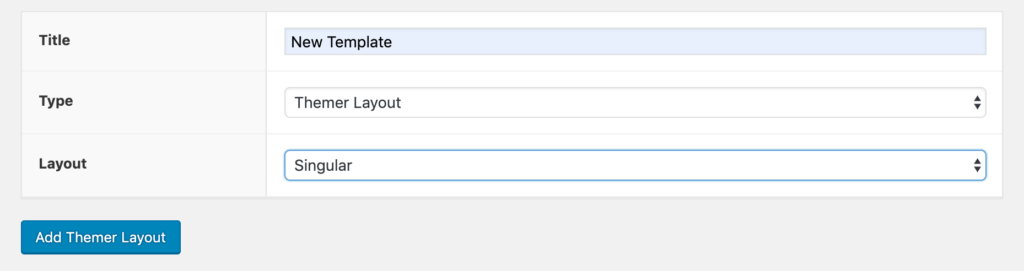
After you’re on the Themer Layouts screen, click Add New. Enter a title for your Themer layout and select Singular as the layout, as in this screenshot. The title doesn’t appear on the published page, it’s just to help you remember the purpose of the layout
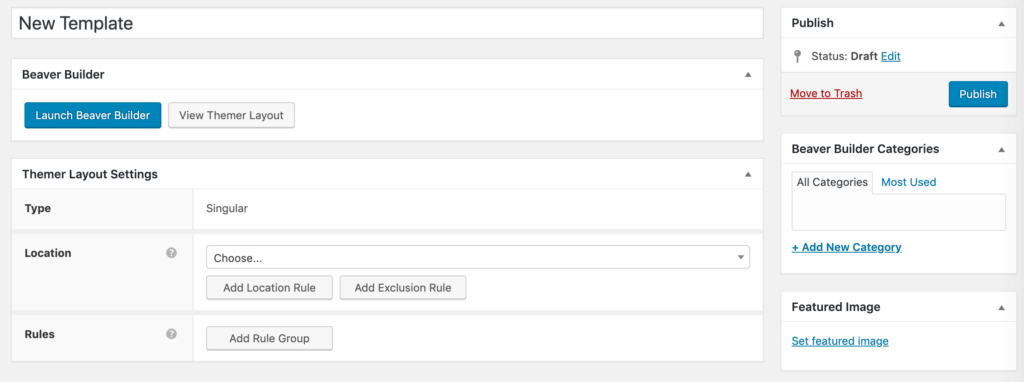
Click the Add Themer Layout button. A new screen appears where you will eventually select a location or apply conditional rules to control where the Themer layout is applied, as in the next screenshot. We’ll get to that part later.
Click the Launch Beaver Builder button to open the Beaver Builder editor. You’ll see that a Beaver Builder layout template was automatically applied to your new layout, as shown in the next screenshot. You can change the template any way you like, but let’s break it down first.
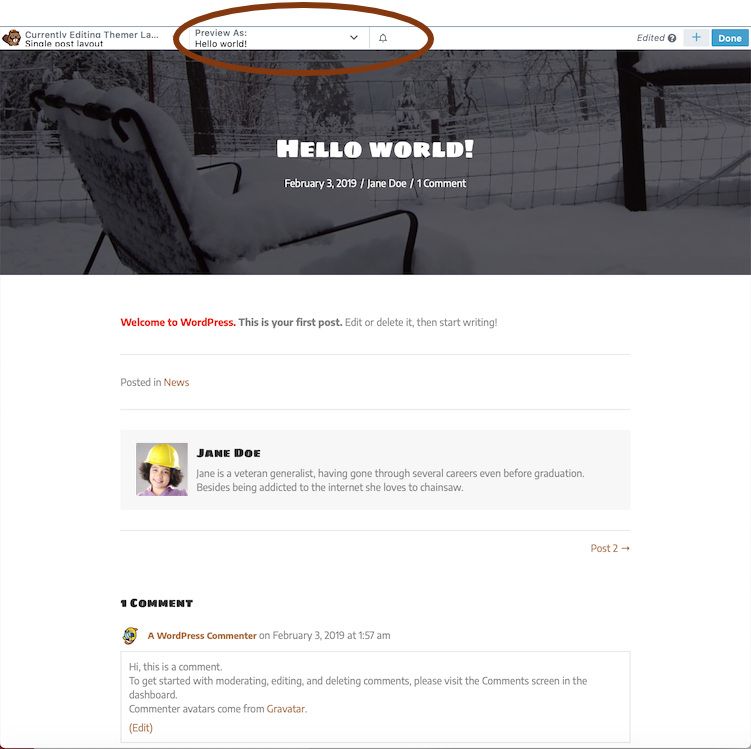
First, in the editor’s title bar, there’s a Preview list where you can choose any post or page. In this case, the “Hello World” post is displayed. If you select a different post to preview, notice how the post title and other information changes.
Second, the template already has most of the major content you’d expect to see for a single post: the post title and post info in a row that displays the featured image as a background. In the row below that, there’s the post content, followed by a list of post categories, and author bio, and a comments section. You can delete, move or edit any parts of the layout.
Third, all of the modules used in this layout are included in a Themer Modules group created specifically for this Themer layout type, as you can see in the following screenshot, so you can add more modules from there.
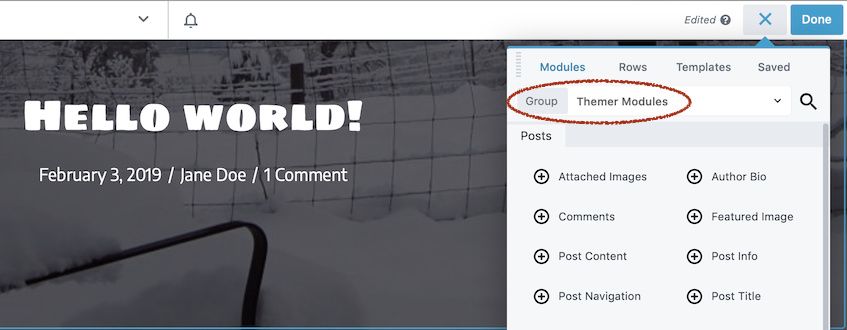
If you have WooCommerce, The Events Calendar, or Easy Digital Downloads installed, you’ll see extra sections in the Themer Modules group specifically for those plugins. Of course, you can add regular Beaver Builder modules from the Standard Modules group.
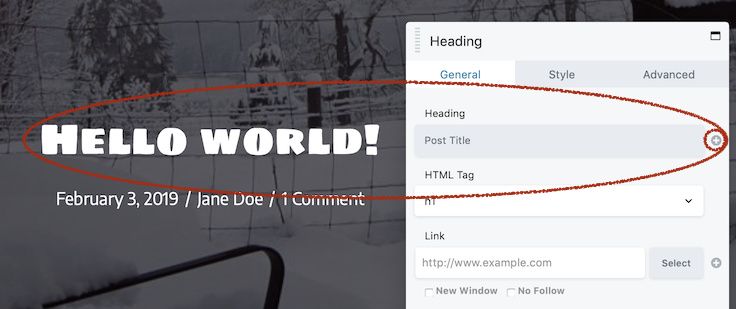
Fourth, most of the Themer Group modules adjust what they display for each post by using field connections to the database. For example, the next screenshot shows the Post Title module settings, where the Heading field contains a field connection to Post Title. Whenever a field has a plus sign to the right, it means you can create a connection to a specified field in the database. This is the magic that changes the information displayed depending on the post being viewed.
When you have Beaver Themer installed, many of the standard modules also have field connection options. One good use of field connections in standard modules is to display custom fields, whether they’re native WordPress custom fields or created with the Advanced Custom Fields or Pods plugins. Custom fields are a great way to ensure every post has similar types of content. For example, suppose you have a blog about biking trails and want to make sure that every post about a trail has the trail distance listed. You could create a custom field for distance, which every author would have to fill in when creating the post, and then in the Themer layout use a heading or Text Editor module with a field connection to display the custom Distance field.
Because of this dynamic display of content depending on the post being viewed, it’s a good idea to preview several posts as you work on your Themer layout to make sure the information appears as you expect.
When you’re finished creating your post template, click Done and then Publish.
Apply Your Themer Layout to the Intended Posts
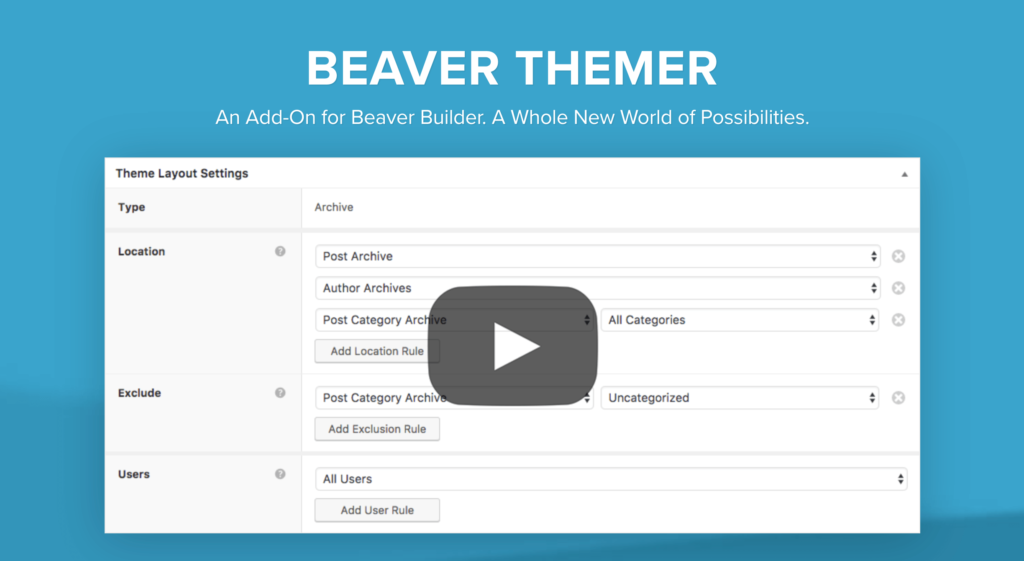
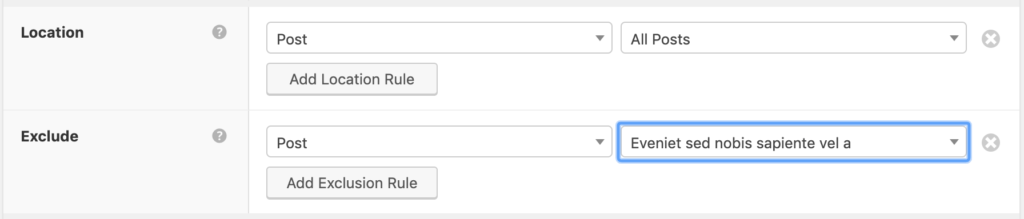
Now you need to tell your Themer layout where it should appear. Navigate back to the Edit Themer Layout screen, and take a look at the Themer Layout Settings again:
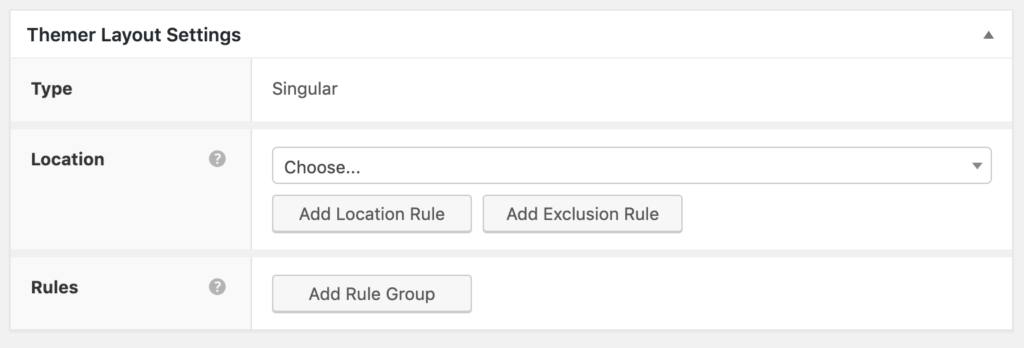
In the Location section, click where it says Choose and select Post from the first drop-down menu. By default, All posts is also selected. This will apply the template to all current posts and any you create in the future:

Instead of All Posts, you can select a particular post, or instead of choosing Post in the first field, you can choose Post Category or Post Tag to apply your template only to posts in certain taxonomies.
You can add more locations by clicking Add Location Rule, or you can apply the layout to all posts and then click Add Exclusion Rule to select posts to be excluded:
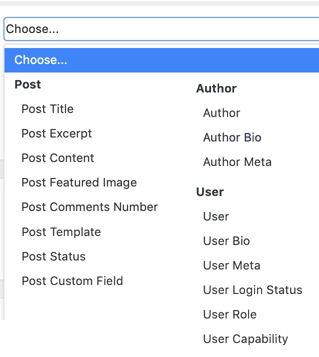
You can also choose to create conditional rules for where the Themer layout will apply. Rules involve conditions other than location, and they vary according to the type of Themer layout, but as you can see in the following screenshot, for single post layouts the rules apply to various features of Posts, Authors, and Users. After you choose a condition, you get a choice of operator (“is,” “is not,” and so on) and you can set a value. So, for example, you could have one Themer layout for the posts that have a featured image, and another layout for posts that don’t.
Make sure to click the Update button to apply your locations and rules.
Any posts not included in your location settings will display your theme’s default styling, or you can create additional Themer layouts to apply to the post or posts you’ve excluded.
Now you have a custom Themer layout that acts as a WordPress single post template to control the layout of your single post page, but without any coding knowledge required! You can generate other types of Themer layouts too, for headers, footers, archives, 404 pages, search results, and even parts like banners, which you can position at various locations on the page.
Conclusion
Templates can help to simplify content authoring by removing the need to consistently recreate style and layout. In this post, we explained two ways you can create a custom single post template. You can take the advanced route and use code to manually create templates, or you can use the simple option to work with the Beaver Themer add-on, which greatly simplifies the process.
Do you have any questions about single post templates and how to use them? Let us know in the comments section below!
6 Comments
Our Newsletter
Our newsletter is personally written and sent out about once a month. It's not the least bit annoying or spammy.
We promise.
Try Beaver Builder Today

Related articles
How to Create Headers and Footers with Beaver Themer
Page builders are great for creating beautiful pages, but they often don’t extend customization to headers and footers. This limitation…
How to Customize WordPress Website Header
Many elements make up a well-designed website. Your WordPress website header is particularly important because it’s the first thing visitors…
How to Use a Header Template in WordPress
Customizing a WordPress header isn’t often an easy process. If you’re not comfortable editing theme files, there aren’t many ways…
Join the community
We're here for you
There's a thriving community of builders and we'd love for you to join us. Come by and show off a project, network, or ask a question.
Since 2014
Build Your Website in Minutes, Not Months
Join Over 1 Million+ Websites Powered By Beaver Builder.
thank you so much for this post! on my first project with the beaverbuilder (i love it!!) i had some problems to create my own single post template. but know i know how it works and try it! thank you so much!!
Awesome! Glad to hear this was helpful and that you love Beaver Builder Martin =)
Hi Anthony,
I wish to get [BeaverBuilder Pro & Beaver Themer ] + [Custom Post Type UI] + [ACF] to display Custom Fields targeted at specific Post Types via a Themer Singular Layout. The ACF Field groups show up OK in the backend, the Custom Post types work fine and the Themer layouts are fully operational on all my sites since long. However, after adding the Text or Image fields inside the Singular Layout (using Beaver Builder and inserting text fields defined with the corresponding ACF name) .. there is still no display of any custom field … Why would this be? Thanks, E.
Hi Eric, our support team would be happy to assist you with this. If you haven’t done so please submit a support ticket here: https://www.wpbeaverbuilder.com/beaver-builder-support/
Hi, it seems my single-post.php is overriding my Themer Layout for single posts. When I set up the Themer Layout everything looks great, but when I check the post it is applied to it is built and styled like the single-post.php file. What am I missing?
Hi Jared, if you submit a ticket to our support team we would be happy to look into this for you =)